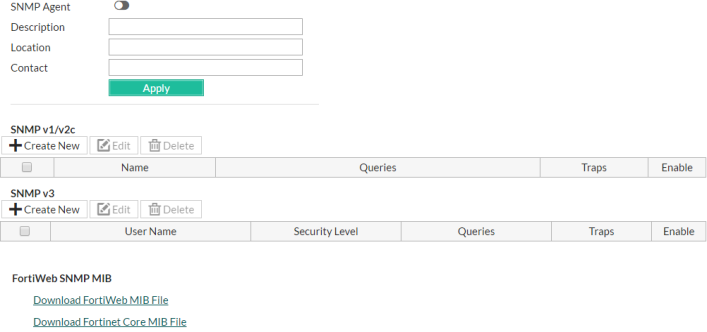
System > Config > SNMP enables you to configure the FortiWeb appliance’s simple network management protocol (SNMP) agent to allow queries for system information and to send traps (alarms or event messages) to the computer that you designate as its SNMP manager. In this way you can use an SNMP manager to monitor the FortiWeb appliance.
Before you can use SNMP, you must activate the FortiWeb appliance’s SNMP agent and add it as a member of at least one community. You must also enable SNMP access on the network interface through which the SNMP manager connects. (See Configuring the network interfaces.)
On the SNMP manager, you must also verify that the SNMP manager is a member of the community to which the FortiWeb appliance belongs, and compile the necessary Fortinet-proprietary management information blocks (MIBs) and Fortinet-supported standard MIBs. For information on MIBs, see MIB support.
1. Add the MIBs to your SNMP manager so that you will be able to receive traps and perform queries. For instructions, see the documentation for your SNMP manager.
2. Go to System > Config > SNMP.
To access this part of the web UI, your administrator's account access profile must have Read and Write permission to items in the System Configuration category. For details, see Permissions.
3. Configure the following settings:

| SNMP Agent |
Enable to activate the SNMP agent, so that the FortiWeb appliance can send traps and receive queries for the communities in which you enabled queries and traps. For more information on communities, see Configuring an SNMP community. |
| Description | Type a comment about the FortiWeb appliance, such as dont‑reboot. The description can be up to 35 characters long, and can contain only letters (a-z, A-Z), numbers, hyphens ( ‑ ) and underscores ( _ ). |
| Location | Type the physical location of the FortiWeb appliance, such as floor2. The location can be up to 35 characters long, and can contain only letters (a-z, A-Z), numbers, hyphens ( ‑ ) and underscores ( _ ). |
| Contact | Type the contact information for the administrator or other person responsible for this FortiWeb appliance, such as a phone number (555-5555) or name (jdoe). The contact information can be up to 35 characters long, and can contain only letters (a-z, A-Z), numbers, hyphens ( ‑ ) and underscores ( _ ). |
4. Click Apply.
5. Create at least one SNMP community to define which hosts are allowed to query, and which hosts will receive traps. See Configuring an SNMP community.
An SNMP community is a grouping of equipment for network administration purposes. You must configure your FortiWeb appliance to belong to at least one SNMP community so that community’s SNMP managers can query the FortiWeb appliance’s system information and receive SNMP traps from the FortiWeb appliance.
On FortiWeb, SNMP communities are also where you enable the traps that will be sent to that group of hosts.
You can add up to three SNMP communities. Each community can have a different configuration for queries and traps, and the set of events that trigger a trap. You can also add the IP addresses of up to eight SNMP managers to each community to designate the destination of traps and which IP addresses are permitted to query the FortiWeb appliance.
1. Go to System > Config > SNMP.
To access this part of the web UI, your administrator's account access profile must have Read and Write permission to items in the System Configuration category. For details, see Permissions.
2. If you have not already configured the agent, do so before continuing. See To configure the SNMP agent.
3. Do one of the following:

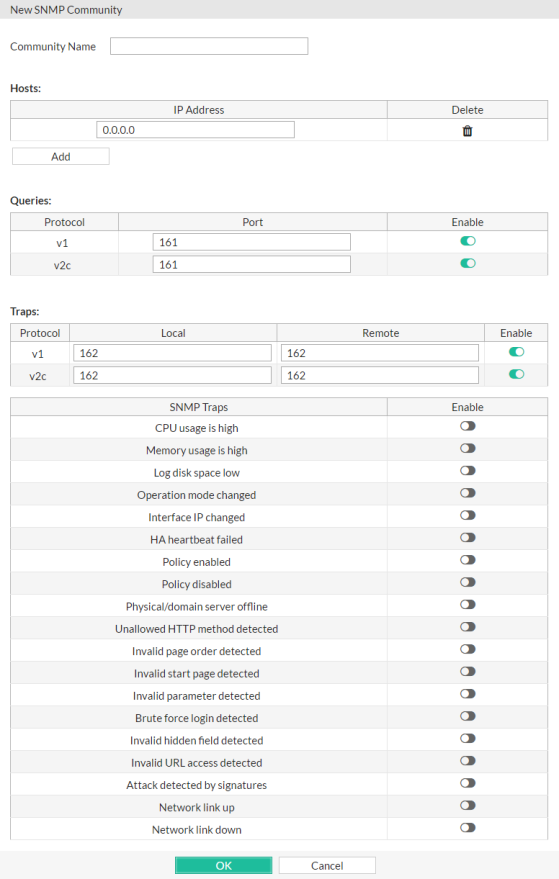
| Community Name |
Type the name of the SNMP community to which the FortiWeb appliance and at least one SNMP manager belongs, such as The FortiWeb appliance will not respond to SNMP managers whose query packets do not contain a matching community name. Similarly, trap packets from the FortiWeb appliance will include community name, and an SNMP manager may not accept the trap if its community name does not match. Caution: Fortinet strongly recommends that you do not add FortiWeb to the community named Available for SNMP version 1 or 2c communities only. |
|
| User Name |
Type the name that identifies the SNMP user. Available for SNMP version 3 communities only. |
|
| Security Level |
Choose one of the following three security levels:
Available for SNMP version 3 communities only. |
|
| Authentication Algorithm | If the Security Level value includes authentication, specify the authentication protocol and password. Ensure that the SNMP manager and FortiWeb use the same protocol and password. |
|
| Privacy Algorithm | If Security Level is Authentication and Privacy, specify the encryption protocol and password. Ensure that the SNMP manager and FortiWeb use the same protocol and password. |
|
| Hosts | ||
| IP Address |
Type the IP address of the SNMP manager that, if traps or queries are enabled in this community:
SNMP managers have read-only access. To allow any IP address using this SNMP community name to query the FortiWeb appliance, enter Caution:FortiWeb sends security-sensitive traps, which should be sent only over a trusted network, and only to administrative equipment. Note: If there are no other host IP entries, entering only |
|
| Queries |
For each protocol the community uses, enter the port number (161 by default) on which the FortiWeb appliance listens for SNMP queries from the SNMP managers in this community, then enable queries for that protocol. For supported queries, see the FortiWeb MIB file and MIB support. |
|
| Traps | For each protocol the community uses, enter the port number (162 by default) for the source port (Local) and destination port (Remote) for trap packets sent to SNMP managers in this community, then enable traps for that protocol. | |
4. Enable traps for the SNMP events that you want FortiWeb to notify your SNMP managers.
While most trap events are described by their names, the following events occur when a threshold has been exceeded:
For more information on supported traps and queries, see MIB support.
5. Click OK.
6. To verify your SNMP configuration and network connectivity between your SNMP manager and your FortiWeb appliance, be sure to test both traps and queries (assuming you have enabled both). Traps and queries typically occur on different port numbers, and therefore verifying one does not necessarily verify that the other is also functional. To test queries, from your SNMP manager, query the FortiWeb appliance. To test traps, cause one of the events that should trigger a trap.
The FortiWeb SNMP agent supports a few management information blocks (MIBs).
| MIB or RFC | Description |
|---|---|
| Fortinet Core MIB | This Fortinet-proprietary MIB enables your SNMP manager to query for system information and to receive traps that are common to multiple Fortinet devices. |
| FortiWeb MIB | This Fortinet-proprietary MIB enables your SNMP manager to query for FortiWeb-specific information such as the utilization of each CPU, and to receive FortiWeb-specific traps, such as when an attack is detected by a signature. |
| RFC-1213 (MIB II) |
The FortiWeb SNMP agent supports MIB II groups, except:
|
| RFC-2665 (Ethernet-like MIB) | The FortiWeb SNMP agent supports Ethernet-like MIB information, except the dot3Tests and dot3Errors groups. |
To obtain these MIB files, go to System > Config > SNMP and click the following links:
To communicate with your FortiWeb appliance’s SNMP agent, first compile these MIBs into your SNMP manager. If the standard MIBs used by the SNMP agent are already compiled into your SNMP manager, you do not have to compile them again.
To view a trap or query’s name, object identifier (OID), and description, open its MIB file in a plain text editor.
All traps sent include the message, the FortiWeb appliance’s serial number, and host name.
For instructions on how to configure traps and queries, see SNMP traps & queries.