1. Before you configure SSO, create one or more of the following authentication server configurations:
2. Add one or more server configurations to an authentication server pool (see Adding servers to an authentication server pool).
3. To use Kerberos authentication delegation, do the following:
Create a Kerberos Key Distribution Centre configuration (see Configuring a Kerberos Key Distribution Center (KDC)).
Because FortiWeb determines the KDC to use based on the realm of the web application, you do not have to specify the KDC in the site publish rule.
4. If you plan to use HTML form authentication, you can customize the HTML pages that FortiWeb presents to clients during the authentication process. See Customizing error and authentication pages (replacement messages).
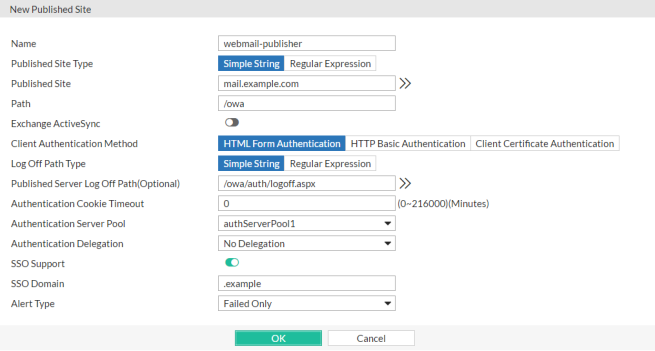
5. Go to Application Delivery > Site Publish > Site Publish and select the Site Publish Rule tab.
6. Click Create New and configure the settings. The settings you select determine which additional settings are displayed:
| Setting name | Description |
|---|---|
| Name |
Type a unique name that can be referenced in other parts of the configuration, such as Do not use spaces or special characters. The maximum length is 35 characters. |
| Request Type |
Select one of the following options:
|
| Published Site |
Enter one of the following:
The maximum length is 255 characters. Note: Regular expressions beginning with an exclamation point ( |
| Path | Enter the URL of the request for the web application, such as /owa. It must begin with a forward slash ( / ). |
| Exchange ActiveSync |
Enable to allow Android clients to access to Microsoft Exchange servers through Exchange ActiveSync protocol. Note: If Exchange ActiveSync is enabled, single sign-on (see SSO Support), authentication cookie (see Authentication Cookie Timeout) and Kerberos authentication (see Authentication Delegation) will be not available, and HTTP Basic Authentication (see Client Authentication Method) will be the only method to authenticate the clients. |
| Client Authentication Method |
Select one of the following options:
Used when Authentication Delegation is Kerberos Constrained Delegation or No Delegation. Note: This option requires you to select a value for Certificate Verification in the server policy or Certificate Verification in the server pool configuration. If Exchange ActiveSync is enabled (see Exchange ActiveSync), only HTML Basic Authentication will be available. |
| Log Off Path Type |
Select one of the following options:
|
| Published Server Log Off Path |
Optionally, enter one of the following values:
Ensure that the value is a sub-path of the Path value. For example, if Path is
When clients log out of the web application, FortiWeb redirects them to its authentication dialog. Available only when Client Authentication Method is HTML Form Authentication. |
| Authentication Cookie Timeout |
Specify the length of time (in minutes) that passes before the cookie that the site publish rule adds expires and the client must re-authenticate. Valid values are from 0 to 216000 minutes. To configure the cookie with no expiration, specify Note: This will be not available if Exchange ActiveSync (see Exchange ActiveSync) is enabled. |
| Authentication Server Pool | Select the pool of servers that FortiWeb uses to authenticate clients. See Adding servers to an authentication server pool. FortiWeb attempts to authenticate the user using each server in the pool, starting with the top-most item in the list and moving downward. Available only when Client Authentication Method is HTML Form Authentication or HTML Basic Authentication. |
| Authentication Delegation |
Select one of the following options:
To work with the Kerberos options, web applications require a specific Windows authentication configuration. See Configuring Windows Authentication for Kerberos authentication delegation. If FortiWeb uses a RADUIS server configuration in the authorization server pool to autheticate the client and RSA SecurID is selected for that server configuration, any authentication delegation settings in this rule are ignored. |
| Username Location in Certificate |
Use one of the following options to specify how FortiWeb determines the client username:
Note: Because the email value can be an alias rather than the real DC (domain controller) domain, the most reliable method for determining the username is SAN - UPN. Available only when Authentication Delegation is Kerberos Constrained Delegation. |
| Delegated HTTP Service Principal Name |
Specify the Service Principal Name (SPN) for the web application that clients access using this site publish rule. A service principal name uses the following format:
For example, for an Exchange server that belongs to the domain For a Fortiwebsite publishing configuration, a valid SPN requires the suffix @<domain> (for example, Available only when Authentication Delegation is Kerberos or Kerberos Constrained Delegation. |
| Keytab File |
Select the keytab file configuration for the AD user that FortiWeb uses to obtain Kerberos service tickets for clients. To add a keytab configuration, go to Application Delivery > Site Publish > Keytab File. For instructions on how to generate the keytab file, see To create an Active Directory (AD) user for FortiWeb. Available only when Authentication Delegation is Kerberos Constrained Delegation. |
| Service Principal Name for Keytab File |
Specify the Service Principal Name (SPN) of the AD user that is a delegator. It is the SPN that you used to generate the keytab specified by Keytab File. (See To create an Active Directory (AD) user for FortiWeb.) For example, For a Fortiwebsite publishing configuration, a valid SPN requires the suffix @<domain> (for example, Available only when Authentication Delegation is Kerberos Constrained Delegation. |
| Default Domain Prefix Support |
Select to allow users in environments that require users to log in using both a domain and username to log in with just a username. Also specify Default Domain Prefix. In some environments, the domain controller requires users to log in with the username format Alternatively, enable this option and enter Available only when Authentication Delegation is HTTP Basic or Kerberos. |
| Default Domain Prefix |
Enter a domain name that FortiWeb adds to the HTTP Available only when Default Domain Prefix Support is enabled. When Authentication Delegation is Kerberos, ensure that the prefix you enter is the full domain name (for example, |
| SSO Support |
Enable for single sign-on support. For example, the website for this rule is Site publishing SSO sessions exist on FortiWeb only; they are not synchronized to the authentication or accounting server. Therefore, SSO is not shared with non-web applications. For SSO with other protocols, see the documentation for your FortiGate or other firewall. Note: This will be not available if Exchange ActiveSync (see Exchange ActiveSync) is enabled. |
| SSO Domain | Type the domain suffix of Host: names that can share this rule’s authentication sessions, such as .example.com. Include the period ( . ) that precedes the host’s name. |
| Alert Type |
Select whether to log authentication failures, successes, or both:
Event log messages contain the user name, authentication type, success or failure, and source address (for example, |
7. Click OK.
8. Go to Application Delivery > Site Publish > Site Publish and select the Site Publish Policy tab.
9. Click Create New.
10. In Name, type a unique name that can be referenced in other parts of the configuration. Do not use spaces or special characters. The maximum length is 35 characters.
11. If you want to prevent users from making further attempts to log in after a specified number of failed login attempts, enable Account Lockout and complete the following settings:
| Setting name | Description |
|---|---|
| Max Login Failures |
Enter the number of times that a user can attempt to log in before FortiWeb prevents the user from attempting to log in again. FortiWeb determines whether the user exceeded this threshold based on the number of login attempts that happen within the time period specified by Within. If the user exceeds the threshold and attempts to log in again during the time period configured by Account Block Period, FortiWeb returns an "Account blocked!" message to the user. You can customize the web page that FortiWeb returns to the blocked user. See Customizing error and authentication pages (replacement messages). |
| Within | Enter the length of time, in minutes, which FortiWeb uses to determine if the user has exceeded the maximum number of login attempts specified by Max Login Failures.
Take the configuration that maximum of 3 attempts within 5 minutes is allowed for a example, if a user fails the login for 3 times within the 5 minutes, FortiWeb will lock the user out for a specified period (Account Block Period). However, if the user fails login for 2 times within the 5 minutes, FortiWeb will not lock out the user for the third failure happens within next 5 minutes. |
| Account Block Period |
Enter the length of time FortiWeb prevents a user from attempting to log in again after the user has exceeded the number of login attempts specified by Max Login Failures. |
12. If you want to prevent users from credential stuffing attacks, enable Credential Stuffing Defense and complete the following settings:
| Setting name | Description |
|---|---|
| Credential Stuffing Defense |
Enable to use FortiGuard's Credential Stuffing Defense database to prevent against Credential Stuffing attacks. When this setting is enabled, FortiWebwill evaluate the username (Username Field) and password (Password Field) of the matched login requests against the Credential Stuffing Defense database to identify whether the paired username/password has been spilled. If it has, the specified Action triggers and Trigger Policy is applied. Caution: FortiWeb has no built-in Credential Stuffing Defense database. At least one FortiGuard update is required to install the database, otherwise this feature is ineffective. For details, see Connecting to FortiGuard services. |
| Action |
Select the action that FortiWeb will take against a request when a paired username/password is found in Credential Stuffing Defense database:
|
| Block Period |
Type the number of seconds that you want to block a request when a paired username/password is found in Credential Stuffing Defense database. This setting is available only if Action is set to Period Block. The valid range is from 1 to 3,600 (1 hour). The default value is 60. See also Monitoring currently blocked IPs. |
| Severity |
When the credential stuffing defense generates an attack log, each log message contains a Severity Level (
The default value is Medium. |
| Trigger Policy | Select which trigger, if any, that FortiWeb will use when it logs or sends an alert email about the credential stuffing hit. See Configuring triggers. |
13. Click Create New and in Rule, select the name of a site publishing rule.
14. Repeat the previous step for each web application that is part of the SSO domain.
15. Click OK.
16. Select the site publishing policy in an inline web protection profile (see Configuring a protection profile for inline topologies). The profile must be used in the policy applying your domain’s virtual servers.
17. To verify the configuration, log in to one of the web applications, then log in to another web application in the same domain that should be part of the SSO domain.