You can scan for known vulnerabilities on your web servers and web applications, helping you to design protection profiles that are an effective and efficient use of processing resources.
Vulnerability reports from a certified vendor can help you comply with regulations and certifications that require periodic vulnerability scans, such as Payment Card Industry Data Security Standard (PCI DSS).
Run vulnerability scans during initial FortiWeb deployment (see How to set up your FortiWeb) and any time you are staging a new version of your web applications. You may also be required by your compliance regime to provide reports on a periodic basis, such as quarterly.
Each vulnerability scan starts from an initial URL, authenticates if set up to do so, then scans for vulnerabilities in web pages that it crawls to from links on the initial page. After performing the scan, the FortiWeb appliance generates a report from the scan results.
|
|
Create and run web vulnerability scans early in the configuration of your FortiWeb appliance. Use the reports to locate vulnerabilities and fine-tune your protection settings. |
|
|
If you have many web servers, you may want a FortiScan appliance to: |
1. Optionally, configure email settings. Email settings included in vulnerability scan profiles cause FortiWeb to email scan reports (see Configuring email settings).
2. Prepare the staging or development web server for the scan (see Preparing for the vulnerability scan).
3. Create a scan schedule, unless you plan to execute the scan manually. The schedule defines the frequency the scan will be run (see Scheduling web vulnerability scans).
4. Create a scan profile. The profile defines which vulnerabilities to scan for (see Configuring vulnerability scan settings).
5. Create a scan policy. The policy integrates a scan profile and schedule (see Running vulnerability scans).
6. Either start the vulnerability scan manually (see Manually starting & stopping a vulnerability scan), or wait for it to run automatically according to its schedule.
7. Examine vulnerability scan report. The report provides details and analysis of the scan results (see Viewing vulnerability scan reports).
For best results, before running a vulnerability scan, you should prepare the network and target hosts for the vulnerability scan.
Fortinet strongly recommends that you do not scan for vulnerabilities on live web sites. Instead, duplicate the web site and its database in a test environment such as a staging server and perform the scan in that environment. For more information, see Scan Mode.
You may need to configure each target host and any intermediary NAT or firewalls to allow the vulnerability scan to reach the target hosts.
You should talk to the owners of target hosts to determine an appropriate time to run the vulnerability scan. You can even schedule in advance the time that the FortiWeb will begin the scan.
For example, you might schedule to avoid peak traffic hours, to restrict unrelated network access, and to ensure that the target hosts will not be powered off during the vulnerability scan.
To determine the current traffic load, see Real Time Monitor widget. For scheduling information, see Scheduling web vulnerability scans.
|
|
Rapid access can result in degraded network performance during the scan. If you do not rate limit the vulnerability scan, some web servers could perceive its rapid rate of requests as a denial of service (DoS) attack. You may need to configure the web server to omit rate limiting for connections originating from the IP address of the FortiWeb appliance. Alternatively, you can configure the vulnerability scan to send requests more slowly. See Delay Between Each Request. |
Web Vulnerability Scan > Web Vulnerability Scan > Web Vulnerability Schedule enables you to configure vulnerability scan schedules.
A vulnerability scan schedule defines when the scan will automatically begin, and whether the scan is a one-time or periodically recurring event.
1. Go to Web Vulnerability Scan > Web Vulnerability Scan > Web Vulnerability Scan Schedule.
To access this part of the web UI, your administrator’s account access profile must have Read and Write permission to items in the Web Vulnerability Scan Configuration category. For details, see Permissions.
2. Click Create New.
A dialog appears.
3. Configure these settings:

| Setting name | Description |
|---|---|
| Name | Type a unique name that can be referenced in other parts of the configuration. Do not use spaces or special characters. The maximum length is 35 characters. |
| Type |
Select the type of schedule:
|
| Time | Select the time of day to run the scan. |
| Date |
Select the date to run the scan. This setting is available only if Type is One Time. |
| Day |
Select the days of the week to run the scan. This setting is available only if Type is Recurring. |
4. Click OK.
5. To use the profile, select it in a web vulnerability scan policy (see Running vulnerability scans).
Web Vulnerability Scan > Web Vulnerability Scan > Web Vulnerability Scan Profile enables you to configure vulnerability scan profiles.
A vulnerability scan profile defines a web server that you want to scan, as well as the specific vulnerabilities to scan for. Vulnerability scan profiles are used by vulnerability scan policies, which determine when to perform the scan and how to publish the results of the scan defined by the profile.
1. If FortiWeb must authenticate in order to reach all URLs that will be involved in the vulnerability scan, configure the web application (if it provides form-based authentication) with an account that FortiWeb can use to log in.
2. Go to Web Vulnerability Scan > Web Vulnerability Scan > Web Vulnerability Profile.
To access this part of the web UI, your administrator’s account access profile must have Read and Write permission to items in the Web Vulnerability Scan Configuration category. For details, see Permissions.
3. Click Create New.
A dialog appears.
4. Configure these settings:

| Setting name | Description |
|---|---|
| Name | Type a unique name that can be referenced in other parts of the configuration. Do not use spaces or special characters. The maximum length is 35 characters. |
| Hostname/IP or URL |
Type the fully qualified domain name (FQDN), IP address, or full URL to indicate which directory of the web site you want to scan. Behavior of the scan varies by the type of the entry:
Links to external web sites and redirects using HTTP Unless you will enter an IP address for the host, you must have configured a DNS server that the FortiWeb appliance can use to query for the FQDN. For details, see Configuring DNS settings. Note: This starting point for the scan can be overridden if the web server automatically redirects the request after authentication. See Login with HTTP Authentication and Login with specified URL/data. |
| Scan |
Enable detection of any of the following vulnerabilities that you want to include in the scan report: |
| Scan Mode |
Select whether the scan job will use Basic Mode (use HTTP Also configure Exclude scanning following URLs. Basic Mode will avoid alterations to the web site’s databases, but only if all inputs always uses
Caution: Fortinet strongly recommends that you do not scan for vulnerabilities on live web sites, even if you use Basic Mode. Instead, duplicate the web site and its database into a test environment, and then use Enhanced Mode with that test environment. |
| Request Timeout | Type the number of seconds for the vulnerability scanner to wait for a response from the web site before it assumes that the request will not successfully complete, and continues with the next request in the scan. It will not retry requests that time out. |
| Delay Between Each Request |
Type the number of seconds to wait between each request. Some web servers may rate limit the number of requests, or blacklist clients that issue continuous requests and therefore appear to be a web site harvester or denial of service (DoS) attacker. Introducing a delay can be useful to prevent the vulnerability scanner from being blacklisted or rate limited, and therefore slow or unable to complete its scan. Note: Increasing the delay will increase the time required to complete the scan. |
5. Click Login Option’s blue arrow to expand the section, then configure the following:

| Setting name | Description |
|---|---|
| Login with HTTP Authentication |
Enable to use basic HTTP authentication if the web server returns HTTP Alternatively, configure Login with specified URL/data. After authentication, if the web server redirects the request (HTTP Note: If a web site requires authentication and you do not configure the vulnerability scan to authenticate, the scan results will be incomplete. |
| User | Type the user name to provide to the web site if it requests HTTP authentication. |
| Password | Type the password corresponding to the user name. |
| Login with specified URL/data |
Enable to authenticate if the web server does not use HTTP After authentication, if the web server redirects the request (HTTP Note: If a web site requires authentication and you do not configure it, the scan results will be incomplete. |
| Authenticate URL | Type the URL, such as /login.jsp, that the vulnerability scan will use to authenticate with the web application before beginning the scan. |
| Authenticate Data | Type the parameters, such as userid=admin&password=Re2b8WyUI, that will be accompany the HTTP POST request to the authentication URL, and contains the values necessary to authenticate. Typically, this string will include user name and password parameters, but may contain other variables, depending on the web application. |
6. Click Scan Web Site URLs Option’s blue arrow to expand the section, then configure the following:

| Setting name | Description |
|---|---|
| Crawl entire website automatically |
Select this option to automatically follow links leading from the initial starting point that you configured in Hostname/IP or URL. The vulnerability scanner will stop following links when it has scanned the number of URLs configured in Crawl URLs Limit. Alternatively, select Specify URLs for scanning. |
| Crawl URLs Limit |
Type the maximum number of URLs to scan for vulnerabilities while automatically crawling links leading from the initial starting point. Note: The actual number of URLs scanned could exceed this limit if the vulnerability scanner reaches the limit but has not yet finished crawling all links on a page that it has already started to scan. |
| Specify URLs for scanning |
Select this option to manually specify which URLs to scan, such as You can enter up to 10,000 URLs. |
| Exclude scanning following URLs |
Enable to exclude specific URLs, such as This may be useful to accelerate the scan if you know that some URLs do not need scanning. It could also be useful if you are scanning a live web site and wish to prevent the scanner from inadvertently adding information to your databases. You can enter up to 1,000 URLs. |
7. Click OK.
8. To use the profile, select it in a web vulnerability scan policy (see Running vulnerability scans).
In order to run a vulnerability scan, you must apply a schedule (if any) to a profile of settings, as well as providing a few additional details.
A vulnerability scan policy defines the scheduling type of scan (an immediate scan or a scheduled scan), the profile to use, the file format of the report, and recipients.
1. Configure a vulnerability scan profile. See Configuring vulnerability scan settings.
2. If the scan will run by a schedule instead of being manually initiated, create a vulnerability scan schedule. See Scheduling web vulnerability scans.
3. Go to Web Vulnerability Scan > Web Vulnerability Scan > Web Vulnerability Scan Policy.
| Field | Description |
|---|---|
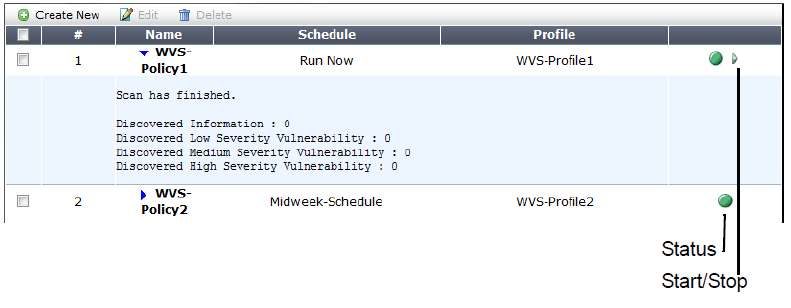
| Status | Indicates whether the scan is idle (the status indicator is solid green) or running (the status indicator is flashing red and yellow). |
| Start/Stop |
The Start/Stop icon appears only if the policy is configured as Run Now. If so, the icon changes depending on the current status of the scan:
|
To access this part of the web UI, your administrator’s account access profile must have Read and Write permission to items in the Web Vulnerability Scan Configuration category. For details, see Permissions.
4. Click Create New.
A dialog appears.
5. Configure these settings:

| Setting name | Description |
|---|---|
| Name | Type a unique name that can be referenced in other parts of the configuration. Do not use spaces or special characters. The maximum length is 35 characters. |
| Type |
Select the scheduling type, either:
|
| Schedule |
Select the predefined schedule to use for the scan. See Scheduling web vulnerability scans. This option appears only if the Type is Schedule. |
| Profile | Select the profile to use when running the vulnerability scan. See Configuring vulnerability scan settings. |
| Report Format |
Enable one or more file formats for the vulnerability scan report: |
| Select the email settings, if any, to use in order to send results of the vulnerability scan. See Configuring email settings. |
6. Click OK.
If Type is Run Now, the scan begins immediately. Otherwise, it begins at the time that you configured in Schedule. Time required varies by the network speed and traffic volume, load of the target hosts (especially the number of request timeouts), and your configuration of Delay Between Each Request.
When the scan is complete, FortiWeb generates a report based on the scan results. See Viewing vulnerability scan reports.
If the schedule type associated with the vulnerability scan policy is set to Run Now, You can manually start and stop a scan. (You cannot manually start a scan that is scheduled.)
1. Go to Web Vulnerability Scan > Web Vulnerability Scan > Web Vulnerability Scan Policy.
2. Locate a vulnerability scan whose Schedule column says Run Now and whose status indicator is green (idle).
You cannot manually start a scan that has been scheduled in advance, or that is currently in progress.

3. In the row for that vulnerability scan, click the Start icon.
FortiWeb connects to the target host configured in the profile and, if enabled to do so, authenticates. The status indicator flashes red and yellow while the scan is running.
When the scan is finished the status indicator returns to green (idle).
A summary of scan results appears in the section hidden by the blue expansion arrow. To reveal them, click the arrow.
You can view and/or download the full scan report via the web UI (see Viewing vulnerability scan reports and Downloading vulnerability scan reports). If email settings were selected in the scan, a scan report is also delivered to its recipients.
1. Go to Web Vulnerability Scan > Web Vulnerability Scan > Web Vulnerability Scan Policy.
2. Locate a vulnerability scan whose status indicator is flashing red and yellow, indicating that the scan is running.
3. In the row for that vulnerability scan, click the Stop icon.
The vulnerability scan stops. The status indicator returns to green (idle). You can In the Name column, you can click the blue expansion arrow to view a summary of the scan results to the point where you stopped the scan.
After a web vulnerability scan completes, the FortiWeb appliance generates a report summarizing and analyzing the results of the scan. If you configured it to email the report to you when complete, you may receive the report in your inbox. However, you can also view and download it through the web UI.
To access this part of the web UI, your administrator’s account access profile must have Read and Write permission to items in the Web Vulnerability Scan Configuration category. For details, see Permissions.
| Field | Description |
|---|---|
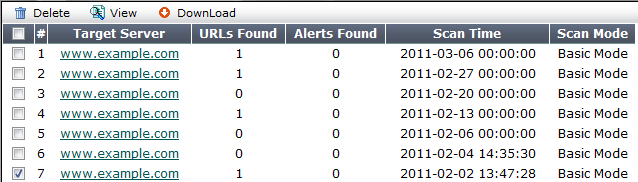
| View | Click to view a scan report. See Downloading vulnerability scan reports. |
| Download | Click to download a copy of a scan report. See Downloading vulnerability scan reports |
| Target Server | Displays the host name of the server that was scanned for vulnerabilities. Click this link to view the scan report associated with this server. |
| URLs Found | Displays the number of URLs on the target host that were scanned for vulnerabilities. |
| Alerts Found | Displays the total number of vulnerabilities discovered during the scan. |
| Scan Time | Displays the date and time that the scan was performed. |
| Scan Mode | Indicates whether the scan job used Basic Mode (use HTTP GET only and omit both user-defined and predefined sensitive URLs) or Enhanced Mode (use both HTTP POST and GET, excluding only user-defined URLs). |
The web vulnerability scan report is divided into sections for a summary, discovered vulnerabilities and affected URLs.

The report contents are the same when using the Download or View feature, though the presentation varies.
1. Go to Web Vulnerability Scan > Web Vulnerability Scan > Scan History.
2. Mark the check box next to the scan report that you want to download.

3. Click Download.
A dialog appears.
4. Click Download Report File.
A file download prompt appears.
5. Click Save.
6. If prompted, select the location on your computer to store the HTML report.