Configuring a high availability (HA) FortiWeb cluster
By default, FortiWeb appliances are each a single, standalone appliance. They operate independently.
If you have purchased more than one, however, you can configure the FortiWeb appliances to form an active-passive high availability (HA) FortiWeb cluster. This improves availability so that you can achieve 99.999% service level agreement (SLA) uptimes regardless of, for example, hardware failure or maintenance periods.

|
If you have multiple FortiWeb appliances but do not need failover, you can still synchronize the configuration. This can be useful for cloned network environments and externally load-balanced active-active HA. See Replicating the configuration without FortiWeb HA (external HA).
You can use the FortiWeb WCCP feature to create an active-active HA cluster. You synchronize the cluster members using FortiWeb's configuration synchronization feature so that each cluster member is ready to act as backup if the other appliance is not available. The WCCP server provides load balancing between the HA pair and redirects all traffic to one cluster member if the other member is unavailable. For more information, see Example: Using WCCP with multiple FortiWeb appliances. |
HA requirements
- Two identical physical FortiWeb appliances (i.e., the same hardware model and firmware version (for example, both appliances could be a FortiWeb 3000C running FortiWeb 5.3.4))
- Redundant network topology: if the active appliance fails, physical network cabling and routes must be able to redirect web traffic to the standby appliance (see Topologies for high availability (HA) clustering)
- At least one physical port on both HA appliances connected directly, via crossover cables, or through switches (see HA heartbeat & synchronization)
- For FortiWeb-VM:
- A valid license for all cluster members. You cannot configure HA with trial licences.
- Configure the vNetwork interfaces that carry heartbeat and synchronization traffic to operate in promiscuous mode and accept MAC address changes.
- Ensure the cluster members have the same number of ports and are configured with the same amount of memory and vCPUs.
|
|
FortiWeb-VM supports HA. However, if you do not wish to use the native HA, you can use your hypervisor or VM environment manager to install your virtual appliances over a hardware cluster to improve availability. For example, VMware clusters can use vMotion or VMware HA. |
HA topology and failover — IP address transfer to the new active appliance
|
|
For best fault tolerance, make sure that your topology is fully redundant, with no single points of failure.
For example, in HA topology and failover — IP address transfer to the new active appliance, the switch, firewall, and Internet connection are all single points of failure. If any should fail, web sites would be unavailable, despite the HA cluster. To prevent this, you would add a dual ISP connection to separate service providers, preferably with their own redundant pathways upstream. You would also add a standby firewall, and a standby switch. |
The style of FortiWeb HA is active-passive: one appliance is elected to be the active appliance (also called the primary, main, or master), applying the policies for all connections. The other is a passive standby (also called the secondary, or slave), which assumes the role of the active appliance and begins processing connections only if the active appliance fails.
The active and standby appliances detect failures by communicating through a heartbeat link that connects the two appliances in the HA pair. Failure is assumed when the active appliance is unresponsive to the heartbeat from the standby appliance for a configured amount of time:
Heartbeat timeout = Detection Interval x Heartbeat Lost Threshold
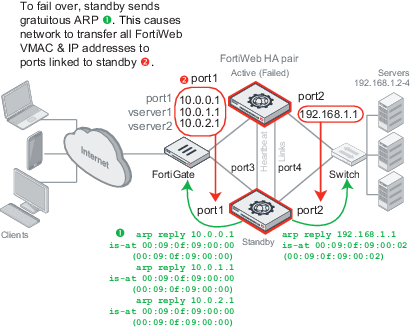
If the active appliance fails, a failover occurs: the standby becomes active. To do this, the standby takes all IP addresses of the unresponsive appliance: it notifies the network via ARP to redirect traffic for that virtual MAC address (VMAC) to its own network interfaces. (In transparent modes, this includes the management IP. Additionally, at Layer 2, switches are notified that the VMAC is now connected to a different physical port. So even though in these modes the interfaces usually are transparent bridges without IPs, ARP traffic will still occur due to failover.)
Time required for traffic to be redirected to the new active appliance varies by your network’s responsiveness to changeover notification and by your configuration:
Total failover time = ARP Packet Numbers x ARP Packet Interval + Network responsiveness + Heartbeat timeout
For example, if:
then the total time between the first unacknowledged heartbeat and traffic redirection could be up to 5.6 seconds.
When the former active appliance comes back online, it may or may not assume its former active role. For an explanation, see How HA chooses the active appliance. (At this time, when an appliance is rejoining the cluster, FortiWeb will also send gratuitous ARP packets. This helps to ensure that traffic is not accidentally forwarded to both the current and former active appliance in cases where the cluster is connected through 2 switches.)
HA topology and failover — IP address transfer to the new active appliance shows an example HA network topology with IP address transfer from the active appliance to the standby appliance upon failover. In this example, the primary heartbeat link is formed by a crossover cable between the two port3 physical network ports; the secondary heartbeat link is formed between the two port4 physical network ports.
To configure FortiWeb appliances that are operating in HA mode, you usually connect only to the active appliance. The active unit’s configuration is almost entirely synchronized to the passive appliance, so that changes made to the active appliance are propagated to the standby appliance, ensuring that it is prepared for a failover.
However, you can use the HA setting for a cluster member to configure it with an independent management port. You can then use the IP address of the port to directly manage the cluster member.
Tasks that can require you to access a cluster member directly include:
- connecting to a standby appliance in order to view log messages recorded about the standby appliance itself on its own hard disk
- connecting to a standby appliance to configure settings that are not synchronized (see Configuration settings that are not synchronized by HA)
To configure HA
1. If the HA cluster will use FortiGuard services, license all FortiWeb appliances in the HA group, and register them with the Fortinet Technical Support web site:
https://support.fortinet.com/

|
If you license only the primary appliance in an active-passive HA group, after a failover, the secondary appliance will not be able to use the FortiGuard service. This could cause traffic to be scanned with out-of-date definitions, potentially allowing newer attacks. |
2. Cable both appliances into a redundant network topology.
For an example, see HA topology and failover — IP address transfer to the new active appliance.
3. Physically link the FortiWeb appliances that will be members of the HA cluster.
You must link at least one of their ports (e.g. port4 to port4) for heartbeat and synchronization traffic between members of the cluster. You can either:
- link two appliances directly via a crossover cable
- link the appliances through a switch
If a switch is used to connect the heartbeat interfaces, the heartbeat interfaces must be reachable by Layer 2 multicast.

|
Maintain the heartbeat link(s). If the heartbeat is accidentally interrupted for an active-passive HA group, such as when a network cable is temporarily disconnected, the secondary appliance will assume that the primary unit has failed, and become the new primary appliance. If no failure has actually occurred, both FortiWeb appliances will be operating as primary appliances simultaneously. |
|
|
To avoid unintentional failovers due to accidental detachment or hardware failure of a single heartbeat link, make two heartbeat links.
For example, you might link port3 to port3 on the other appliance, and link port4 to port4 on the other appliance, then configure both appliances to use those network interfaces for heartbeat and synchronization. |
|
|
If you link HA appliances through switches, to improve fault tolerance and reliability, link the ports through two separate switches. Do not connect these switches to your overall network, which could introduce a potential attack point, and could also allow network load to cause latency in the heartbeat, which could cause an unintentional failover. |
4. Log in to both appliances as the admin administrator account.
Accounts whose access profile includes Read and Write permissions to the System Configuration area can configure HA, but may not be able to use features that may be necessary when using HA, such as logs and network configuration.
5. On both appliances, go to System > Config > HA-Config.
To access this part of the web UI, your administrator's account access profile must have Read and Write permission to items in the System Configuration category. For details, see Permissions.
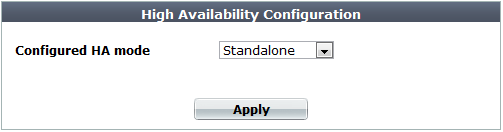
By default, each FortiWeb appliance operates as a single, standalone appliance: only the Configured HA mode drop-down list appears, with the Standalone option selected.
6. From Configured HA mode, select Active-Passive.
Additional options appear that enable you to configure HA.
7. Configure these settings:
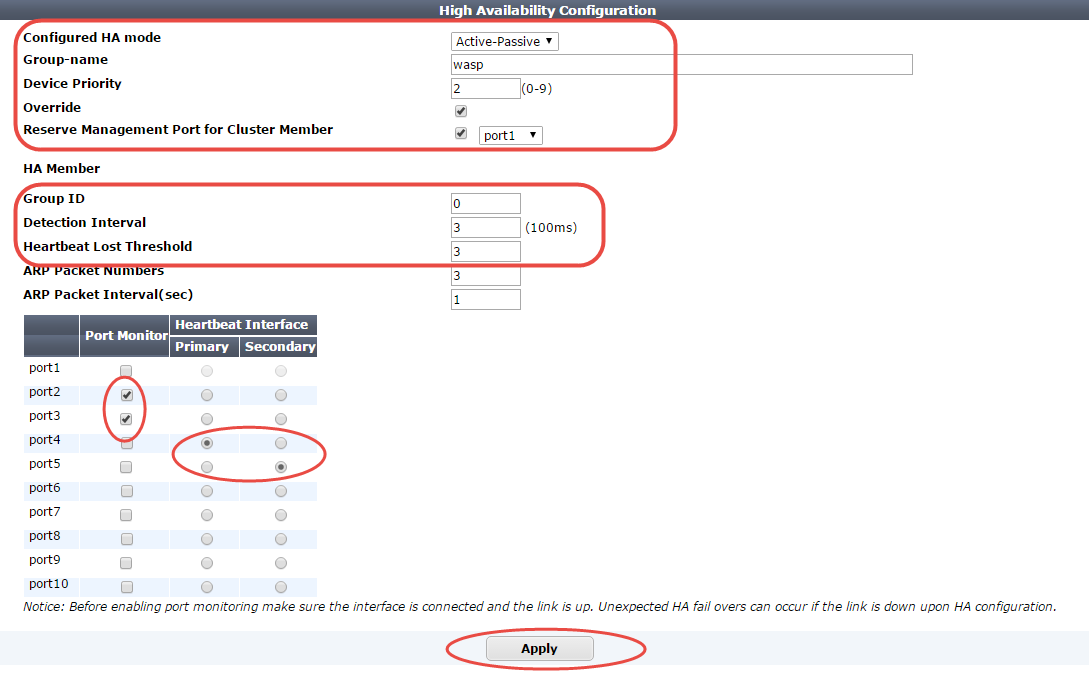
| Group-name |
Type a name to identify the HA pair if you have more than one.
This setting is optional, and does not affect HA function.
The maximum length is 35 characters. |
| Device Priority |
Type the priority of the appliance when electing the primary appliance in the HA pair. (On standby devices, this setting can be reconfigured using the CLI command execute ha manage <serial-number_str> <priority_int>. For details, see the FortiWeb CLI Reference.)
This setting is optional. The smaller the number, the higher the priority. The valid range is 0 to 9. The default is 5.
Note: By default, unless you enable Override, uptime is more important than this setting. For details, see How HA chooses the active appliance. |
| Override |
Enable to make Device Priority a more important factor than uptime when selecting the main appliance. See How HA chooses the active appliance. |
Reserve Management Port for Cluster Member
<interface name> |
Specifies whether the network interface you select provides administrative access to this appliance when it is a member of the HA cluster.
When this option is selected, you can access the configuration for this cluster member using the IP address of the specified network interface. The interface configuration, including administrative access and other settings, is not synchronized with other cluster members.
You cannot configure routing for the port you select. To allow your management computer to connect with the web UI and CLI, ensure it is on the same subnet as the port. (Alternatively, you can configure a source IP NAT on the router or firewall that modifies the management computer's source IP.)
You can configure up to 8 reserved management ports in each HA cluster.
|
| Group ID |
Type a number that identifies the HA pair.
Both members of the HA pair must have the same group ID. If you have more than one HA pair on the same network, each HA pair must have a different group ID.
Changing the group ID changes the cluster’s virtual MAC address.
The valid range is 0 to 63. The default value is 0. |
| Detection Interval |
Type the number of 100-millisecond intervals to set the pause between each heartbeat packet that the one FortiWeb appliance sends to the other FortiWeb appliance in the HA pair. This is also the amount of time that a FortiWeb appliance waits before expecting to receive a heartbeat packet from the other appliance.
This part of the configuration is synchronized between the active appliance and standby appliance.
The valid range is 1 to 20 (that is, between 100 and 2,000 milliseconds).
Note: Although this setting is synchronized between the main and standby appliances, you should initially configure both appliances with the same Detection Interval to prevent inadvertent failover from occurring before the initial synchronization. |
| Heartbeat Lost Threshold |
Type the number of times one of HA appliances retries the heartbeat and waits to receive HA heartbeat packets from the other HA appliance before assuming that the other appliance has failed.
This part of the configuration is synchronized between the main appliance and standby appliance.
Normally, you do not need to change this setting. Exceptions include:
- Increase the failure detection threshold if a failure is detected when none has actually occurred. For example, during peak traffic times, if the main appliance is very busy, it might not respond to heartbeat packets in time, and the standby appliance may assume that the main appliance has failed.
- Reduce the failure detection threshold or detection interval if administrators and HTTP clients have to wait too long before being able to connect through the main appliance, resulting in noticeable down time.
The valid range is from 1 to 60.
Note: Although this setting is synchronized between the main and standby appliances, you should initially configure both appliances with the same Heartbeat Lost Threshold to prevent inadvertent failover from occurring before the initial synchronization.
|
| Port Monitor |
Mark the check boxes of one or more network interfaces that each directly correlate with a physical link. These ports will be monitored for link failure.
Port monitoring (also called interface monitoring) monitors physical network ports to verify that they are functioning properly and linked to their networks. If the physical port fails or the cable becomes disconnected, a failover occurs. You can monitor physical interfaces, but not VLAN subinterfaces or 4-port switches.
If you select a link aggregate interface, failover occurs only if all the physical network interfaces in the logical interface fail. For more information, see Link aggregation.
Note: To prevent an unintentional failover, do not configure port monitoring until you configure HA on both appliances in the HA pair, and have plugged in the cables to link the physical network ports that will be monitored. |
| Heartbeat Interface |
Select which port(s) on this appliance that the main and standby appliances will use to send heartbeat signals and synchronization data between each other (i.e. the HA heartbeat link).
Connect this port to the same port number on the other member of the HA cluster. (e.g., If you select port3 for the primary heartbeat link, connect port3 on this appliance to port3 on the other appliance.)
At least one heartbeat interface must be selected on each appliance in the HA cluster. Ports that currently have an IP address assigned for other purposes (that is, virtual servers or bridges) cannot be re-used as a heartbeat link.
Tip: If enough ports are available, you can select both a primary heartbeat interface and a secondary heartbeat interface on each appliance in the HA pair to provide heartbeat link redundancy. (You cannot use the same port as both the primary and secondary heartbeat interface on the same appliance, as this is incompatible with the purpose of link redundancy.)
Note: If a switch is used to connect the heartbeat interfaces, the heartbeat interfaces must be reachable by Layer 2 multicast. |
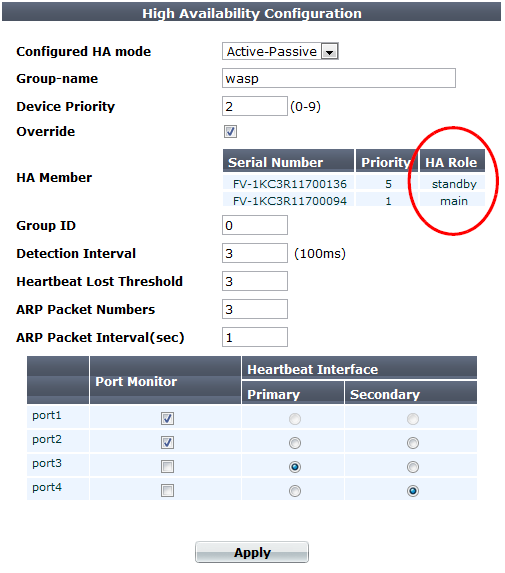
8. Click Apply.
Both appliances join the HA cluster by matching their Group ID. They begin to send heartbeat and synchronization traffic to each other through their heartbeat links.
To determine which appliance currently has the role of the main appliance, on System > Config > HA-Config, in the HA Member table, view the HA Role column:
- main — The appliance in this row is currently active. The active appliance applies policies to govern the traffic passing to your web servers. Also called the primary, master, or main appliance.
- standby — The appliance in this row is currently passive, and is not actively applying policies. The passive appliance listens to heartbeat traffic and port monitoring for signs that the main appliance may have become unresponsive, at which point it will assume the role of the main appliance. Also called the secondary or standby appliance.
If both appliances believe that they are the main:
- Test the cables and/or switches in the heartbeat link to verify that the link is functional.
- Verify that you have selected the heartbeat port or ports in Heartbeat Interface. Make sure that the primary and secondary link is not crossed (that is, the primary heartbeat interface is not connected to the secondary heartbeat interface on the other appliance).
- Verify that the Group ID matches on both appliances.
- Verify that the ports on Port Monitor are linked and up (available).
- If the heartbeat link passes through switches and/or routers, you may need to adjust the time required after a reboot to assess network availability before electing the main appliance. For details, see the
boot-time <seconds_int> setting in the FortiWeb CLI Reference.
- For debugging logs, use the
diagnose system ha status and diagnose debug application hatalk level commands. For details, see the FortiWeb CLI Reference.
9. To monitor the HA cluster for failover, you can use SNMP (see Configuring an SNMP community), log messages, and alert email (see Configuring logging).
If failover time is too long, adjust the following:
| ARP Packet Numbers |
Type the number of times that the FortiWeb appliance will broadcast extra address resolution protocol (ARP) packets when it takes on the main role. (Even though a new NIC has not actually been connected to the network, FortiWeb does this to notify the network that a new physical port has become associated with the IP address and virtual MAC of the HA pair.) This is sometimes called “using gratuitous ARP packets to train the network,” and can occur when the main appliance is starting up, or during a failover. Also configure ARP Packet Interval.
Normally, you do not need to change this setting. Exceptions include:
- Increase the number of times the main appliance sends gratuitous ARP packets if your HA pair takes a long time to fail over or to train the network. Sending more gratuitous ARP packets may help the failover to happen faster.
- Decrease the number of times the main appliance sends gratuitous ARP packets if your HA pair has a large number of VLAN interfaces and virtual domains. Because gratuitous ARP packets are broadcast, sending them may generate a large amount of network traffic. As long as the HA pair still fails over successfully, you could reduce the number of times gratuitous ARP packets are sent to reduce the amount of traffic produced by a failover.
The valid range is 1 to 16. |
| ARP Packet Interval |
Type the number of seconds to wait between each broadcast of ARP packets.
Normally, you do not need to change this setting. Exceptions include:
- Decrease the interval if your HA pair takes a long time to fail over or to train the network. Sending ARP packets more frequently may help the failover to happen faster.
- Increase the interval if your HA pair has a large number of VLAN interfaces and virtual domains. Because gratuitous ARP packets are broadcast, sending them may generate a large amount of network traffic. As long as the HA pair still fails over successfully, you could increase the interval between when gratuitous ARP packets are sent to reduce the rate of traffic produced by a failover.
The valid range is from 1 to 20. |
|
|
If your HA link passes through switches and/or routers, and inadvertent failovers occur when rebooting the HA pair, you can increase the maximum time to wait for a heartbeat signal after a reboot by configuring boot‑time <limit_int>. See the FortiWeb CLI Reference. |
See also
Replicating the configuration without FortiWeb HA (external HA)
Configuration synchronization provides the ability to duplicate the configuration from another FortiWeb appliance without using FortiWeb high availability (HA). The synchronization is unilateral push: it is not a bilateral synchronization. It adds any missing items, and overwrites any items that are identically named, but does not delete unique items on the target FortiWeb, nor does it pull items from the target to the initiating FortiWeb.
Replicating the configuration can be useful in some scenarios where you cannot use, or do not want, FortiWeb HA:
- External active-active HA (load balancing) could be provided by the firewall, the router, or an HTTP-aware load balancer such as FortiADC , since active-active HA is not provided by FortiWeb itself.
- External active-passive HA (failover) could be provided by a specialized failover device, instead of the FortiWebs themselves, for network load distribution, latency, and performance optimization reasons. The failover device must monitor for live routes.
- Multiple identical non-HA FortiWeb appliances in physically distant locations with the same network scheme might be required to have the same (maybe with a few extra different) server policies, and therefore management could be simplified by configuring one FortiWeb and then replicating that to the others.
In such cases, you may be able to save time and preserve your existing network topology by synchronizing a FortiWeb appliance’s configuration with another FortiWeb. This way, you do not need to individually configure each one, and do not need to use FortiWeb HA.
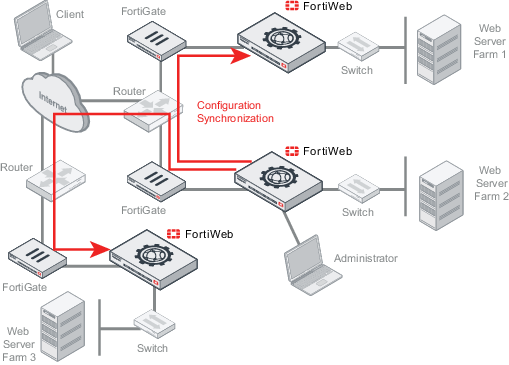
Example network topology: Configuration synchronization with multiple identical FortiWeb appliances (non‑HA)
|
|
Configuration synchronization is not a complete replacement for HA. Each synchronized FortiWeb does not keep any heartbeat link (no failover will occur and availability will not be increased) nor does it balance load with the other. Additionally, configuration synchronization will not delete items on the target FortiWeb if the item’s name is different. Also it will not import items that exist on the target, but not on your local FortiWeb.
Configuration synchronization is not supported when administrative domains (ADOMs) are enabled.
If you require such features, either use FortiWeb HA instead, or augment configuration synchronization with an external HA/load balancing device such as FortiADC. |
Like HA, due to hardware-based differences in valid settings, configuration synchronization requires that both FortiWeb appliances be of the same model. You cannot, for example, synchronize a FortiWeb-VM and FortiWeb 1000D.
You can configure which port number the appliance uses to synchronize its configuration. See Config-Sync.
Synchronize each time you change the configuration, and are ready to propagate the changes. Unlike FortiWeb HA, configuration synchronization is not automatic and continuous. Changes will only be pushed when you manually initiate it.
To replicate the configuration from another FortiWeb
|
|
Back up your system before changing the operation mode (see Backups). Synchronizing the configuration overwrites the existing configuration, and cannot be undone without restoring the configuration from a backup.
|
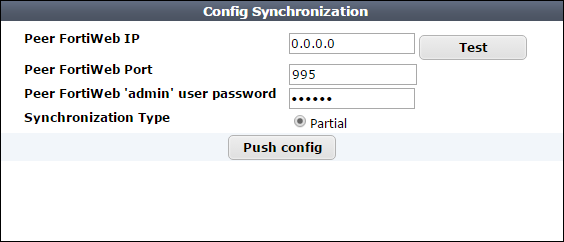
1. Go to System > Config > Config-Synchronization.
To access this part of the web UI, your administrator's account access profile must have Read and Write permission to items in the Network Configuration category. For details, see Permissions. This feature is not available if ADOMs are enabled.
2. In Peer FortiWeb IP, type the IP address of the target FortiWeb appliance that you want to receive configuration items from your local FortiWeb appliance.
3. In Peer FortiWeb Port, type the port number that the target FortiWeb appliance uses to listen for configuration synchronization. The default port is 8333.
4. In Peer FortiWeb 'admin' user password, type the password of the administrator account named admin on the other FortiWeb appliance.
5. In Synchronization Type, select one of the following options:
| Full |
For all operation modes except WCCP, synchronizes all configuration except:
- Network interface used for synchronization (prevents sync from accidentally breaking connectivity with future syncs)
- Administrator accounts
- Access profiles
- HA settings
When the operation mode is WCCP, synchronizes all configuration except:
- System > Network > Interface
- System > Network > Static Route
- System > Network > Policy Route
- System > Config > WCCP Client
- Administrator accounts
- Access profiles
- HA settings
|
| Partial |
Synchronizes all configuration except:
- System
- Policy > Server Policy
- Server Objects > Server
- Server Objects > Service
For a detailed list of settings that are excluded from a partial synchronization, including CLI-only settings, see the FortiWeb CLI Reference.
|
To test the connection settings, click Test. Results appear in a pop-up window. If the test connection to the target FortiWeb succeeds, this message should appear:
Service is available...
If the following message appears:
Service isn't available...
verify that:
- the other FortiWeb is the same model
- the other FortiWeb is configured to listen on your indicated configuration sync port number (see Config-Sync)
- the other FortiWeb’s
admin account password matches
- firewalls and routers between the two FortiWebs allow the connection
6. Click Push config.
A dialog appears, warning you that all policies and profiles with identical names will be overwritten on the other FortiWeb, and asking if you want to continue.
7. Click Yes.
The FortiWeb appliance sends its configuration to the other, which synchronizes any identically-named policies and settings. Time required varies by the size of the configuration and the speed of the network connection. When complete, this message should appear:
Config. synchronized successfully.
See also
Open topic with navigation