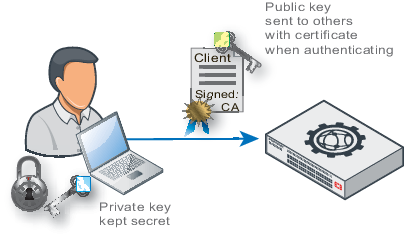
If your clients will connect to your web sites using HTTPS, you can configure FortiWeb to require clients to present a personal certificate during the handshake in order to confirm their identities. This is sometimes called public key infrastructure (PKI) authentication (RFC 5280).
Because FortiWeb presents its own server certificate to the client before requesting one from the client, all PKI authentication with FortiWeb is actually mutual (2-way) authentication.
|
|
In addition to FortiWeb verifying client certificates, you can configure FortiWeb to forward client certificates to the back-end server, whether for additional verification or identity-based functionality. See Client Certificate Forwarding in Configuring a server policy. |
PKI authentication is an alternative to traditional password-based authentication. The traditional method is based on “what you know” — a password used for authentication. PKI authentication is based on “what you have” — a private key related to the certificate bound to only one person. PKI authentication may be preferable for devices where it is onerous for the person to type a password, such as an Android or iPhone smart phone.
A known weakness of traditional password based authentication is the vulnerability to password guessing or brute force attack. Despite your admonitions, many users will still choose weak passwords either because they do not understand what makes a password “strong,” because they do not understand the risks that it poses to the organization, or because they cannot remember a randomized password.
PKI authentication is far more resilient to brute force attacks, and does not require end-users to remember anything, so it is stronger than a password.
|
|
For even stronger authentication, you can combine PKI authentication with HTTP or form-based authentication. For more information, see Authentication styles. |
PKI authentication relies on these factors to strongly confirm identity:
The private key is a randomized string of text that has a hard-to-guess relationship with its corresponding public key. As such, it features cryptographic protection that passwords lack: passwords do not necessarily have a verifiable, computable relationship with anything. However, like a password, a private key’s strength depends on it remaining a secret.
|
|
Provide the client’s private keys only to that specific client, and transmit and store any backups securely, just as you would for passwords. Failure to store them securely and restrict the private key solely to its intended end-user could allow others to authenticate as that person, compromising the security of your web sites. (i.e., It damages the property of non-repudiation.) In the event of potential private key compromise, immediately revoke the corresponding personal certificate. See Revoking certificates. |
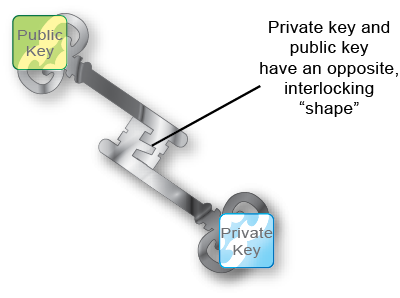
Only the private key can decrypt data that was encrypted by its public key. The inverse is also true: only the public key can decrypt data that was encrypted by its private key. This is true, for example, in the RSA cryptographic algorithm.
SSL 3.0 or TLS 1.0 is required. During an SSL or TLS handshake, the client and server (in this case, FortiWeb) negotiate which of their supported cryptographic algorithms to use, and exchange certificate(s). After the server receives the client’s certificate with its public key, the client encrypts subsequent communications using its private key. As a result, if the server can decrypt messages using the public key, it knows that they originate from the originally connecting client who has the related private key, not an intercepting host (i.e. a man‑in-the-middle attack).
|
|
Depending on factors such as a misconfigured client, an SSL/TLS connection may in some cases still be vulnerable to man-in-the-middle attacks. There are several steps that you can take to harden security, including using greater bit strengths, updating and properly configuring clients, revoking compromised certificates, and installing only trusted certificates. See also Hardening security and Configuring FortiWeb to validate client certificates. |
Encrypted transmissions can contain a message authentication checksum (MAC) to verify that the message was not altered during transmission by an interceptor.
Digital signatures — Public keys are also used as signatures. Similar to an encrypted message, as long as the private key is possessed by only one individual, any signature generated from it is also guaranteed to come only from that client. The client will sign a certificate with its matching public key.
Because certificate authorities (CA) sign applicants’ certificates, third parties who have that CA’s certificate can also confirm that that CA certified the applicant’s identity, and the certificate was not forged.
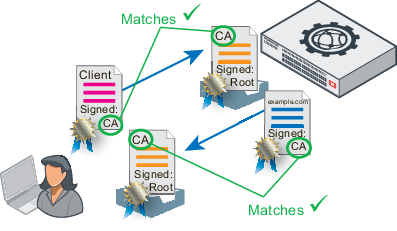
Chain of trust — What if a device does not know the CA that signed the connecting party’s certificate? Since there are many CAs, this is a common scenario.
The solution is to have a root CA in common between the two connecting parties, a “friend of a friend.”
If a root CA is trusted to be genuine and to sign only certificates where it has verified the applicant’s identity, then by induction, all sub-CA’s certificates that the root CA has verifiably signed will also be trusted as genuine. Hence, if a client or server’s certificate can prove that it is either indirectly (through an intermediary CA signed by the root CA) or directly signed by the trusted root CA, that client/server’s certificate will be trusted as genuine.
1. Obtain a personal certificate for the client, and its private key, from a CA.
Steps vary by the CA. Personal certificates can be purchased or downloaded from either commercial CAs such as VeriSign, Thawte, or Comodo, or your organization’s own private CA, such as a Linux server where you use OpenSSL or a Mac OS X server where you have set up a CA in Keychain Access. For information on certificate requirements such as extended attributes, see Configuring FortiWeb to validate client certificates.
For a private CA example, see Example: Generating & downloading a personal certificate from Microsoft Windows 2003 Server.
2. Download the CA’s certificate, which contains its public key and therefore can verify any personal certificate that the CA has signed.
Steps vary by the CA.
For a private CA example, see Example: Downloading the CA’s certificate from Microsoft Windows 2003 Server.
If you purchased personal certificates from CAs such as VeriSign, Thawte, or Comodo, you should not need to download the certificate: simply export those CAs’ certificates from your browser’s own trust store, similar to To export and transmit a personal certificate from the trust store on Microsoft Windows 7, then upload them to the FortiWeb (see Uploading trusted CAs’ certificates).
3. Install the personal certificate with its private key on the client.
Steps vary by the client’s operating system and web browser. If the client uses Microsoft Windows 7, see Example: Importing the personal certificate & private key to a client’s trust store on Microsoft Windows 7.
4. Upload the CA’s certificate to the FortiWeb’s trust store (see Uploading the CA’s certificate to FortiWeb’s trusted CA store).
5. If you have a certificate revocation list, configure FortiWeb with it (see Revoking certificates).
6. Depending on the FortiWeb’s current operation mode, configure either a server policy or server pool to consider CA certificates and CRLs when verifying client certificates (see Configuring FortiWeb to validate client certificates).
7. Configure the server policy to accept HTTPS (see HTTPS Service).
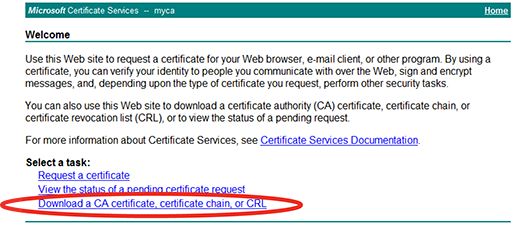
If you are running Microsoft Certificate Services on Microsoft Windows 2003 Server, you can use your server as a CA, to generate and sign personal certificates on behalf of your clients.
As part of signing the certificate, the CA will send the finished personal certificate to your web browser. As a result, when you are finished generating, you must export the certificates from your computer’s trust store in order to deploy the certificates to clients.
1. On your management computer, start your web browser.
2. Go to:
https://<ca-server_ipv4>/certsrv/
where <ca-server_ipv4> is the IP address of your CA server.
3. Log in as Administrator.
Other accounts may not have sufficient privileges. The Microsoft Certificate Services home page for your server’s CA should appear.
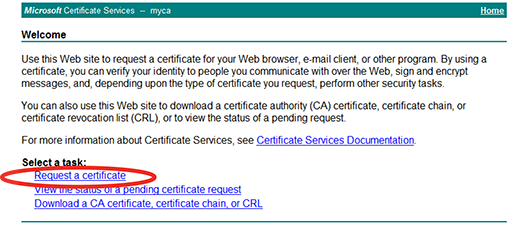
4. Click the Request a certificate link.
The Request a Certificate page appears.
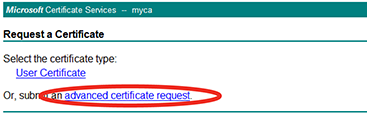
5. Click the advanced certificate request link.
The Advanced Certificate Request page appears.
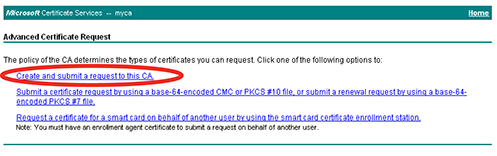
6. Click the Create and submit a request to this CA link.
The Certificate Request Template appears.
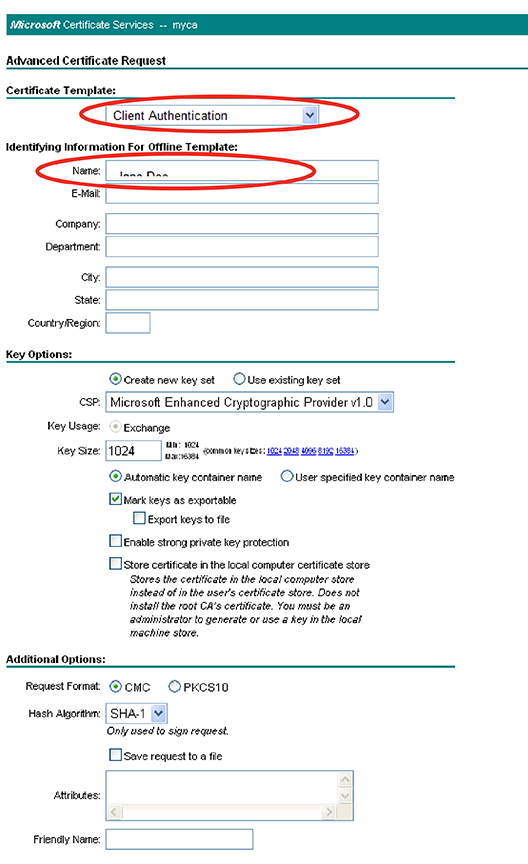
7. In the Certificate Template drop-down list, select the Client Authentication template (or a template that you have created for the purpose using Microsoft Management Console (MMC)).
8. In the Name field, type the name the end-user on behalf of which the client certificate request is being made. This will be the Subject: field in the certificate. Other fields are optional.
9. Click Submit.
The certificate signing request (CSR) is submitted to the CA.
10. If a message appears, warning you that the web site is requesting a new certificate on your behalf, click Yes to proceed.
Once the CA server generates the requested certificate, the Certificate Issued window appears.
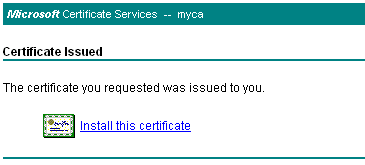
11. Click the Install this certificate link.
Your browser downloads the certificate, including its private key, and installs it in its trust store. The certificate’s name is the one you specified in step 8.
|
|
Transmit and store any private key backups securely, just as you would for passwords. Failure to store them securely and restrict the private key solely to its intended end-user could allow others to authenticate as that person, compromising the security of your web sites. In the event of potential private key compromise, immediately revoke the corresponding personal certificate. See Revoking certificates. |
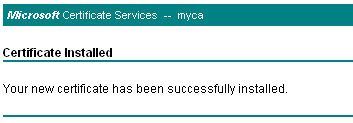
12. If a message appears, warning you that the web site is adding one or more certificates to your computer, click Yes to proceed.
The Certificate Installed window appears.
13. Return to the Microsoft Certificate Services (MSCS) home page for your local CA and repeat step 4 through step 12 for each end-user that will use PKI authentication.
1. Start Microsoft Internet Explorer 9.
2. Go to Tools [gear icon] > Internet options.
The Internet Options dialog window appears.
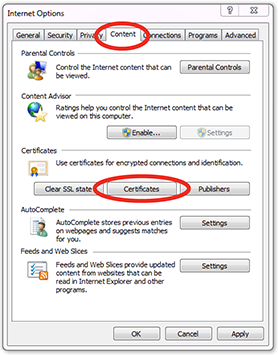
3. Click the Content tab.
4. Click the Certificates button.
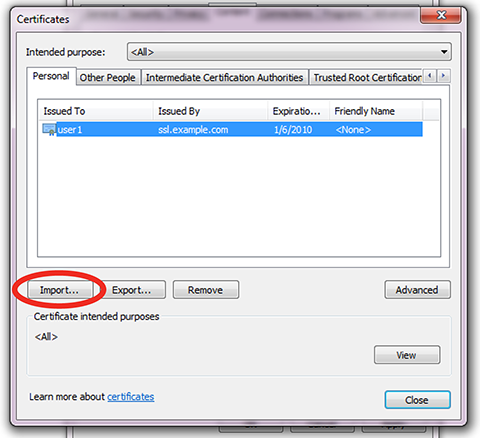
The Certificates dialog window appears. By default, the Personal tab is front most.
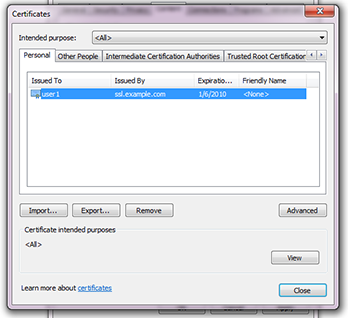
5. Click to select a personal certificate in the list.
6. Click Export.
The Certificate Export Wizard dialog appears.
7. Click Next.
The Export Private Key step appears.
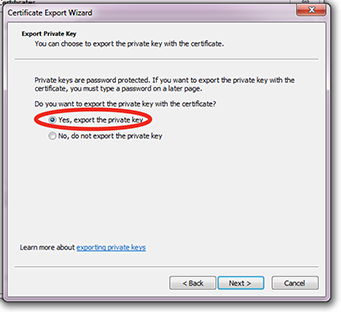
8. Select Yes, export the private key.
The end-user will require his or her private key in order to authenticate. Without that token (or if many people possess that token), identity cannot be confirmed.
|
|
Transmit and store any private key backups securely, just as you would for passwords. Failure to store them securely and restrict the private key solely to its intended end-user could allow others to authenticate as that person, compromising the security of your web sites. In the event of potential private key compromise, immediately revoke the corresponding personal certificate. See Revoking certificates. |
9. Click Next.
The Export File Format step appears.
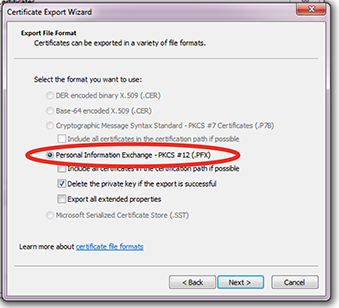
10. Select Personal Information Exchange - PKCS #12 (.PFX) as the file format.
11. If you need to absolutely guarantee identity (i.e. not even you, the administrator, will have the end-user’s private key installed — only the end-user will), mark the check box named Delete the private key if the export is successful.
For improved performance, do not include all CA certificates from the personal certificate’s certification path (i.e. the chain of trust or signing chain). Including the signing chain increases the size of the certificate, which slightly increases the amount of time and traffic volume required to transmit the certificate each time to FortiWeb. Instead, upload those CAs’ certificates to the FortiWeb appliance (see Uploading trusted CAs’ certificates).
12. Click Next.
The Password step appears.
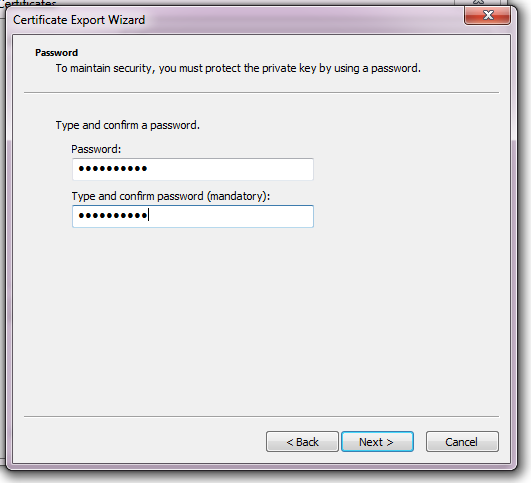
13. Enter and confirm the spelling of the password that will be used to password-protect and encrypt the exported certificate and its private key.
14. Click Next.
The File to Export step appears.
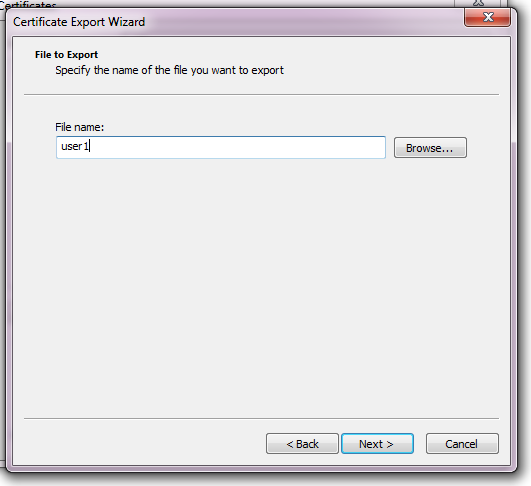
15. In File name, enter a unique file name for the certificate, then click Browse to specify the location where you want to save the exported certificate and private key.
Use a consistent naming convention. This will minimize the likelihood that you confuse one person’s private key with another’s, deliver it to the wrong person, and therefore need to revoke the corresponding certificate and generate a new one.
16. Click Finish to export the certificate and private key.
The certificate and private key are exported in a single file with a .pfx file extension to the location specified in step In File name, enter a unique file name for the certificate, then click Browse to specify the location where you want to save the exported certificate and private key..
If the export is successful, a notice appears.
17. Click OK.
18. Securely transmit both the .pfx file and its password to the end-user, along with instructions on how to install the certificate in his or her web browser’s trust store.
|
|
Only provide the client’s private key to that specific client, and transmit and store any backups securely, just as you would for passwords. Failure to store it securely and restrict the private key solely to its intended end-user could allow others to authenticate as that person, compromising the security of your web sites. In the event of potential private key compromise, immediately revoke the corresponding personal certificate. See Revoking certificates. |
For example, you could give him or her a USB key in person and instruct the end-user to double-click the file, or install the .pfx in a Microsoft Active Directory roaming profile. See also Example: Importing the personal certificate & private key to a client’s trust store on Microsoft Windows 7.
If you are generated and signed your end-users’ personal certificates using Microsoft Certificate Services on Microsoft Windows 2003 or 2008 Server, you must download the CA’s certificate and provide it to the FortiWeb appliance so that it will be able to verify the CA signature on each personal certificate.
1. On your management computer, start your web browser.
2. Go to:
https://<ca-server_ipv4>/certsrv/
where <ca-server_ipv4> is the IP address of your CA server.
3. Log in as Administrator.
Other accounts may not have sufficient privileges. The Microsoft Certificate Services home page for your server’s CA should appear.
4. Click the Download CA certificate, certificate chain, or CRL link.
The Download a CA Certificate, Certificate Chain, or CRL page appears.
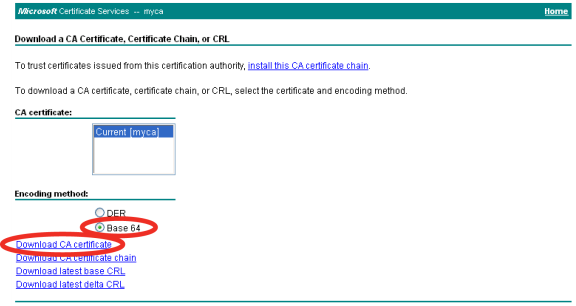
5. From Encoding Method, select Base64.
6. Click Download CA certificate.
7. If your browser prompts you, select a location to save the CA’s certificate file.
If you need to import one or two certificates to a person’s computer on his or her behalf, you can manually import the .pfx file.
Methods for importing a certificate to the trust store vary by the client’s browser and operating system. In this section are methods for some popular browsers. For other browsers and operating systems, consult the client’s browser documentation.
1. Start Microsoft Internet Explorer 9.
Alternatively, if you have a .pfx file, double-click it to open the wizard, then skip to step Click Next..
2. Go to Tools [gear icon] > Internet options.
The Internet Options dialog window appears.
3. Click the Content tab.
4. Click the Certificates button.
The Windows Certificates store dialog window appears. By default, the Personal tab is front most.
The Certificate Import Wizard appears.
The File to Import step appears.
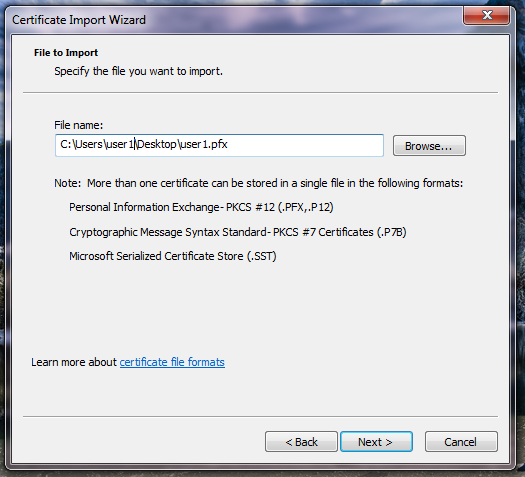
7. If you double-clicked the certificate and private key file to start the wizard, the file is already specified in File name.
Otherwise, click Browse. Go to the location where you downloaded the personal certificate. From Files of type, select Personal Information Exchange (*.pfx, *.p12), All Files (*.*), or whatever file format was used to export the certificate. Finally, select the certificate file, and click Open.
8. Click Next.
The Password step appears.
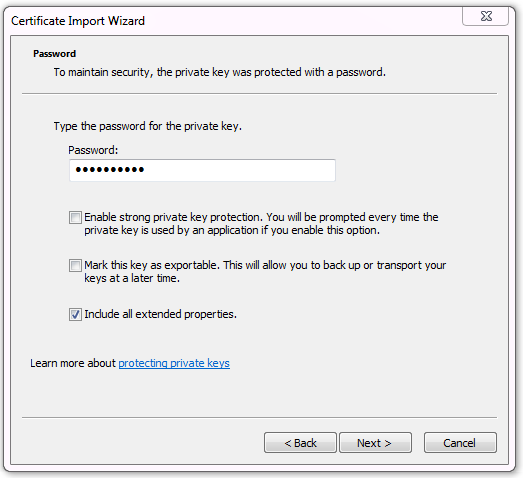
9. In Password, type the password that was used to secure the private key. (If the certificate was made on your behalf by an administrator, this is the password that the administrator used when exporting your .pfx file. He or she must provide this password to you.)
10. Click Next.
The Certificate Store step appears.
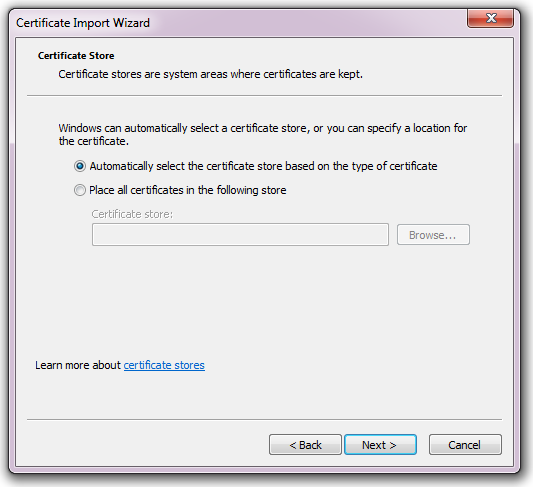
Automatically select the certificate store based on the type of certificate — Your personal certificate will automatically be placed in the default personal certificate store, as long as it was created correctly.
Place all certificates in the following store — Click the Browse button to manually indicate your personal certificate store.
12. Click Next.
13. Click Finish.
If the import is successful, a notification appears.
14. Click OK.
The certificate and private key are now imported to the store of certificates specified in step Select either:, which should be the personal certificate store. The person’s browser should now be able to present his or her personal certificate whenever a server requires PKI authentication.
15. Click the Advanced tab.
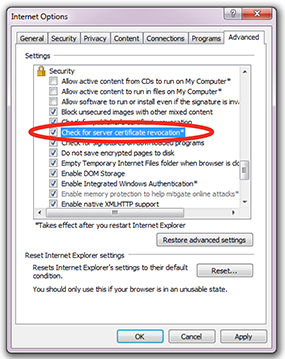
16. In the Settings area, scroll down to the Security settings.
17. Enable Check for server certificate revocation.
18. Click OK to save your settings and close the Internet Options dialog window.
19. Close Internet Explorer.
|
|
The Check for server certificate revocation option will not take effect until you restart the browser. |
1. Start Google Chrome.
2. Click the wrench icon in the top right (Customize and control Google Chrome), then select Settings... from the drop-down menu that appears. (On Mac OS X, this option is named Preferences instead.)
The dialog for configuring Google Chrome settings appears. On the left hand navigation menu, the Settings section is selected.
3. At the bottom of the page, click Show advanced settings to reveal additional settings, including, towards the bottom of the page, HTTP/SSL.
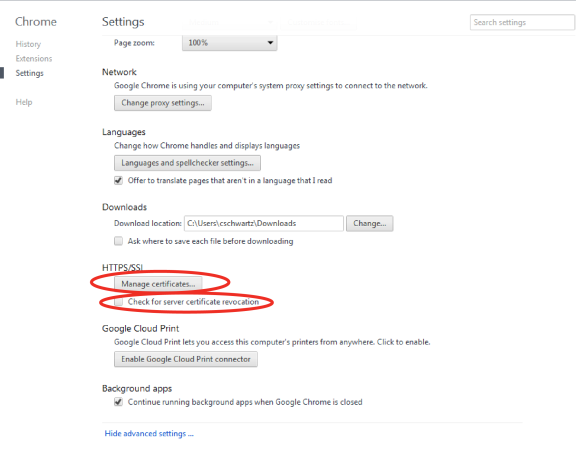
4. In the HTTPS/SSL area, enable Check for certificate revocation.
5. Click the Manage certificates button.
The Windows Certificates store dialog window appears. (In Mac OS X, this is the Keychain Access application instead.) By default, the Personal tab is front most. Continue with step 5 in To import a client certificate into Microsoft Windows 7.
Importing a personal certificate in Google Chrome — [Wrench icon] > Options > Under the Hood, click Manage Certificates, then click Import
In order for FortiWeb to be able to verify the CA’s signature on client’s personal certificates when they connect, the CA’s certificate must exist in the FortiWeb’s trusted CA certificate store.
You must either:
|
|
To harden security, regularly update FortiWeb’s CRL file in order to immediately revoke a CA’s certificate if has been compromised. See Revoking certificates. |
To be valid, a client certificate must:
CA field whose value matches a CA’s certificateIssuer field whose value matches the Subject field in a CA’s certificateIf the client presents an invalid certificate during PKI authentication for HTTPS, the FortiWeb appliance will not allow the connection.
Certificate validation rules (in the web UI, these are called certificate verification rules) tell FortiWeb which set of CA certificates to use when it validates personal certificates. They also specify a CRL, if any, if the client’s certificate must be checked for revocation.
Alternatively, if you have enabled SNI in a server policy or server pool, FortiWeb uses the set of CA certificates specified in the SNI configuration that matches the client request to validate personal certificates.
If you configure the URL-based client certificate feature in a server policy orgroup, the rules in the specified URL-based client certificate group determine whether a client is required to present a personal certificate.
1. Before you can configure a certificate validation rule, you must first configure a CA group (see Grouping trusted CAs’ certificates). You may also need to upload a CRL file (see Revoking certificates) if you need to explicitly revoke some invalid or compromised certificates.
2. Go to System > Certificates > Certificate Verify.
To access this part of the web UI, your administrator's account access profile must have Read and Write permission to items in the Admin Users category. For details, see Permissions.
3. Click Create New.
A dialog appears.
4. Configure these settings:
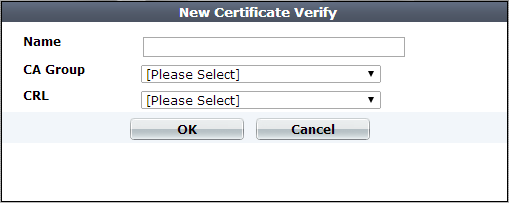
| Setting name | Description |
|---|---|
| Name | Type a name that can be referenced in other parts of the configuration. Do not use spaces or special characters. The maximum length is 35 characters. |
| CA Group | Select the name of an existing CA group that you want to use to authenticate client certificates. See Grouping trusted CAs’ certificates. |
| CRL | Select the name of an existing certificate revocation list, if any, to use to verify the revocation status of client certificates. See Revoking certificates. |
5. Click OK.
6. To apply a certificate verification rule, do one of the following:
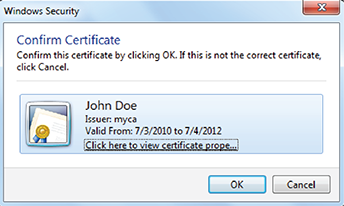
When a client connects to the web site, after FortiWeb presents its own server certificate, it will request one from the client.The web browser should display a prompt, allowing the person to indicate which personal certificate he or she wants to present.
When a PKI authentication attempt fails, if you have enabled logging, attack log messages will be recorded. Messages vary by the cause of the error. Common messages are:
X509 Error 20 - Issuer certificate could not be found (FortiWeb does not have the certificate of the CA that signed the personal certificate, and therefore cannot verify the personal certificate; see Uploading trusted CAs’ certificates)
X509 Error 52 - Get client certificate failed (the client did not present its personal certificate to FortiWeb, which could be caused by the client not having its personal certificate properly installed; see How to apply PKI client authentication (personal certificates))
X509 Error 53 - Protocol error (various causes, but could be due to the client and FortiWeb having no mutually understood cipher suite or protocol version during the SSL/TLS handshake)
For more logs, see the FortiWeb Log Reference.
You can use Certificate Verification in a server policy (reverse proxy mode) or server pool configuration (true transparent proxy) to require clients to present a personal certificate. When you select a value for this setting, all clients are required to present a personal certificate.
Alternatively, you can configure the URL-based client certificate feature in a server policy or server pool, which allows you to require a certificate for some requests and not for others. Whether a client is required to present a personal certificate or not is based on the requested URL and the rules you specify in the URL-based client certificate group.
A URL-based client certificate group specifies the URLs to match and whether the matched request is required to present a certificate or exempt from presenting a certificate.
When the URL-based client certificate feature is enabled, clients are not required to present a certificate if the request URL is specified as exempt in the URL-based client certificate group rule or URL of the request does not match a rule.
1. Go to System > Certificates > URL Certificate.
To access this part of the web UI, your administrator's account access profile must have Read and Write permission to items in the Admin Users category.
2. Click Create New.
3. For Name, enter a name that can be referenced in other parts of the configuration.
4. Click OK.
5. Click Create New, and then complete the following settings:
| Setting name | Description |
|---|---|
| URL |
Specify the URL to match. When the URL of a client request matches this value and Match is selected, FortiWeb requires the client to present a private certificate. |
| Match |
Specifies whether client requests with the URL specified by URL are required to present a personal certificate. If this option is not selected, client requests with the URL specified by URL are not required to present a personal certificate. |
6. Repeat the URL certificate member creation steps for any other URLs you require.
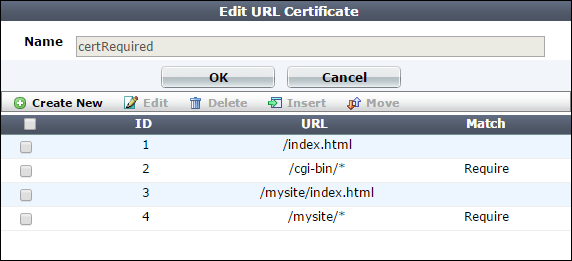
7. Click OK to close the URL certificate configuration.
8. To apply URL-based client certificate group, select it in a server policy or server pool cofiguration that includes a HTTPS service/SSL. For details, seeConfiguring a server policy or Creating a server pool.