Anti-defacement
Anti-defacement
The anti-defacement features monitors your web sites for defacement attacks. If it detects a change, it can automatically reverse the damage.
This feature can be especially useful if you are a hosting provider with many customers, such as favorite local restaurants or community associations, who have basic web pages that should not be changed, but it is impractical to manually monitor them on a continuous basis.

|
Anti-defacement backs up web pages only, not databases.
Content that will not be backed up includes all database-driven content that is inserted into web pages using AJAX, PHP, JSP, ASP, or ColdFusion, such as stepin boards, forums, blogs, and shopping carts: page content does not reside within the page markup itself, but instead resides in a back-end database that is queried and whose results are dynamically inserted into page content at runtime when the client requests a page. Separately from configuring anti-defacement, you should regularly back up MySQL, Oracle, PostgreSQL, and other databases and defend them with controls such as FortiDB.
|
The anti-defacement feature examines a web site’s files for changes at specified time intervals. If it detects a change that could indicate a defacement attack, the FortiWeb appliance can notify you and quickly react by automatically restoring the web site contents to the previous backup.

|
Before updating a web site where you are using web site anti-defacement, disable both the Enable Monitor and Restore Changed Files Automatically options. Otherwise, the FortiWeb appliance will perceive your changes as a defacement attempt and undo them. |
To configure anti-defacement
1. Go to Web Protection > Web Anti-Defacement > Anti‑Defacement.

| Monitor |
Indicates whether or not anti-defacement is currently enabled for the web site.
- Green icon — Anti-defacement is enabled.
- Flashing yellow-to-red icon — Anti-defacement is off because the Enable Monitor option is disabled.
|
| Connected |
Indicates the connection results of the FortiWeb appliance’s most recent attempt to connect to the web site’s server.
- Green check mark icon — The connection was successful.
- Red X mark icon — The FortiWeb appliance was unable to connect. Verify the IP address/FQDN and login credentials of your anti-defacement configuration. If these are valid, verify that connectivity has not been interrupted by dislodged cables, routers, or firewalls.
|
| Total Files |
Displays the total number of files on the web site. |
| Total Backup |
Displays the total number of files that have been backed up onto the FortiWeb appliance for recovery purposes. Those files that you choose not to monitor will not be backed up. |
| Total Changed |
Displays the total number of files that have changed.
Click the number to see an itemized list of the changed files. |
To access this part of the web UI, your administrator’s account access profile must have Read and Write permission to items in the Web Anti-Defacement Management category. For details, see Permissions.
2. Click Create New.
Alternatively, click an entry to view its contents, then click the Edit button.
A dialog appears.
3. Configure these settings:
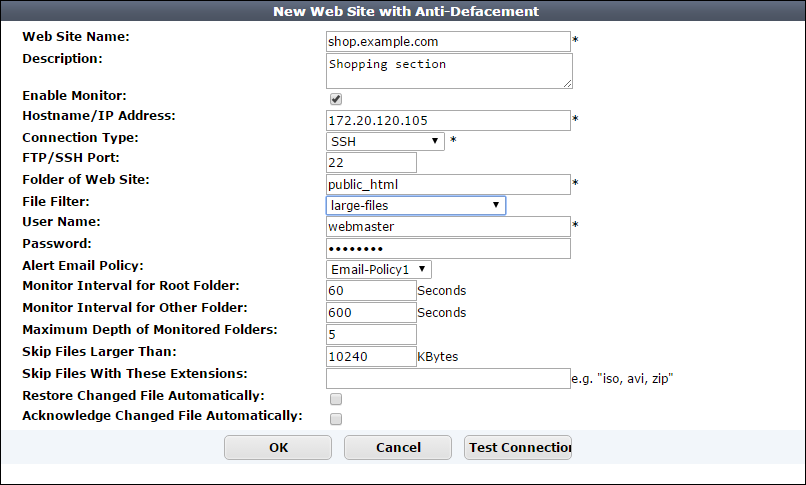
| Web Site Name |
Type a name for the web site. This name is not used when monitoring the web site. It does not need to be the web site’s FQDN or virtual host name. |
| Description |
Enter a comment up to 63 characters long. This field is optional. |
| Enable Monitor |
Enable to monitor the web site’s files for changes, and to download backup revisions that can be used to revert the web site to its previous revision if the FortiWeb appliance detects a change attempt.
Note: While you are intentionally modifying the web site, you must turn off this option and Restore Changed Files Automatically. Otherwise, the FortiWeb appliance will detect your changes as a defacement attempt, and undo them.
|
| Hostname/IP Address |
Type the IP address or FQDN of the web server on which the web site is hosted.
This will be used when connecting by SSH or FTP to the web site to monitor its contents and download backup revisions, and therefore could be different from the host name that may appear in the Host: field of HTTP headers.
For example, clients might connect to the public DNS name www.example.com, while FortiWeb would connect using the web server’s private network IP address, 192.168.1.1.
|
| Connection Type |
Select which protocol (FTP, SSH, or Windows Share) to use when connecting to the web site in order to monitor its contents and download web site backups. |
| FTP/SSH Port |
Enter the TCP port number on which the web site’s real server listens. The standard port number for FTP is 21; the standard port number for SSH is 22.
This field appears only if Connection Type is FTP or SSH.
|
| Windows Share Name |
Type the name of the shared folder on the web server, such as Share. Do not include the CIFS host name or workgroup name.
This field appears only if Connection Type is Windows Share.
|
| Folder of Web Site |
Type the path to the web site’s folder, such as public_html or wwwroot, on the real server. The path is relative to the initial location when logging in with the user name that you specify in User Name.
This field appears only if Connection Type is FTP or SSH.
|
| File Filter |
Select an optional anti-defacement file filter.
The anti-defacement file filter is a list of folder (directory) or file names that the anti-defacement feature does not monitor,or a list of items that anti-defacement always monitors. See Specifying files that anti-defacement does not monitor. |
| User Name |
Enter the user name, such as FortiWeb, that the FortiWeb appliance will use to log in to the web site’s real server. |
| Password |
Enter the password for the user name you entered in User Name. |
| Alert Email Policy |
From the drop-down list, select existing email settings that contains one or more recipient email addresses (MAIL TO:) to which the FortiWeb appliance sends an email when it detects that the web site has changed. |
| Monitor Interval for Root Folder |
Enter the time interval in seconds between each monitoring connection from the FortiWeb appliance to the web server. During this connection, the FortiWeb appliance examines Folder of Web Site (but not its subfolders) to see if any files have changed by comparing the files with the latest backup.
If it detects any file changes, the FortiWeb appliance will download a new backup revision. If you have enabled Restore Changed Files Automatically, the FortiWeb appliance will revert the files to their previous version.
For details, see Reverting a defaced web site.
|
| Monitor Interval for Other Folder |
Enter the time interval in seconds between each monitoring connection from the FortiWeb appliance to the web server. During this connection, the FortiWeb appliance examines subfolders to see if any files have been changed by comparing the files with the latest backup.
If any file change is detected, the FortiWeb appliance will download a new backup revision. If you have enabled Restore Changed Files Automatically, the FortiWeb appliance will revert the files to their previous version.
For details, see Reverting a defaced web site.
|
| Maximum Depth of Monitored Folders |
Type how many folder levels deep to monitor for changes to the web site’s files.
Files in subfolders deeper than this level are not backed up.
|
| Skip Files Larger Than |
Type a file size limit in kilobytes (KB) to indicate which files will be included in the web site backup. Files exceeding this size will not be backed up. The default file size limit is 10 240 KB.
Note: Backing up large files can impact performance.
|
| Skip Files With These Extensions |
Type zero or more file extensions, such as iso, avi, to exclude from the web site backup. Separate each file extension with a comma.
Note: Backing up large files, such as video and audio, can impact performance.
|
| Restore Changed Files Automatically |
Enable to automatically restore the web site to the previous revision number when FortiWeb detects that the web site has been changed.
Disable to do nothing. You can manually restore the web site to a previous revision when the FortiWeb appliance detects that the web site has been changed. See Reverting a defaced web site. Alternatively, you can manually revert all or some of the individual file changes that FortiWeb detects. See Accepting or reverting changed files
Note: While you are intentionally modifying the web site, you must turn off this option and Enable Monitor. Otherwise, the FortiWeb appliance detects your changes as a defacement attempt, and undoes them.
Note: FortiWeb does not restore your back-end database, if any. If the web site has been defaced using SQL injection or similar attacks and its database-driven content has been affected, even if this option is enabled, you need to manually restore the database.
You cannot enable this setting when Acknowledge Changed File Automatically is selected.
|
| Acknowledge Changed File Automatically |
Enable to automatically accept changes to the web site when FortiWeb detects that the web site has been changed.
You cannot enable this setting when Restore Changed Files Automatically is selected.
Alternatively, you can manually acknowledge all or some of the changes that FortiWeb detects. See Accepting or reverting changed files
|
4. Click Test Connection to test the connection between the FortiWeb appliance and the web server.
5. Click OK.
During the next interval, FortiWeb should connect to download its first backup. You should notice that Total Files and Total Files will increment, and Connected should become and remain a green check mark.

If not, first verify the login and IP address that you provided. Also, on the web server, check the file system permissions for the account that FortiWeb is using to connect. (FortiWeb must be able to both read and, if it will be restoring files, write to the folder and files. On Microsoft Windows, you may need to examine your security policy configuration to make sure that the account is authenticating as itself, and is not degrading to the guest account.) Verify that a route exists between the FortiWeb and the web server, and that connectivity is reliable, with no packet loss. Also verify that any routers or firewalls between them, including Windows Firewall, are not blocking SSH, FTP, or CIFS connections. Other troubleshooting varies by the protocol that FortiWeb is using to connect, such as checking for a compatible protocol version and cipher suite.
See also
Specifying files that anti-defacement does not monitor
You can create a list of folder (directory) or file names that the anti-defacement feature does not monitor. You can also create a list of items that anti-defacement always monitors.
FortiWeb applies the filters in these lists to any web site you configure using Web Protection > Web Anti Defacement > Anti Defacement.
To configure anti-defacement file filtering
1. Go to Web Protection > Web Anti Defacement > Anti Defacement File Filter and complete the following settings:
| Name |
Type a name for the filter. |
| Filter Type |
Specify the type of list to create:
- Black File List — A list of the names of folders and files that the anti-defacement feature does not monitor. FortiWeb monitors all other folders and files.
- White File List — A list of the names of folders and files that the anti-defacement feature monitors. FortiWeb does not monitor any other folders or files.
FortiWeb still applies criteria in the anti-defacement configuration to these items. For example, if the file size exceeds the maximum, FortiWeb does not monitor it.
|
2. Click OK.
3. Click Create New and complete the following settings:
| File Type |
Specify the type of item to add to the list:
- Directory — A folder or directory path.
- Standard File — A file.
|
| File Name |
Enter the name of the folder or file to add to the list.
Ensure that the name exactly matches the folder or file that you want to specify. For Directory items, include the / (forward slash).
For example, if File Type is Directory and you want to add a folder abc that is under the root folder of a web site, enter /abc.
You can restrict the filter condition to a specific file by including file path information in File Name. For example, a web site contains many files with the name 123.txt. To specify the instance located in the abc folder only, enter /abc/123.txt.
|
4. Repeat the filter member creation steps until the list contains all the required folder and file names.
Accepting or reverting changed files
The anti-defacement feature maintains a list of files that have changed for each web site it monitors. You can use this list to review, accept, and revert the changes.
To restore all the web site files, see Reverting a defaced web site.
Alternatively, to automatically acknowledge all changes to files (for example, if you are updating the web site), use the Acknowledge Changed File Automatically setting in the web site's anti-defacement configuration.
To accept or revert changed files
1. Go to Web Protection > Web Anti-Defacement > Anti‑Defacement, and then, for the appropriate web site, click the value in the Total Changed column.
2. Do one of the following:
- Click Acknowledge All to accept all the file changes in the list.
FortiWeb clears the list.
- Select an item in the list, and then click Acknowledge to accept the individual change.
FortiWeb clears the item from the list.
- Select an item in the list, and then click the Revert icon. In the list of previous versions, click the Revert icon for the version to revert to. (FortiWeb adds this revert action as a new version in the list.)
Reverting a defaced web site
When you configure a FortiWeb appliance to protect a web site via anti-defacement, FortiWeb periodically downloads a backup copy of that web site’s files automatically. It creates a new backup revision in the following cases:
- When the FortiWeb appliance initiates monitoring for the first time, the FortiWeb appliance downloads a backup copy of the web site’s files and store it as the first revision.
|
|
Backup copies omit files that exceed the file size limit or match the file extensions that you have configured the FortiWeb appliance to omit. See Anti-defacement. |
- If the FortiWeb appliance could not successfully connect during a monitor interval, it creates a new revision the next time that it re-establishes the connection.
If you do not enable Restore Changed Files Automatically, you can still manually revert the defaced web site after a defacement attack to any known good backup revision that the FortiWeb appliance has downloaded.
To revert a web site to a backup revision
1. Go to Web Protection > Web Anti-Defacement > Anti-Defacement.
2. Mark the check box next to the web site you want to revert, click the Revert icon.
A dialog appears, listing previous site backup copies.
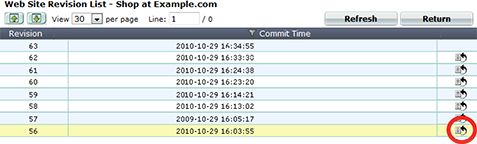
3. In the row corresponding to the copy that you want to restore, click the Revert to this time icon.
The FortiWeb appliance connects to the web server and replaces defaced files from the revision you selected.
4. Click OK.
Open topic with navigation