You can restrict file uploads based upon file type and size.
Detection and restriction are performed by scanning Content-Type: and Content‑Length: headers in HTTP PUT and POST request methods submitted to your web servers.
For example, if you want to allow only specific types of files (MP3 audio files, PDF text files and GIF and JPG picture files) to be uploaded to:
http://www.example.com/upload.php
create a file upload restriction policy that contains rules that define only those specific file types. When FortiWeb receives an HTTP PUT or POST request for the /upload.php URL with Host: www.example.com, it scans the HTTP request and allows only the specified file types to be uploaded. FortiWeb blocks file uploads for any HTTP request that contains non-specified file types.
1. Go to Web Protection > Input Validation > File Upload Restriction Rule.
To access this part of the web UI, your administrator’s account access profile must have Read and Write permission to items in the Web Protection Configuration category. For details, see Permissions.
2. Click Create New.
A dialog appears.
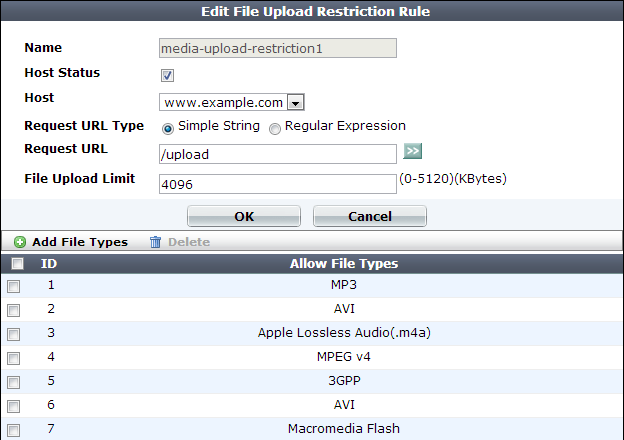
3. In Name, type a unique name that can be referenced by other parts of the configuration. Do not use spaces or special characters. The maximum length is 35 characters.
4. If you want to apply this file upload restriction rule only to requests for specific web hosts:
Disable Host Status to match the file upload restriction rule based upon the other criteria, such as the URL, but regardless of the Host: field
5. In Request URL, type the literal URL, such as /upload.php, to which the file upload restriction applies. The URL must begin with a slash ( / ).
Do not include the name of the host, such as www.example.com, which is configured separately in the Host drop-down list.
6. In File Upload Limit, type a number to represent the maximum size in kilobytes for any individual file. The upload rule rejects allowed files larger than this number. The valid range is from 0 to 5,120 KB (5 MB).
7. Click OK.
8. To add or remove file types, click Add File Types.
A dialog appears.
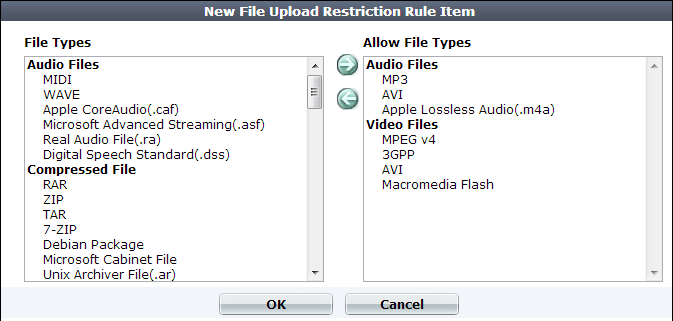
9. In the File Types pane, select the file types to allow, then click the right arrow (->) to move them to the Allow Files Types pane.
|
|
Microsoft Office Open XML file types such as .docx, xlsx, .pptx, and .vsdx are a type of ZIP-compressed XML. If you specify restrictions for them, those signatures will take priority. However, if you do not select a MSOOX restriction but do have an XML or ZIP restriction, the XML and ZIP restrictions will still apply, and the files will still be restricted. |
10. Click OK.
11. Go to Web Protection > Input Validation > File Upload Restriction Policy.
To access this part of the web UI, your administrator’s account access profile must have Read and Write permission to items in the Web Protection Configuration category. For details, see Permissions.
12. Click Create New.
A dialog appears.
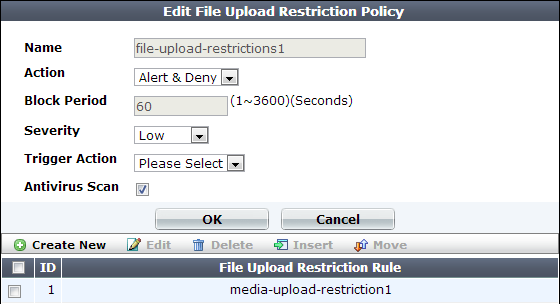
13. Configure these settings:
| Setting name | Description |
|---|---|
| Name | Type a unique name that can be referenced in other parts of the configuration. Do not use spaces or special characters. The maximum length is 35 characters. |
| Action |
Select which action the FortiWeb appliance will take when it detects a violation of the rule:
The default value is Alert. Caution: This setting will be ignored if Monitor Mode is enabled. Note: Logging and/or alert email will occur only if enabled and configured. See Logging and Alert email. Note: If you will use this rule set with auto-learning, you should select Alert. If Action is Alert & Deny, or any other option that causes the FortiWeb appliance to terminate or modify the request or reply when it detects an attack attempt, the interruption will cause incomplete session information for auto-learning. |
| Block Period |
Type the number of seconds that you want to block subsequent requests from the client after the FortiWeb appliance detects that the client has violated the rule. This setting is available only if Action is set to Period Block. The valid range is from 1 to 3,600 (1 hour). The default value is 1. See also Monitoring currently blocked IPs. |
| Severity |
When rule violations are recorded in the attack log, each log message contains a Severity Level (
The default value is High. |
| Trigger Action | Select which trigger, if any, that the FortiWeb appliance will use when it logs and/or sends an alert email about a violation of the rule. See Viewing log messages. |
| Antivirus Scan |
Enable to scan for trojans. Also enable the signatures (Trojans) and configure the antivirus-specific Action, Block Period, Severity, and Trigger Action (see Blocking known attacks & data leaks). Attackers often modify HTTP header so that the request’s |
14. Click OK.
15. Click Create New to include a rule in the set.
A dialog appears.

16. From the File Upload Restriction Rule drop-down list, select an existing file upload restriction rule that you want to use in the policy.
To view or change the information associated with the item, select the Detail link. The File Upload Restriction Rule dialog appears. Use the browser Back button to return.
17. Click OK.
18. Repeat the previous steps for each rule that you want to add to the file upload restriction policy.
19. To apply the file upload restriction policy, select it in an inline or offline protection profile (see Configuring a protection profile for inline topologies or Configuring a protection profile for an out-of-band topology or asynchronous mode of operation).