GCP Collector Deployments
This Case covers the situation where your Collectors are deployed on GCP.
To use the Collector HA feature with GCP, after configuring your collectors, you will need to create an instance group, create a load balancer, and apply the instance group, check and configure the load balancer so FortiSIEM can monitor and report the load balancer's health status. The final step is to add the load balancer to your FortiSIEM configuration so High Availability is achieved via load balancing mechanisms.
During normal operations:
-
Logs sent to the Load Balancer are distributed among the Collectors in the Cluster.
-
FortiSIEM Supervisor node distributes event pulling and performance monitoring jobs among all Collectors in the Cluster.
-
Job distribution is handled via Round Robin.
If a Collector goes down, then:
-
Load Balancer will skip the failed Collector and distribute logs among other Collectors.
-
FortiSIEM Supervisor node will automatically re-distribute event pulling and performance monitoring jobs previously assigned to the failed Collector, to other Collectors in the Cluster.
- Step 1 - Configure Collectors
- Step 2 - Create Instance Group
- Step 3 - Create Load Balancer
- Step 4 - Check Load Balancer
- Step 5 - Configure Load Balancer to Report Health Status
- Step 6 - Configure Collector HA Group Via Load Balancer
Step 1 - Configure Collectors
Configure Collectors as normal.
Step 2 - Create Instance Group
- Go to the Instance Group page - https://console.cloud.google.com/compute/instanceGroups?_ga=2.213011796.1727950196.1712175609-895679178.1667947390
- Click CREATE INSTANCE GROUP.
- In the left pane, select New unmanaged instance group.
- In the Name field, enter a name for the instance group.
- From the Location drop-down list, select a region.
- From the Zone drop-down list, select a zone.
- From the Network drop-down list, select default.
- From the Subnetwork drop-down list, select default.
- From the VM instances drop-down list, select the collectors you wish to include as part of your Collector HA group.
- Under Port mapping, click + ADD PORT.
- In the Port name 1 field, enter a name for the port.
- In the Port numbers 1 field, confirm "514" appears. If it isn't, input 514.
- Click CREATE.

Your Instance Group is now created, and you can go to the next step to create a load balancer.
Step 3 - Create Load Balancer
Reference: https://cloud.google.com/load-balancing/docs/https/ext-https-lb-simple#load-balancer
To create a load balancer, take the following steps.
- Use https://console.cloud.google.com/net-services/loadbalancing/list?_ga=2.221907288.1727950196.1712175609-895679178.1667947390.
or
Navigate to Network services > Load balancing . - Click +CREATE LOAD BALANCER.
- Under Type of load balancer, select Network Load Balancer (TCP/UDP/SSL), then click NEXT.

- Under Proxy or passthrough, select Passthrough load balancer, and click NEXT.

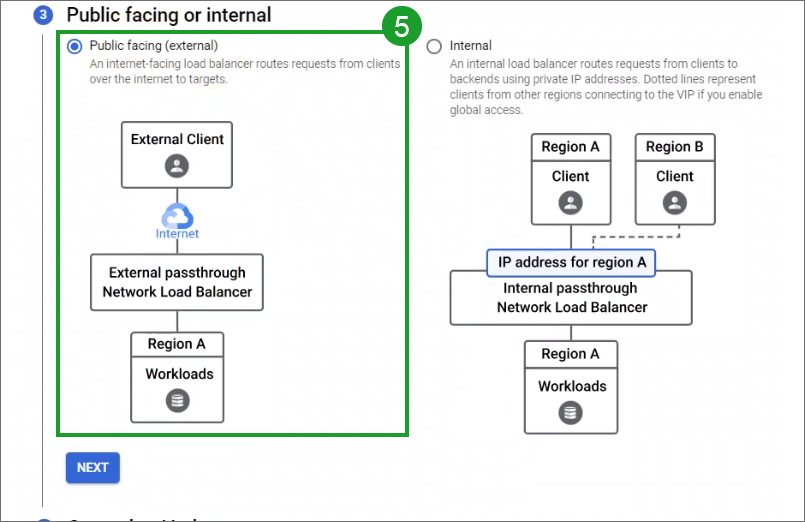
- Under Public facing or internal, select Public facing (external) and click NEXT.

- Click CONFIGURE.

- In the Load Balancer name field, enter a name for the load balancer.
- From the Region drop-down list, select a region.
- From the Backend configuration column, take the following steps.
- From the Protocol drop-down list, select L3 (Multiple protocols).
- From the Instance group drop-down list, select the instance group you created in Create Instance Group, and click DONE.

- Click the Health check drop-down list.
- Click CREATE A HEALTH CHECK.
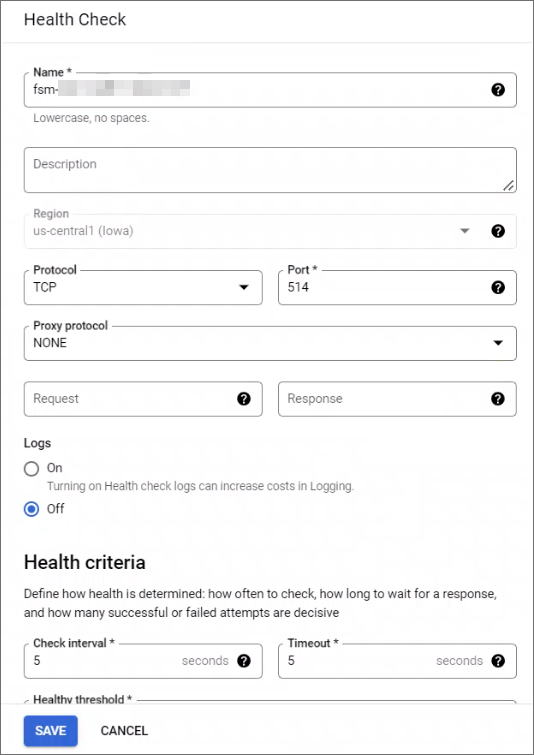
- From the Health Check window, take the following steps.
- In the Name field, enter a name for the health check.
- From the Protocol drop-down list, select TCP.
- In the Port field, enter "514".
- Click SAVE.

- Select Frontend configuration.
- From the Protocol drop-down list, select L3 (Multiple protocols).
- Click DONE.

- Click Review and finalize. You can review your configuration.
- Click CREATE.

Step 4 - Check Load Balancer
Select your load balancer and confirm whether Collectors can receive data from Load balancer external IP. This IP address is displayed under the IP:Port column in the Frontend table. This is also the IP address you will need to use when configuring Collector HA in FortiSIEM.

Step 5 - Configure Load Balancer to Report Health Status
- Go to your VM instances, using https://console.cloud.google.com/compute/instances?_ga=2.191581290.1727950196.1712175609-895679178.1667947390/.
- Select a Collector instance that you intend to use as part of your HA Collector group.
- Shut down the instance, then click EDIT.
Note: The instance must be shut down in order to edit.
- Navigate to Access scopes, and locate Compute Engine.
- From the Compute Engine drop-down list, select Read Only.

- Click SAVE.
- Repeat steps 2-6 for any additional collectors that are part of your load balancer.
After all your collectors have Compute Engine configured to Read Only, your load balancer is now ready to report its health status. - Go to Configure Collector HA Via Load Balancer for FortiSIEM configuration.
Step 6 - Configure Collector HA Group Via Load Balancer
To create a new Collector High Availability configuration, take the following steps:
- Navigate to ADMIN > Settings > System > Cluster Config.
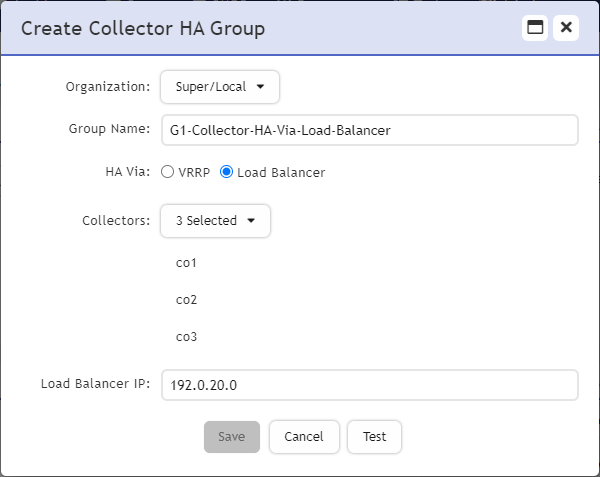
- Under Collector High Availability, click New. The Create Collector HA Group window appears. Take the following steps.
- From the Organization drop-down list, select your Organization.
- In the Group Name field, enter the name of your Collector group.
- From HA Via, select Load Balancer.
- From the Collectors drop-down list, select the Collectors to include in the group.
Note: The available Collectors displayed are those from the same Organization selected earlier. - In the Load Balancer IP field, enter the Load Balancer frontend IP address.
- Click Test to confirm it is working correctly. If it succeeds, proceed to the next step.
- Click Save.

