Configuring ClickHouse Based Deployments
This section covers the following topics.
ClickHouse Configuration Overview
It may be helpful to review the concepts in ClickHouse Operational Overview and the ClickHouse Sizing Guide. First you need to design your ClickHouse Online Cluster and the role of supervisor and worker nodes. There are 3 cases:
-
Small deployments: All-in-one deployment using Supervisor Virtual Machine or a hardware appliance like FortiSIEM 2000G or 3500G.
-
Medium sized deployments: Supervisor is a member of Keeper Cluster but not the Data Cluster. Workers are members of both Keeper and Data Clusters.
-
Large deployments: Supervisor is not a part of Keeper or Data Clusters. Workers entirely form the Keeper and Data Clusters.
The configuration steps involve:
-
Creating storage on Supervisor and Worker nodes depending on their role.
-
Creating a ClickHouse topology to specify the Supervisor and Worker nodes belonging to Keeper cluster and Data cluster.
Next, you need to configure the Archive, where events will be stored after the Online data stores become full. There are two options:
-
For on-premises deployments, you can use a large Warm disk tier as Archive; or real-time archive to NFS.
-
For AWS Cloud deployments, you can use AWS S3 for Archive.
After configuring the online and archive storage, you need to specify the retention policies. See How ClickHouse Event Retention Works for details.
Information on Online event database usage can be seen at Viewing Online Event Data Usage.
Information on Archive event database usage can be seen at Viewing Archive Data.
Creating ClickHouse Online Storage
Case 1: If your FortiSIEM deployment is a hardware appliance, then the appliance acts both as a Keeper node and a ClickHouse Data Node. Follow these configuration steps:
-
Navigate to ADMIN > License and click Upload to load license. For more information, refer to FortiSIEM Licensing Guide.
-
Navigate to ADMIN > Setup > Storage, and click Online to choose storage.
-
From the Event Database drop-down list, select ClickHouse.
-
The Storage Tiers and the disks will be automatically set for you. If you are running a 2000G appliance, then there will be 2 Storage Tiers and 1 disk in Hot Tier (SSD disks) and 1 disk in Warm Tier (Magnetic Disks). If you are running a 3500G appliance, then there will be 1 Storage Tier and 1 disk in Hot Tier (Magnetic Disks).
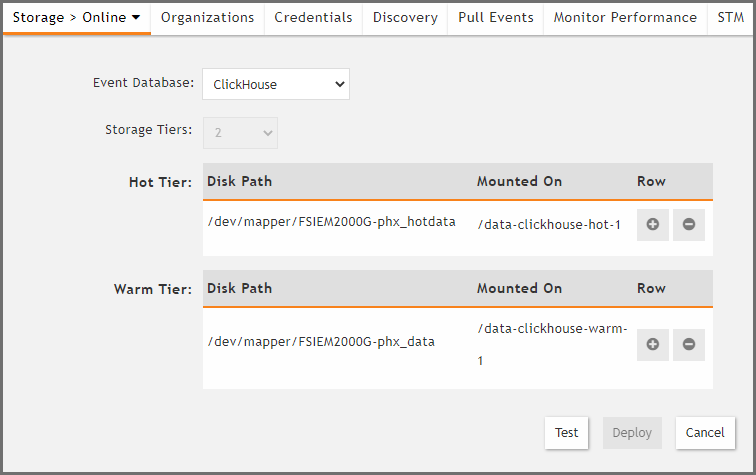
2000G Storage Setup for ClickHouse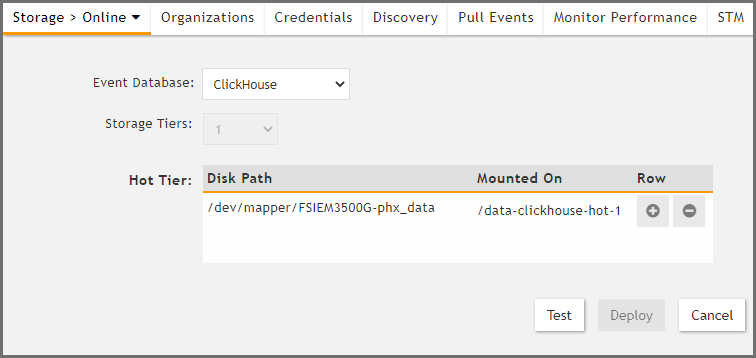
3500G Storage Setup for ClickHouse
-
Click Test.
-
Once it succeeds, then click Deploy.
-
-
The system is now ready for use.
Case 2: If your FortiSIEM deployment is an all-in-one Virtual Machine (VM), then the VM acts both as a Keeper node and a ClickHouse Data Node. Follow these configuration steps:
-
Navigate to ADMIN > License and click Upload to load license. For more information, refer to FortiSIEM Licensing Guide.
-
Navigate to ADMIN > Setup > Storage, and click Online to choose storage.
-
From the Event Database drop-down list, select ClickHouse.
- Storage Tiers: [Required] Choose 1.
-
Disk Path: [Required] Click + and add a 200GB disk path. Use one of the following CLI commands to find the disk names.
fdisk -l
or
lsblk
When using
lsblkto find the disk name, please note that the path will be ‘/dev/<disk>’. In the below example, running on KVM, the 5th disk (hot) will be ‘/dev/vde’ and the 6th disk (warm) will be ‘/dev/vdf’.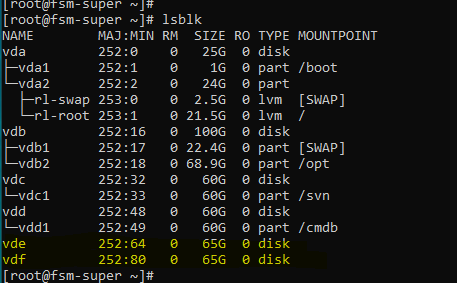
-
Click Test.
-
Once it succeeds, click Deploy.
-
-
The system is now ready for use.
Case 3: In this case, your ClickHouse deployment is a cluster deployment. This will involve creating storage for Supervisor and Worker nodes and forming Keeper and Data Clusters. It may be helpful to review the concepts in ClickHouse Operational Overview and the ClickHouse Sizing Guide before proceeding.
First, during the Supervisor node installation, take the following steps to choose ClickHouse as the Online Event Database and set up storage.
-
Navigate to ADMIN > License and click Upload to load license. For more information, refer to FortiSIEM Licensing Guide.
-
Navigate to ADMIN > Setup > Storage, and click Online to choose storage.
-
From the Event Database drop-down list, select ClickHouse.
-
If the Supervisor will be a Keeper node, then a 200GB disk is required. If Supervisor is neither a Keeper node nor a Data Node, then a small disk is still needed to store Query Results.
-
-
After configuring storage for the Supervisor node, create Worker nodes and add storage. See Adding a Worker Node for details.
Configuring ClickHouse Topology
After configuring storage, you need to set up the ClickHouse topology. This involves:
-
Selecting which Worker nodes belong to the ClickHouse Keeper cluster
-
Choosing the number of shards and the Worker nodes belonging to ClickHouse Cluster in each shard
See ClickHouse Keeper Considerations for details.
Creating ClickHouse Archive Storage
There are two options:
-
For on-premises deployments, you can use a large Warm disk tier as Archive, or you can use real-time archive to NFS.
-
For AWS Cloud deployments, you can use AWS S3 for Archive.
Case 1: To configure real-time archive using NFS, follow these steps:
-
Go to ADMIN > Setup > Storage.
-
Click Archive, and select NFS.
-
Enter the following parameters:
-
IP/Host: [Required] Select IP or Host and enter the IP address/Host name of the NFS server.
-
Exported Directory: [Required] Enter the file path on the NFS Server which will be mounted.
-
-
Click Test.
-
If the test succeeds, click Deploy.
Case 2: To configure AWS S3 for Archive, follow these steps:
-
Go to ADMIN > Setup > Storage.
-
Click Archive, and select AWS S3.
-
For Credential Type, select Environmental Credentials or Explicit Credentials.
-
If Environmental Credentials is selected, you will need to have an Identity and Access Management. Follow the instructions in Creating IAM Policy for AWS S3 Explicit Credentials to create an IAM Policy
-
If Explicit Credentials is selected, then enter the following information:
-
Access Key ID: Access Key ID required to access the S3 bucket(s)
-
Secret Access Key: The Secret Access Key associated with the Access Key ID to access the S3 bucket(s)
-
-
-
For Buckets:
-
In the Bucket field, enter the bucket URL.
-
In the Region field, enter the region. For example, "us-east-1".
Note: To minimize any latency, enter the closest region.
-
If more Buckets are required, click + to add a new row.
-
-
Click Test.
-
If the test succeeds, click Deploy.
-
Configure each ClickHouse Worker to use the configured S3 bucket.
-
Navigate to Admin > License > Nodes, edit each Worker, check AWS S3 and choose the Bucket from the drop-down.
-
Click Test, and if the test succeeds, click Deploy.
-
-
If the Supervisor is used as ClickHouse node, take the following steps:
-
Navigate to Admin > Setup > Storage, click Online, check AWS S3 and choose the Bucket from the drop-down.
-
Click Test, and if the test succeeds, click Deploy.
-
-
Apply AWS S3 as the new storage policy to the ClickHouse cluster by taking the following steps.
-
Navigate to Admin > Settings > Database > ClickHouse Config.
-
Click Test, and if the test succeeds, click Deploy.
Implementation Notes:
-
AWS S3 buckets MUST be created prior to this configuration.
-
When storing ClickHouse data in AWS S3, Fortinet recommends turning Bucket Versioning off, or suspending it (if it was previously enabled). This is because data in ClickHouse files may change and versioning will keep both copies of data - new and old. With time, the number of stale objects may increase, resulting in higher AWS S3 costs. If versioning was previously enabled for the bucket, Fortinet recommends suspending it and configuring a policy to delete non-current versions.
-
Archive data will NOT be automatically purged by FortiSIEM or ClickHouse.
-
S3 archive folder will not be generated until the worker performs its first archive into S3.
Creating IAM Policy for AWS S3 Explicit Credentials
Take the following steps from your AWS console.
-
From your EC2 Dashboard, select your instance.
-
Navigate to the IAM dashboard.
Note: You can go there by clicking the IAM button, or by clicking on Services and selecting IAM.
-
Click Policies to navigate to the Policies page, and click Create policy.
-
From the Create policy page, click the JSON tab.
-
Paste the following JSON code into the editor to configure your policy.
{ "Version":"2012-10-17", "Statement":[ { "Sid":"VisualEditor0", "Effect":"Allow", "Action":[ "s3:ListStorageLensConfigurations", "s3:ListAccessPointsForObjectLambda", "s3:GetAccessPoint", "s3:PutAccountPublicAccessBlock", "s3:GetAccountPublicAccessBlock", "s3:ListAllMyBuckets", "s3:ListAccessPoints", "s3:PutAccessPointPublicAccessBlock", "s3:ListJobs", "s3:PutStorageLensConfiguration", "s3:ListMultiRegionAccessPoints", "s3:CreateJob" ], "Resource":"*" }, { "Sid":"VisualEditor1", "Effect":"Allow", "Action":"s3:*", "Resource":[ "arn:aws:s3:::demo-bucket", "arn:aws:s3:::demo-bucket/*" ] } ] } -
Click the Next: Tags button.
Note: Tags does not need to be configured.
-
Click the Next: Review button.
-
On the Create policy page, in the Name field, enter a name for the policy.
-
Click the Create policy button. Your policy has been created.
-
Navigate back to the IAM dashboard and click Roles, and click Create role.
-
For Select trusted entity, select AWS service.
-
Under Use case, select EC2.
-
Click Next, and then click Next again.
-
On the Name, review, and create page, in the Role name field, enter a name for the role.
-
Under Step 2: Add permissions, click the Edit button, and select the policy you created earlier, and click Next.
-
Click Create role.
-
Navigate to the Instances page, select your instance and click the Security tab.
-
Click Actions (located upper left), and select Security > Change security groups > Modify IAM role.
-
Select the role you just created, and click Update IAM role.
Copyright © 2024 Fortinet, Inc. All Rights Reserved. | Terms of Service | Privacy Policy
