External Authentication Settings
The following section describes the procedure to configure External Authentication Settings:
- General Configuration Information
- Adding External Authentication Settings
- Modifying External Authentication Settings
General Configuration Information
Once one or more authentication server profiles have been defined, users of the system can be configured to be authenticated locally against FortiSIEM, or by one or more of these external authentication services.
To configure a user for external authentication, select that user from the CMDB > Users screen, and select External as the authentication mode (See Adding Users/Editing User Information for more details). If more than one authentication profile is associated with a user, then the servers will be contacted one by one until a connection to one of them is successful. Once a server has been contacted, if the authentication fails, the process ends, and the user is notified that the authentication failed.
See Setup External Authentication Profiles for LDAP, Radius, and Okta general configuration steps.
Adding External Authentication Settings
Prerequisites
The following sections provide prerequisites steps before setting up external authentication in FortiSIEM.
Note: RADIUS and Okta follow the same authentication set up process.
- Adding Users from Active Directory via LDAP
- Adding Users from Okta
- Configuring FortiSIEM for SAML Overview
- Adding 2-Factor Authentication via Duo Security
- Authenticating Users Against FortiAuthenticator (FAC) via RADIUS
Adding Users from Active Directory via LDAP
If you want to add users to your FortiSIEM deployment from an Active Directory server over LDAP, you must first add the login credentials for your server and associate them to an IP range, and then run the discovery process on the Active Directory server. If the server is discovered successfully, then all the users in that directory will be added to your deployment. You then must set up an authentication profile, which will become an option you can associate with users as described in Adding Users.
- Creating Login Credentials and Associate with an IP Address
- Discovering the Active Directory Server and Users
- Creating External Authentication Profile
- Updating User Information for External Authentication
Creating Login Credentials and Associating with an IP Address
- Log in to your Supervisor node.
- Go to ADMIN > Setup > Credentials.
- Click New.
- Enter a Name.
- For Device Type, select Microsoft Windows.
- Select your Access Protocol.
FortiSIEM supports these LDAP protocols: - For Used For, select Microsoft Active Directory.
- For Base DN, enter the root of the LDAP user tree.
- Enter the NetBIOS/Domain for your LDAP directory.
- Enter the User Name for your LDAP directory.
For user discovery from OpenLDAP, specify the full DN as the user name. For Active Directory, use your server login name. - Enter and confirm the Password for your User Name.
- Click Save.
Your LDAP credentials will be added to the list of Credentials. - Under Enter IP Range to Credential Associations, click Add.
- Select your LDAP credentials from the list of Credentials. Click + to add more.
- Enter the IP/IP Range or host name for your Active Directory server.
- Click Save.
Your LDAP credentials will appear in the list of credential/IP address associations. - Click Test > Test Connectivity to make sure you can connect to the Active Directory server.
| Protocol | Settings |
|---|---|
| LDAP | [Required] IP Host - Access IP for LDAP Port - Non-secure version on port 389 |
| LDAPS | [Required] IP Host - Access IP for LDAPS Port - Secure version on port 636 |
| LDAP Start TLS | [Required] IP Host - Access IP for LDAP Start TLS Port - Secure version on port 389 |
Discovering the Active Directory Server and Users
- Go to ADMIN > Setup > Discovery.
- Click New.
- For Name, enter Active Directory.
- For Include Range, enter the IP address or host name for your Active Directory server.
- Leave all the default settings, but clear the Discover Routes under Options.
- Click OK.
Active Directory will be added to the list of discoverable devices. - Select the Active Directory device and click Discover.
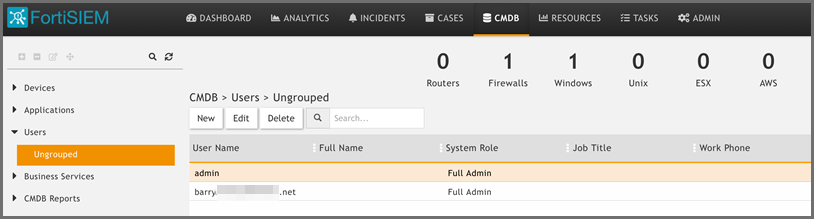
- After discovery completes, go to CMDB > Users to view the discovered users.
You may need to click Refresh for the user tree hierarchy to load.
Creating External Authentication Profile
For a User to use Active Directory for authentication to FortiSIEM, an External Authentication profile needs to be associated with the User. Take the following steps.
- Navigate to Admin > Settings > General > External Authentication.
- Click New.
- In the Name field, enter a name for the External Authentication Profile.
- From the Organization drop-down list, select the org.
- From the Protocol drop-down list, select the appropriate LDAP (LDAP, LDAPS, LDAPTLS).
- In the IP/Host field, enter the IP address or host name for your Active Directory server.
- In the Port field, enter the port number used for your LDAP protocol if different from the default.
- Select the Check Certificate checkbox if required.
- Select the Set Base DN checkbox if required, and in the Base DN field, enter/paste the Base DN. Setting the DN pattern manually is not necessary if the user is discovered via LDAP. However, this feature allows you to manually override the discovered pattern, or enter it for a user that is being manually created. Enter
%sto represent the user's name (CN/uid), for example:CN=%s,CN=Users,DC=accelops,DC=com - Click Save.
Updating User Information for External Authentication
Take the following steps to configure external authentication for a user.
- Navigate to CMDB > Users, and select your user.
- Click Edit.
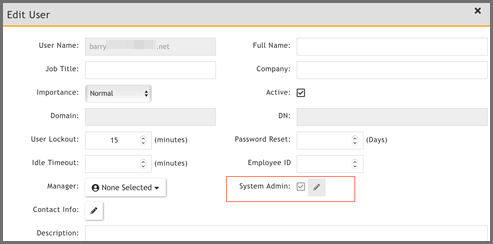
- Click the System Admin field to open the New User window.
- From the Mode drop-down list, select External.
- From the Authentication Profiles drop-down list, select your authentication profile that you created under your External Authentication profile.
- From the Default Role drop-down list, select the appropriate user role and check the appropriate organization checkboxes the user is enabled for.
- Click Back.
- Click Save.
Adding Users from Okta
Follow the procedures below to add users from Okta.
Configuring Okta Authentication
To use Okta authentication for your FortiSIEM deployment, you must set up a SAML 2.0 Application in Okta, and then use the certificate associated with that application when you configure external authentication.
- Log into Okta.
- In the Applications tab, create a new application using Template SAML 2.0 App.
- Under Settings, configure the settings similar to the table below:
Post Back URL Post Back URL Application label FortiSIEM Demo Force Authentication Enable Post Back URL https://<FortiSIEMIP>/phoenix/okta Name ID Format EmailAddress Recipient FortiSIEM Audience Restriction Super authnContextClassRef PasswordProtectedTransport Response Signed Assertion Signed Request Uncompressed Destination https://<FortiSIEMIP>/phoenix/okta - Click Save.
- In the Sign On tab, click View Setup Instructions.
- Click Download Certificate.
- Follow the instructions above and enter the downloaded certificate for Okta authentication.
Creating an Okta API Token
- Log in to Okta using your Okta credentials.
- Got to Administration > Security > API Tokens.
- Click Create Token.
You will use this token when you set up the Okta login credentials in the next section. Note that this token will have the same permissions as the person who generated it.
Creating Login Credentials and Associating Them with an IP Address
- Log in to your Supervisor node.
- Go to ADMIN > Setup > Credentials.
- Click New.
- Enter a Name.
- For Device Type, select OKTA.com OKTA.
- For Access Protocol, select OKTA API.
- Enter the Pull Interval in minutes.
- Enter the Domain associated with your Okta account.
For example,FortiSIEM.okta.com. - Enter and reconfirm the Security Token you created.
- Enter any related information in Description.
- Click Save.
Your Okta credentials will be added to the list of Credentials. - Under Enter IP Range to Credential Associations, click New.
- Enter the IP/IP range or host name for your Okta account.
- Select your Okta credentials from the list of Credentials. Click + to add more.
- Click Save.
Your Okta credentials will appear in the list of credential/IP address associations. - Click Test > Test Connectivity to make sure you can connect to the Okta server.
Discovering Okta Users
If the number of users is less than 200, then Test Connectivity will discover all the users. Okta API has some restrictions that do not allow FortiSIEM to pull more than 200 users. In this case, follow these steps:
- Log in to Okta.
- Download user list CSV file (OktaPasswordHealth.csv) by visiting Admin > Reports > Okta Password Health.
- Rename the CSV file to
all_user_list_%s.csv. (%sis the placeholder of token obtained in Create an Okta API Token - Step 3, e.g.all_user_list_00UbCrgrU9b1Uab0cHCuup-5h-6Hi9ItokVDH8nRRT.csv). - Log in to FortiSIEM Supervisor node:
- Upload CSV file
all_user_list_%s.csvto this directory/opt/phoenix/config/okta/ - Make sure the permissions are
adminandadmin(Runchown -R admin:admin /opt/phoenix/config/okta/) - Go to ADMIN > Setup > Credentials > Enter IP Range to Credential Associations.
- Select the Okta entry and run Test > Test connectivity to import all users.
- Upload CSV file
Configuring FortiSIEM for SAML Overview
In SAML authentication, there are 3 entities:
-
Identity Provider (IDP) - this is where user authentication happens. There are many examples, OKTA, Entrust, etc...
-
IDP Portal - this is where you define users and credentials for your IDP and Service Providers.
-
Service Provider (SP) - this is where the user logs on after authentication succeeds, e.g. FortiSIEM in this case.
After configuration, the flow is as follows:
-
The user authenticates on to the IDP Portal.
-
The user clicks a FortiSIEM icon on the IDP Portal.
-
IDP sends a SAML response to FortiSIEM containing the User, Org, and Role. User and Org are required, while Role is optional.
-
FortiSIEM trusts the IDP and logs in the User with the right Org and Role (if applicable).
To ensure SAML works correctly, the following must be done.
-
Define URLs and credentials in IDP Portal and FortiSIEM so that they can securely communicate with each other.
-
Map the User, Org, and Role in the IDP Portal to the User, Org, and Role in FortiSIEM. The User must be an exact match, including case-sensitivity. For Org and Role, you can define mappings in FortiSIEM for IDP Org to FortiSIEM Org and IDP Role to FortiSIEM Role.
The following is a detailed example showing the steps required for configuration. This example assumes a FortiSIEM user has already been created in an IDP Portal.
Step 1 - Preparation
-
Configure your IDP for the specific User, Organization, and Role. Collect IDP Portal endpoint and certificate.
-
Study the SAML Response from your IDP and determine where to find the User, Org, and Role. Typically, the User is in the NameIdentifier element of the Subject statement. Org is in the Audience element of AudienceRestriction.
This step is different for every IDP vendor. See the representative examples below for Okta.com and samltest.idp website. In OKTA.com, there is no Role information. However, the samltest.idp website allows you to define a role.
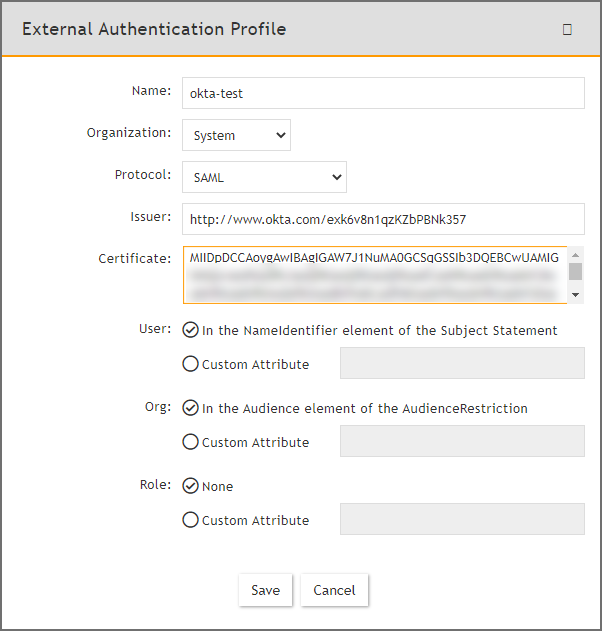
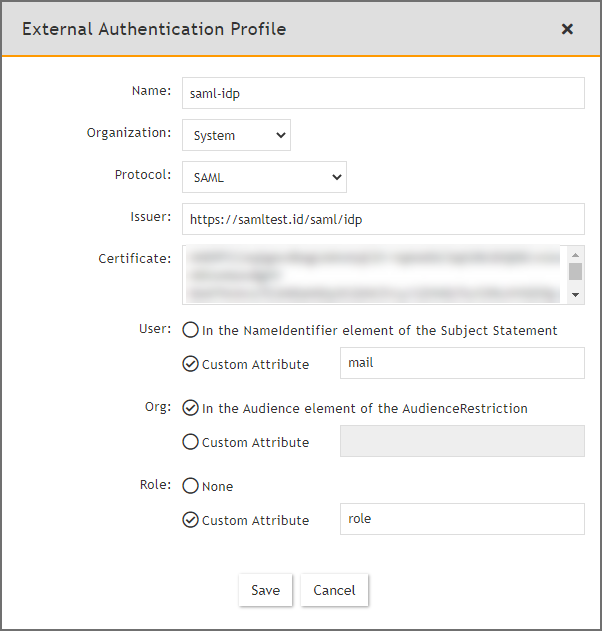
Step 2 - Create External Authentication Profile in FortiSIEM
-
Log on to FortiSIEM as Admin.
-
Go to ADMIN > Settings > General > External Authentication.
-
Click New to create an External Authentication profile.
-
(Service Provider Case) Set Organization to System if any User from any Org can use this profile. Otherwise, set it to the specific Org.
-
In the Protocol drop-down list, select SAML.
-
Fill in the Issuer and Certificate (credentials) fields using the information collected in Step 1A.
-
Set User to the specific field in the SAML Response containing the User information. (note - match is exact and case-sensitive). This information was gathered in Step 1B. If the User is not in the NameIdentifier element of the Subject Statement, then select Custom Attribute and enter the field containing the User information.
-
Set Org to the specific field in the SAML Response containing the Org information. This information was gathered in Step 1B. If Org is not in the Audience element of AudienceRestriction, then select Custom Attribute and enter the field containing the Org information. Matching is determined by the Role mapping rules in Step 3.
-
If Role is present in the SAML Response from the IDP, then select Custom Attribute and enter the field containing the Role information. Otherwise, select None. In the later case, you must create the User in CMDB for the specific Org, and assign the right Role. Step 3 is not needed.
-
Step 3 - Create SAML Role Mappings in FortiSIEM
This step is only needed if Role is present in the SAML Response as in Step 2Cvi. For example, OKTA does not have Role, so this step is not needed.
-
Log on to FortiSIEM as Admin.
-
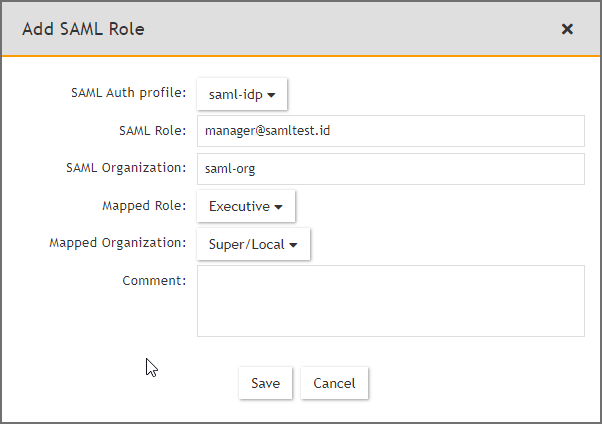
Go to ADMIN > Settings > Role > SAML Role.
-
Click New.
-
In the Add SAML Role, enter the following information.
-
From the SAML Auth profile, select the user.
-
In the SAML Role field, enter the SAML Role.
-
In the SAML Organization field, enter the SAML Organization.
-
From the Mapped Role drop-down list, select an existing role.
-
From the Mapped Organization drop-down list, select an organization.
-
(Optional) In the Comments field, enter any information you may wish to reference at a future date.
-
Click Save.
-
Step 4 - Create the User in CMDB
This step is only needed if Role is not present in the SAML Response, as in Step 2Cvi. For example, OKTA does not have Role, so this step is needed.
-
Log on to FortiSIEM as Admin.
-
Go to CMDB > Users.
-
If the SAML user is not present, then click New to create a new user.
Note: You may need to navigate to CMDB > Users > Ungrouped. -
In the User Name field, enter the name exactly as that used in Step 2Civ. The name must match exactly, including case-sensitivity.
-
Click System Admin and set the Role.
-
When done, click Save.
This procedure is described in more details in https://help.fortinet.com/fsiem/6-5-1/Online-Help/HTML5_Help/Adding_users.htm.
OKTA Example
-
Using an admin account, log into Okta (https://okta.com/)
-
Click on the Admin button.
-
Enter the Okta Verify code.
-
At the Use single sign on option, click the Add App button.
-
Click on Create New App.
-
Select SAML 2.0 and click Create.
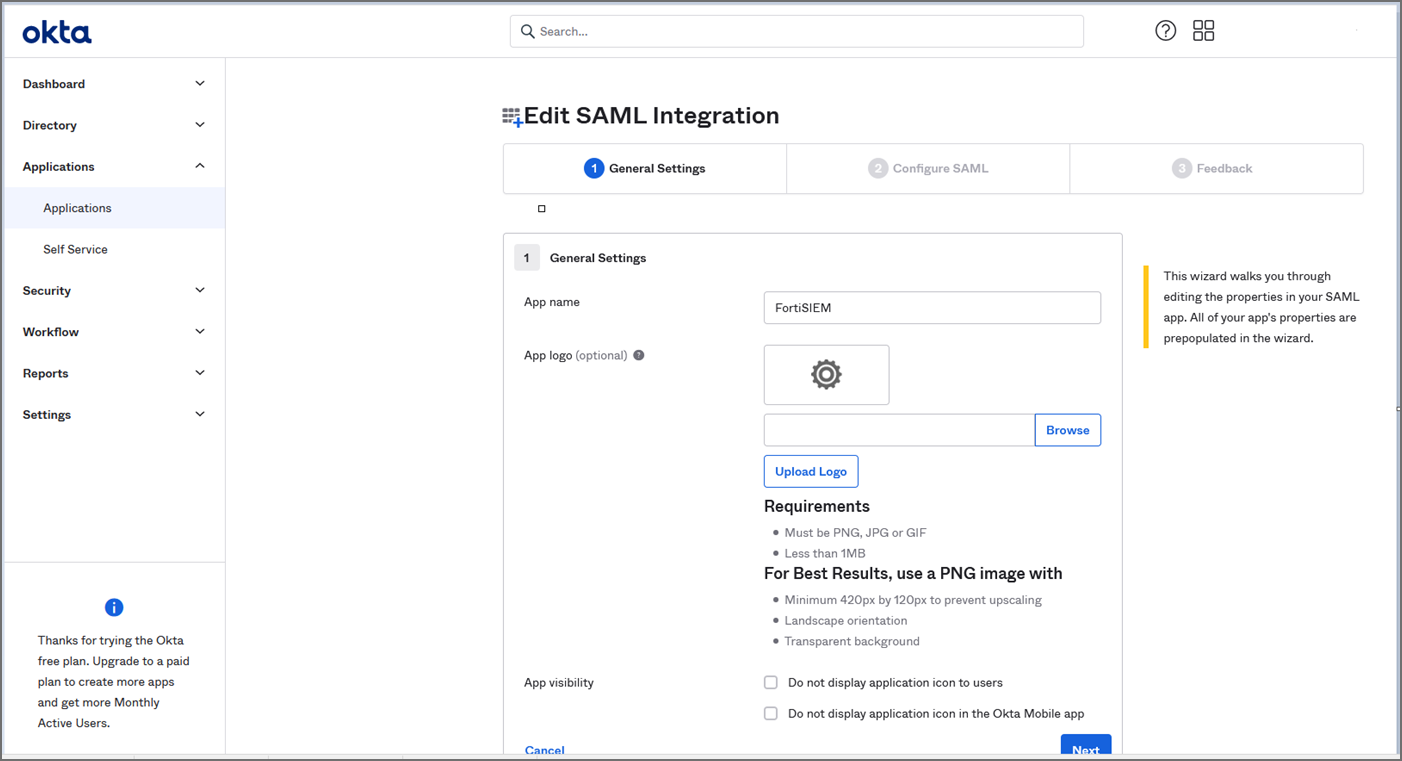
In General Settings, provide the following:
-
App name - FortiSIEM
-
App logo (optional)
-
Click Next.
-
In Configure SAML, provide the following:
-
In Single sign on URL, enter https://super_ip/phoenix/sso/saml/ExternalAuthenticationProfileName
super_ip represents the FortiSIEM IP address you want to log into, and ExternalAuthenticationProfileName will need to be configured in FortiSIEM by a full Admin creating an SAML External Authentication Profile via ADMIN > Settings > General > External Authentication. -
In the Audience URI (SP Entity ID), enter your organization name, for example "Super".
-
Click Next, then Finish. The FortiSIEM app is now being created.
-
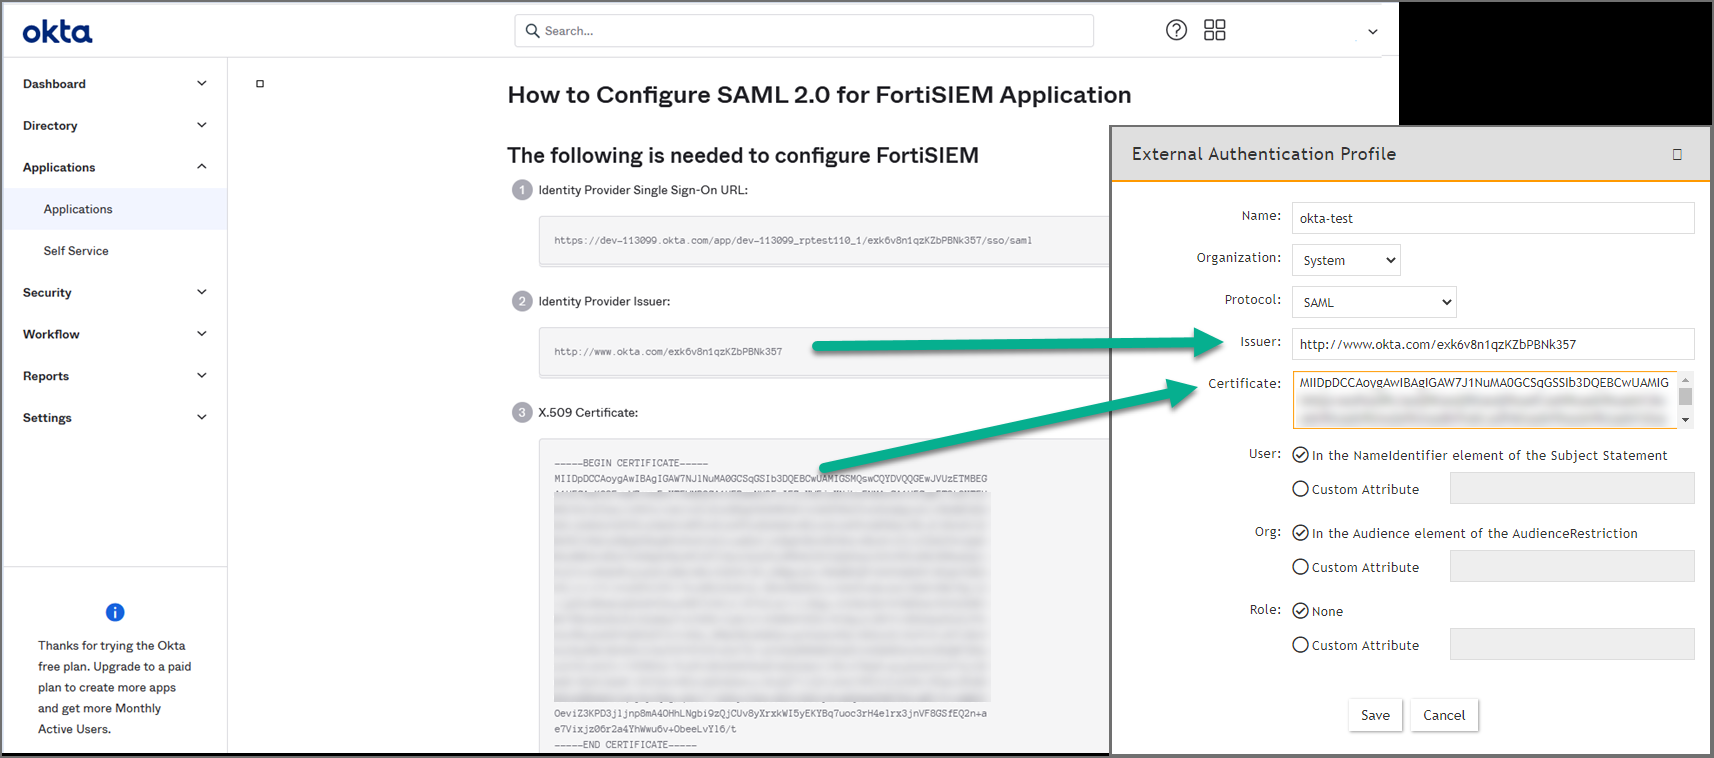
On the Okta Application page, under Sign On Settings, SAML 2.0, click View Setup Instructions.
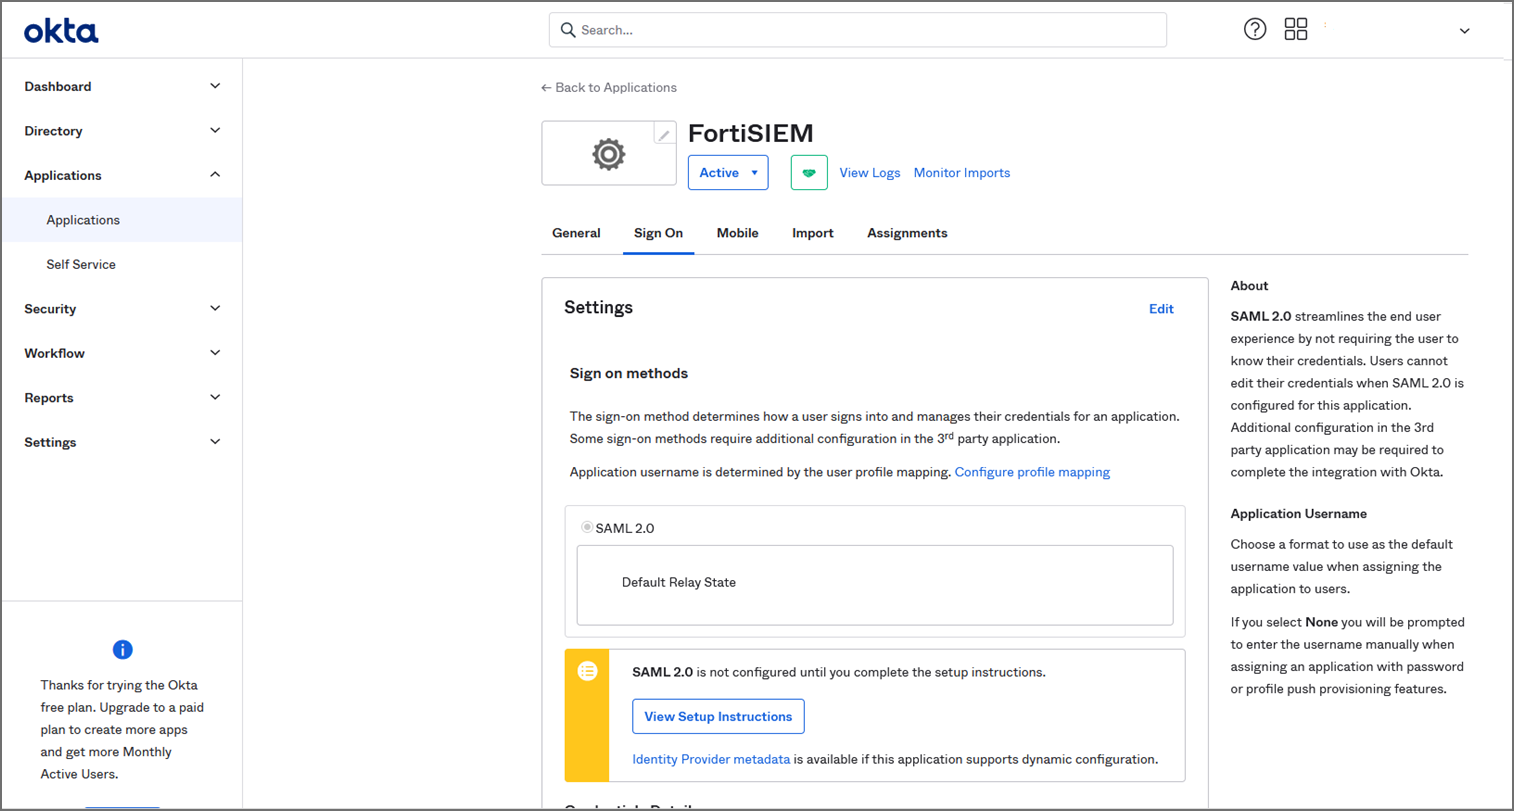
-
Copy the Identify Provider Issuer and Certificate information. When you create your External Authentication Profile in FortiSIEM, the Identify Provider Issuer will go into the Issuer field, and the Certificate information will go into the Certificate field.
-
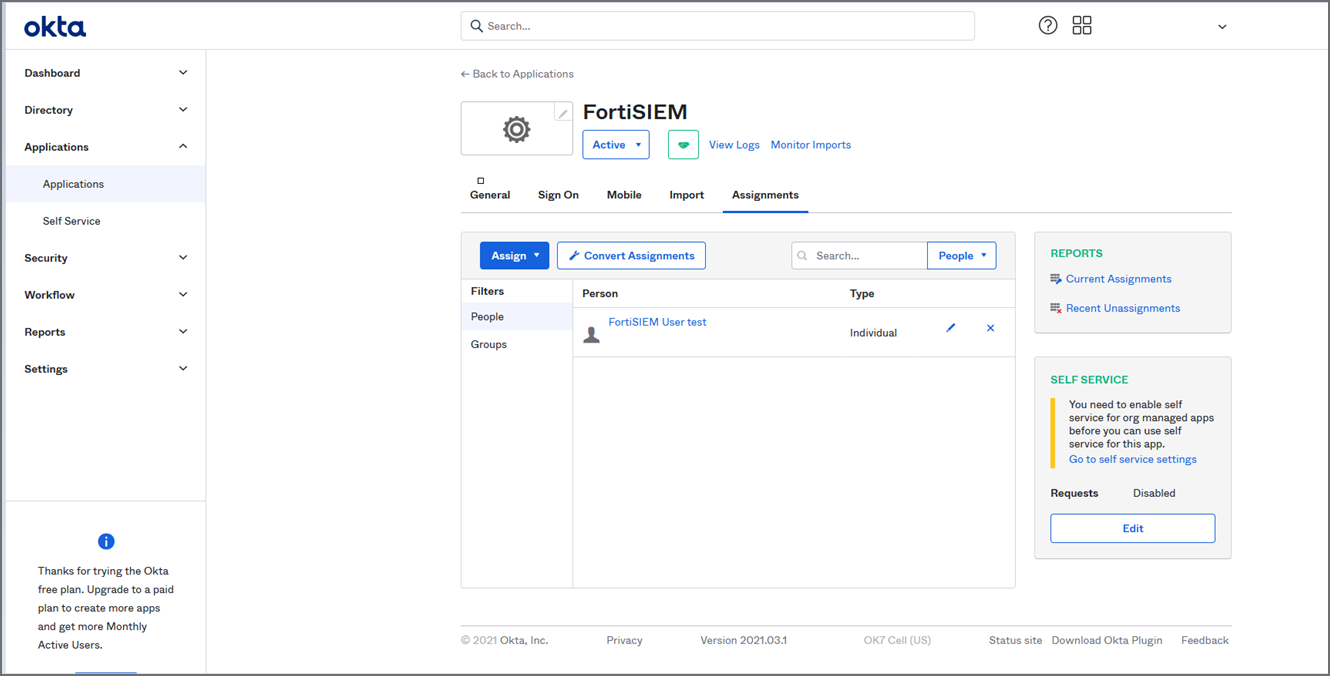
Assign the OKTA user(s) for FortiSIEM.
-
Log on to FortiSIEM as a full Admin.
-
Go to ADMIN > Settings > General > External Authentication.
-
Click New to create an External Authentication Profile.
-
From External Authentication Profile, take the following steps:
-
In the Name field, enter your ExternalAuthenticationProfileName.
-
From the Organization drop-down list, select the org.
-
From the Protocol drop-down list, select SAML.
-
In the Issuer field, enter the Identify Provider Issuer from Okta.
-
In the Certificate field, enter/paste the certificate information from Okta.
-
Configure User, and Org according to your IDP.
-
Click Save.
-
Go to CMDB > Users > Ungrouped.
-
Click New to add the Okta user.
-
In the User Name field, enter the user's Okta assigned username.
Note: You can enter the name by using an email address depending on how the user was configured in Okta. -
Click the System Admin field to open the New User window.
-
From the Mode drop-down list, select External.
-
From the Authentication Profiles drop-down list, select your Okta authentication profile that you created under your External Authentication profile.
-
From the Default Role drop-down list, select the appropriate user role and check the appropriate organization checkboxes the user is enabled for.
-
Click Back.
-
Click Save.
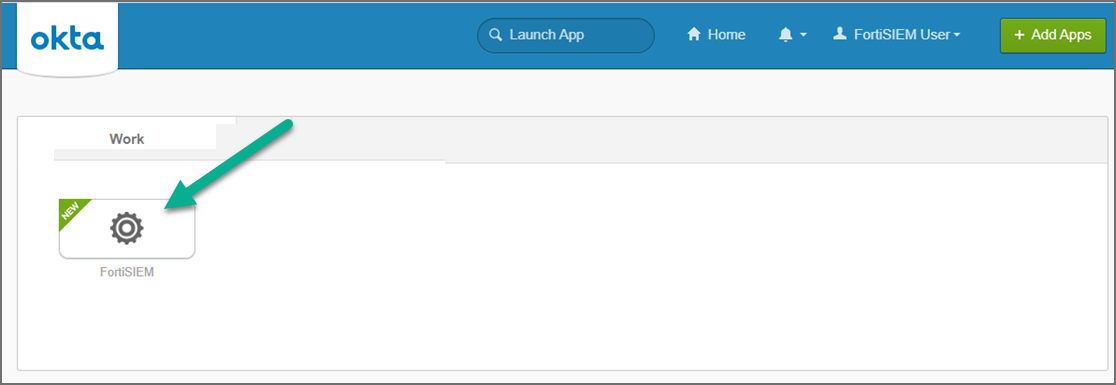
-
Log on to Okta as an assigned user for FortiSIEM. The assigned Okta user is now able to log on to FortiSIEM by clicking the FortiSIEM icon/application.
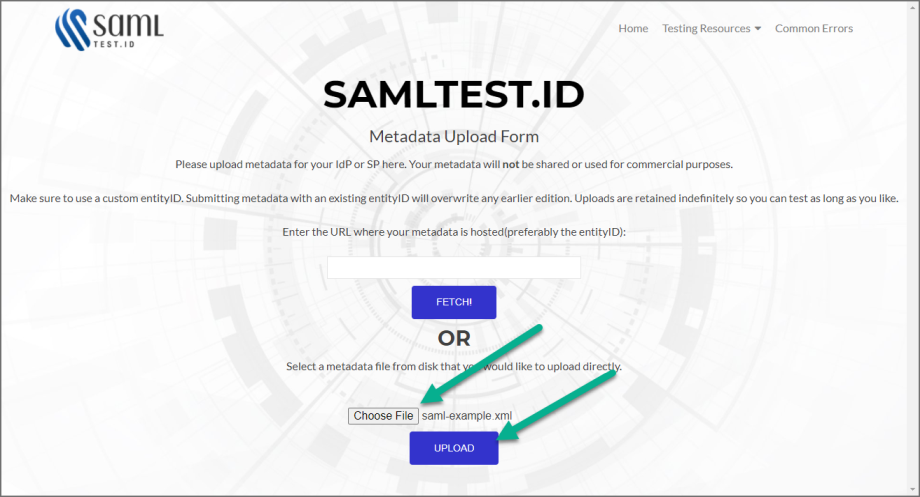
SAMLTest ID Example (https://samltest.id/)
-
Prepare a SAML.XML file.
-
Go to https://samltest.id/.
-
Click UPLOAD METADATA.
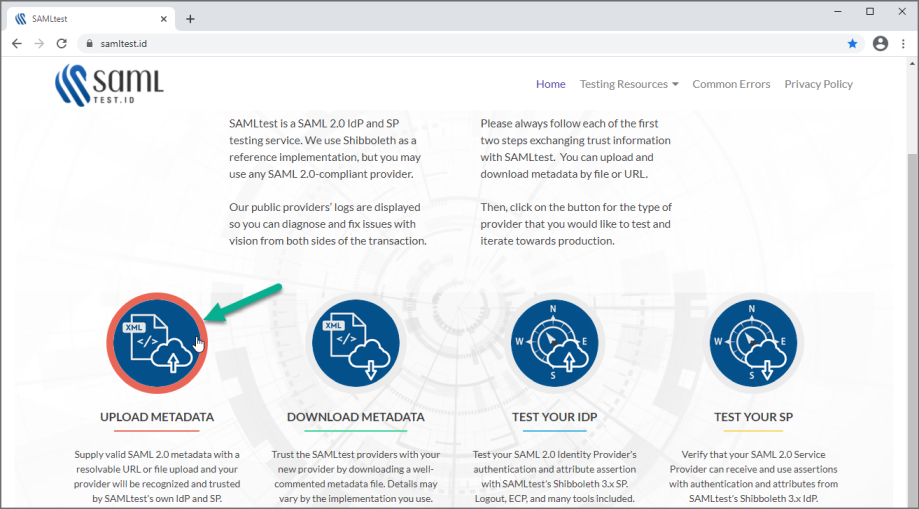
-
Click Choose File, select your SAML.XML file, and click UPLOAD. When SAMLTEST.ID reports success, proceed to the next step, otherwise check your XML file and re-upload.
-
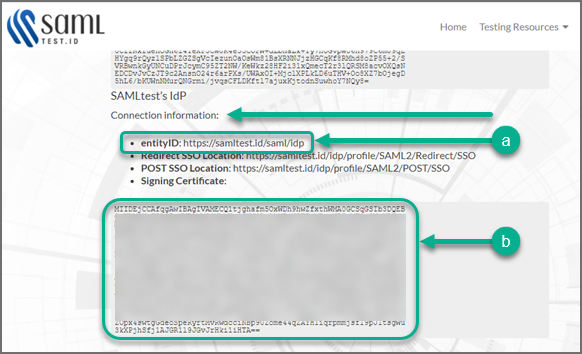
Click on Testing Resources, and select Download Metadata.
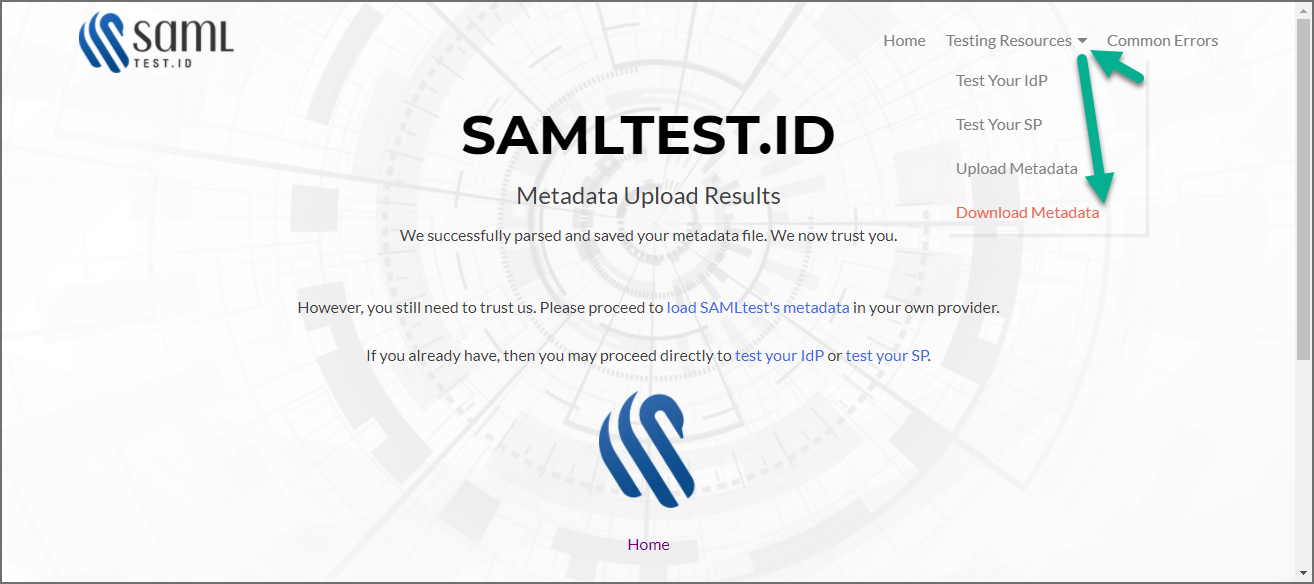
-
Scroll down until you see SAMLtest's IdP " Connection information".
-
Log on to FortiSIEM with an Admin account, and navigate to ADMIN > Settings > General > External Authentication.
-
Click New.
-
Following Step 2 - Create External Authentication Profile in FortiSIEM, in the External Authentication Profile window, fill out the required information and click Save. Mandatory settings include
-
Go to ADMIN > Settings > Role > SAML Role, click New, fill out the information and click Save. The SAML user will be added automatically in CMDB > Users once the user logs on to FortiSIEM.
-
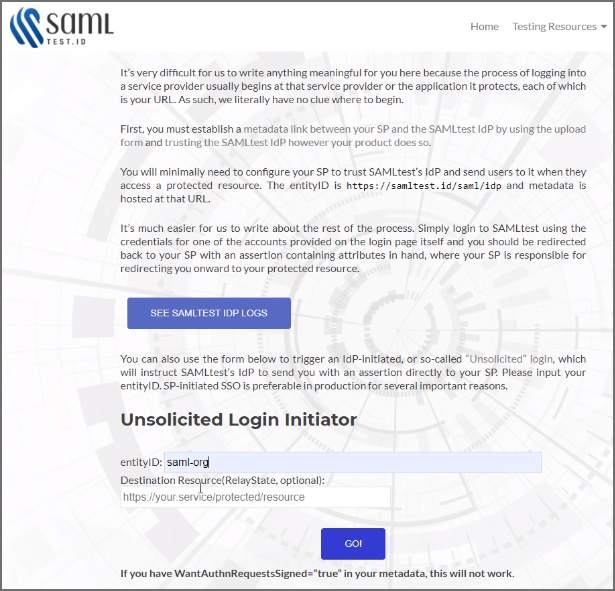
Go to https://samltest.id/ and navigate to Testing Resources > Test Your SP.
-
On the Test Your SP page, in the entityID field, enter your entityID, and click GO!.
-
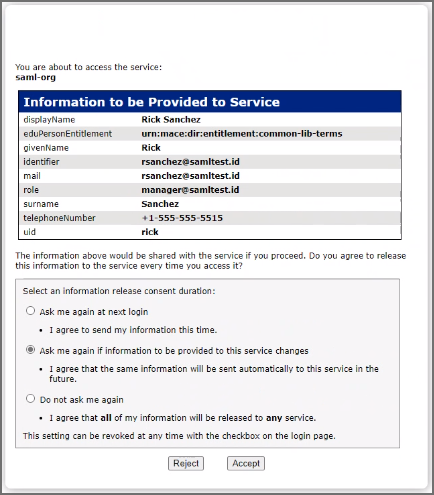
In the Username and Password fields, enter your user name and password respectively, and click LOGIN.
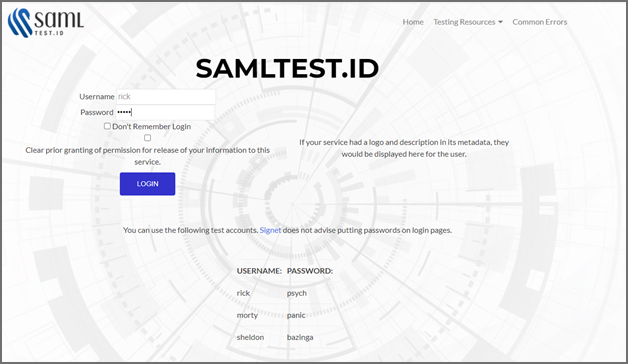
-
SAMLTEST.ID will prompt with choices for logging in. Select your choice, and click Accept to login to FortiSIEM.
FortiSIEM SAML Authentication with Azure AD
This example has the following sections:
Azure Setup
-
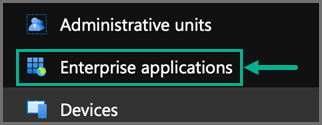
In Azure, navigate to Azure Active Directory.
-
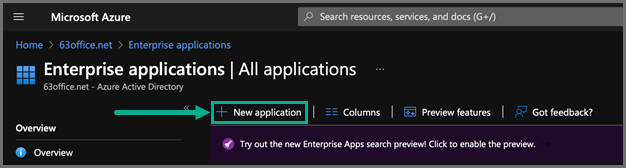
Navigate to Enterprise applications.
-
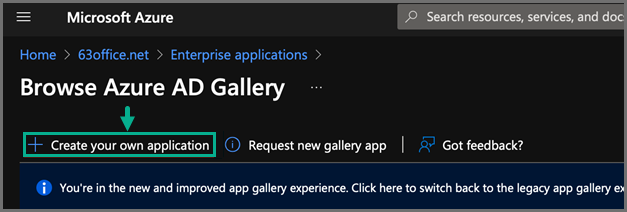
Select New application.
-
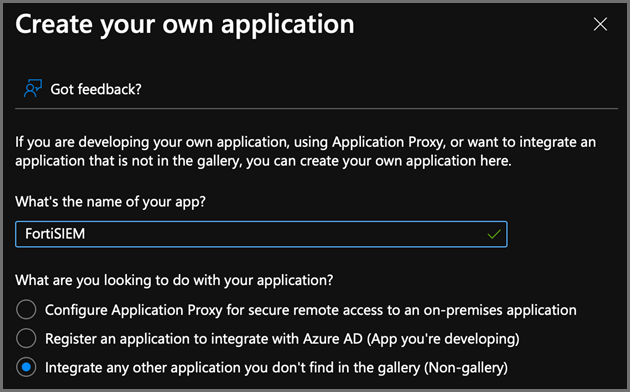
Select Create your own application.
-
For "What's the name of your app?", enter a name, such as FortiSIEM.
-
For "What are you looking to do with your application?", select Integrate any other application you don't find in the gallery (Non-gallery).
After the application has been created, take the following steps:
-
From the Azure Active Directory, select your new application.
-
Display the Properties.
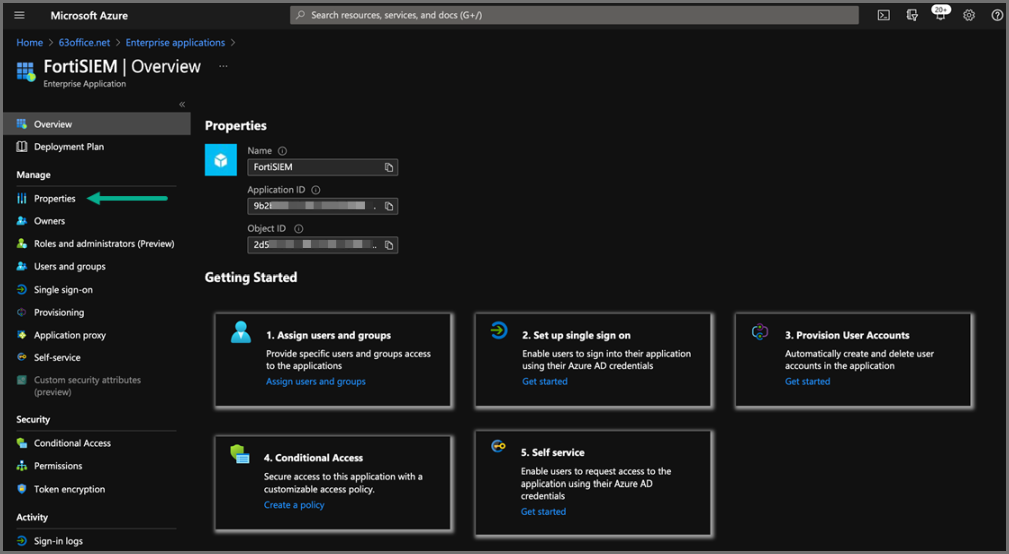
-
Under Getting Started, under options 1. Assign users and groups, select the Assign users and groups link and ensure you have some users and groups defined who will be able to access the new application.
-
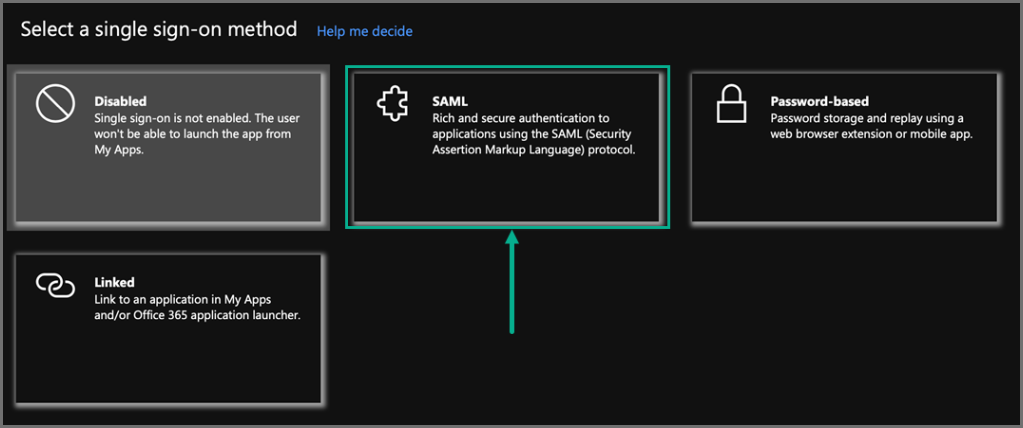
Under option 2. Set up single sign on, click the Get started link, and select SAML.
-
Under the Set up Single Sign-On with SAML options, click Edit for Step One: Basic SAML Configuration.
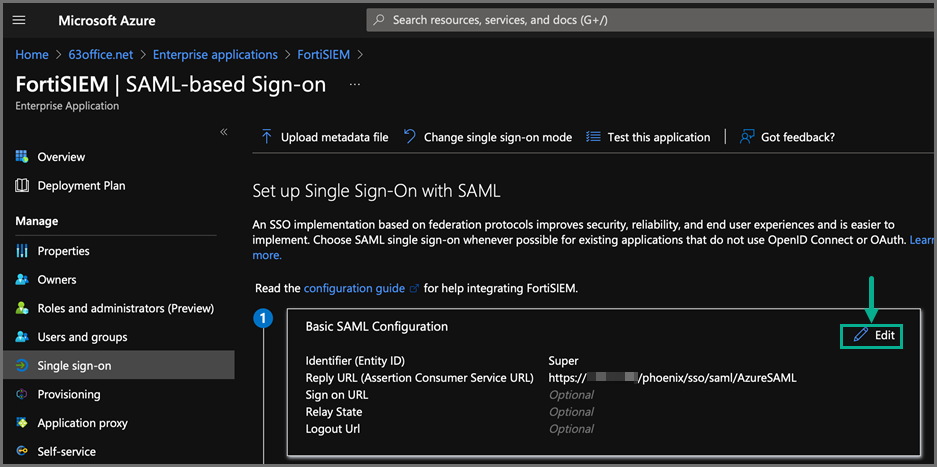
-
For Identifier (Entity ID) and Reply URL, enter the following information whether you plan to use Option 1 or Option 2.
Note: The difference between the two options suggested is that for the Option 2 FortiSIEM interface, you need to specify which SAML schema attribute will determine the Organization at login.Option 1 - Using the Default Org Mapping in FortiSIEM
Identifier (Entity ID) <FortiSIEM Org Name>
For example, enter Super for Enterprise installations or the name of your new Organization created in a Multi-Tenant installation.
Reply URL https://<fsm ip or fqdn>/phoenix/sso/saml/<external authentication profile name>In the FortiSIEM Authentication Profile, the default value of “AudienceRestriction” will be used.
Option 2 - Using a Custom Attribute to Define the Org Mapping in FortiSIEM
Identifier (Entity ID) Anything you like.
Reply URL https://<fsm ip or fqdn>/phoenix/sso/saml/<external authentication profile name> -
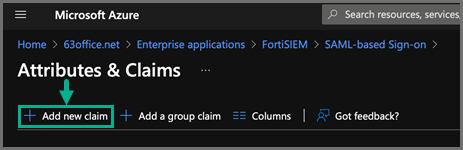
Under Step Two: Attributes & Claims, click Edit.
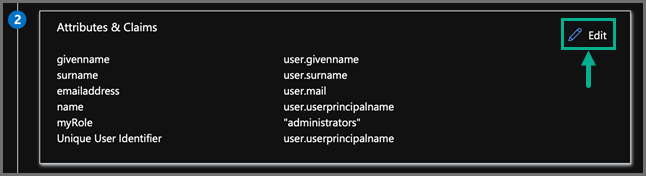
Here is where the SAML response can be manipulated to add extra attributes which can be used to tell FortiSIEM the Org to use at login (If Option 2 is used above), and also a Role name to be assigned at Login, if the user does not exist already in the FortiSIEM CMDB.
Take the following steps to add an attribute for Organization, if Option 2 is being used above.
-
Click Add new claim.
-
In the Name field, enter the Custom Attribute to use, for example: Organization.
-
For Namespace, leave the field blank.
-
For Source, make sure “Attribute” is selected and then under Source attribute select the drop-down and then type a value such as the Organization name or an Identifier you will use in FortiSIEM to map to the correct Org.
Note: Alternatively, one of the predefined Azure Values can be used such as
user.companynameif those values are populated in the directory. (Just make sure the Name of the attribute does not contain any characters other than letters, underscore or dash.)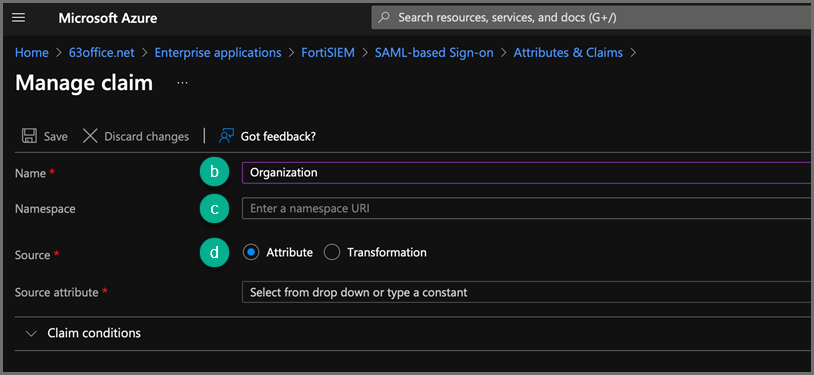
-
-
Take the following steps to add an attribute for Role.
-
Click Add new claim.
-
In the Name field, enter the Custom Attribute to use, for example: myRole.
-
For Namespace, leave the field blank.
-
For Source Attribute, set it to be a value for the Role.
-
-
Under Step Three: SAML Signing Certificate, click Edit.
-
For the Signing Option, select Sign SAML Response.
-
For the Signing Algorithm, select SHA-256.
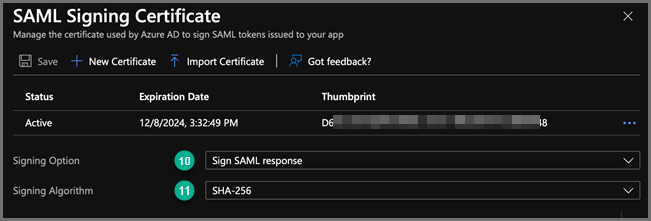
-
Click Save.
-
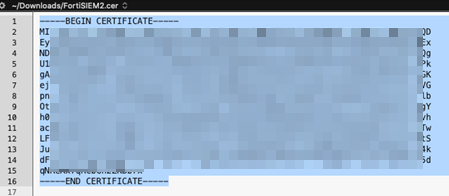
Exit back to the configuration by clicking the X in the top right corner, and then Download the Certificate in Base64 encoded format. (This will be needed in step 3e. under FortiSIEM Setup.)
-
Under Step Four: Set up FortiSIEM, copy the Azure AD Identifier string. (This will also be needed below to be input into FortiSIEM)
FortiSIEM Setup
In FortiSIEM, take the following steps:
-
Navigate to ADMIN > Settings > General > External Authentication.
-
Click New.
-
In the External Authentication Profile window, take the following steps:
-
In the Name field, enter a name, for example, AzureSAML.
-
In the Organization drop-down list, select your Organization.
-
In the Protocol drop-down list, select SAML.
-
In the Issuer field, paste the Azure AD Identifier.
-
In the Certificate field, paste the certificate information.
-
In the User section, leave the default option “In the NameIdentifier element of the Subject Statement” selected.
-
In the Org section, take the following steps:
-
If Option 1 was used at step (6) in Azure setup, then leave the default option of “In the Audience element of the AudienceRestriction” selected.
-
If Option 2 was used, then select Custom Attribute and enter the name of the Attribute created at step (7b) in the Azure set up above.
-
-
In the Role section, select Custom Attribute and enter the name of the Attribute created at step (8d) in the Azure set up above.
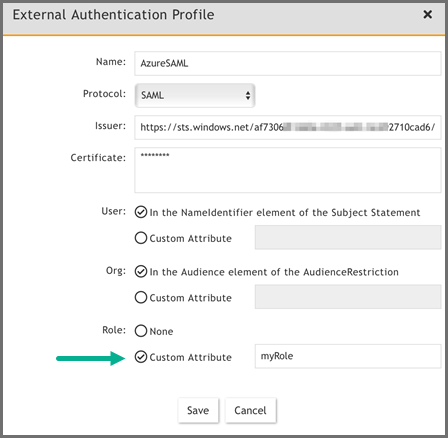
-
Click Save when done.
-
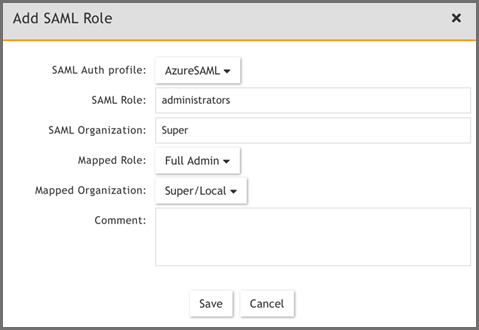
Using a SAML Role Mapping
-
Log into the FortiSIEM GUI as a user with Admin rights and navigate to ADMIN > Settings > Role > SAML Role.
-
Click New.
-
From the Add SAML Role window, take the following steps.
-
From the SAML Auth profile drop-down list, select the External SAML Authentication Profile created above.
-
For the SAML Role field, enter the value being output in the SAML response which should be the Source Attribute value entered at Azure set up step (8d).
-
For the SAML Organization field, enter the value being output in the SAML response which should be the Identifier (Entity ID) at Azure set up step (6) if Option 1 was used, or the Source Attribute value entered at Azure set up step (7c) if Option 2 was used.
-
For the Mapped Role drop-down list, select the FortiSIEM Role to assign based upon a matching value.
-
For the Mapped Organization drop-down list, select the FortiSIEM Organization to assign based upon a matching value.
-
Click Save.
-
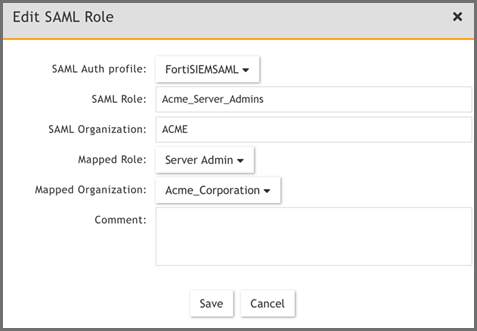
Here is an example of an Enterprise mapping. The SAML Organization for an Enterprise mapping is Super.
Here is an example of a Multi-Tenant mapping.
Troubleshooting SAML Configuration
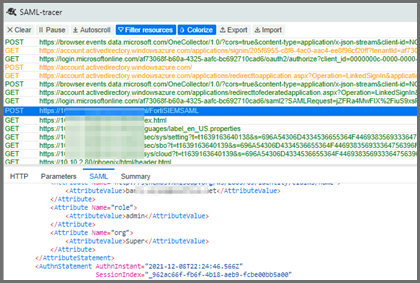
Plugin Tool
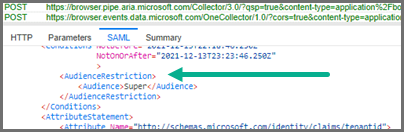
One way to troubleshoot a SAML response is to install the SAML-tracer Google Chrome plugin.
It will display the complete SAML response, with the actual attributes being returned. You can then check what the AudienceRestriction or expected Custom Attributes are and whether you have mapped them correctly.
Issues after Successful Authentication
When the logged in user is automatically added to the CMDB.
Some fields are Read Only, for example the System Admin flag.
Common Configuration Errors
Organization is Blank
If you get a message saying "Organization is blank", check that the Org definition in the FortiSIEM External Authentication Profile is correct and mapped to the output from the SAML response.
![]()
I.e. either AudienceRestriction or your Custom Attribute definition:
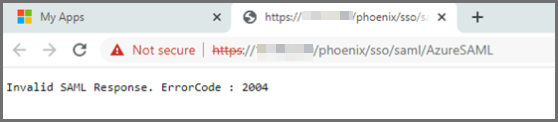
ErrorCode 2004
If you get the message "Invalid SAML Response. ErrorCode : 2004", check that the certificate definition in the FortiSIEM External Authentication Profile is correct.
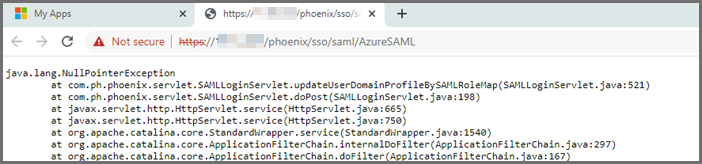
UpdateUserDomainProfileBySAMLRoleMap Issue
If you run into the following issue, check that the Role definition in the FortiSIEM External Authentication Profile is correct.
SAML Login Error Codes
Error Code 1000-2000: Invalid SAML Configuration
Error Code 2000-3000: Invalid SAML Response
Error Code 3000-4000: Invalid username or password or organization
Adding 2-factor Authentication via Duo Security
Obtain keys for FortiSIEM to communicate with Duo Security
- Sign up for a Duo Security account: signup.
This will be admin account for Duo Security. - Log in to Duo Security Admin Panel and navigate to Applications.
- Click Protect an Application. Locate Web SDK in the applications.
- Get API Host Name, Integration key, Secret key from the page.
You will need it when you configure FortiSIEM. - Generate Application key as a long string.
This is a password that Duo Security will not know. You can choose any 40 character long string or generate it as follows using pythonimport os, hashlibprint hashlib.sha1(os.urandom(32)).hexdigest()
Create and Manage FortiSIEM users in Duo Security
This determines how the 2-factor authentication response page will look like in FortiSIEM and how the user will respond to the second-factor authentication challenge:
- Log in to Duo Security as admin user.
- Choose the Logo which will be shown to users as they log on.
- Choose the super set of 2-factor Authentication Methods.
- Optional - you can create the specific users that will logon via FortiSIEM. If the users are not pre-created here, then user accounts will be created automatically when they attempt 2-factor authentication for the first time.
Setup External Authentication Profiles
- LDAP External Authentication Profile
- Radius External Authentication Profile
- Okta External Authentication Profile
LDAP External Authentication Profile
Add LDAP, LDAPS, and LDAPTLS authentication profile as follows:
- Go to ADMIN > Settings > General > External Authentication.
- Click New.
- Enter Name.
- Select Organization.
- Set Protocol as LDAP or LDAPS or LDAPTLS.
- Set IP/Host of LDAP server.
- Change the port if it is different than default port.
- Check Set DN Pattern if needed by filling in the DN Pattern field.
Setting the DN pattern manually is not necessary if the user is discovered via LDAP. However, this feature allows you to manually override the discovered pattern, or enter it for a user that is being manually created. Enter%sto represent the user's name (CN/uid), for example:CN=%s,CN=Users,DC=accelops,DC=com - Click Save.
Radius External Authentication Profile
Add RADIUS authentication profile as follows:
- Go to ADMIN > Settings > General > External Authentication.
- Click New.
- Enter Name.
- Select Organization.
- Set Protocol as RADIUS.
- Set IP/Host of RADIUS server.
- Change and set Authen Port if the port is different from default.
- Enter Shared Secret.
- Click on CHAP if Radius server uses Challenge Handshake Authentication Protocol.
- Click Save.
Okta External Authentication Profile
Add Okta authentication profile as follows:
- Go to ADMIN > Settings > General > External Authentication.
- Click New.
- Enter Name.
- Select Organization
- Set Protocol as "Okta".
- Copy and paste the certificate you downloaded in Configuring Okta Authentication - step 6 to Certificate.
- Click Save.
Add 2-Factor Authentication Option for FortiSIEM Users
- Create a 2-factor authentication profile:
- Go to ADMIN > Settings > General > External Authentication.
- Click New.
- Add the 2-factor authentication profile to a user:
- Go to CMDB > Users > Ungrouped.
- Click New to create a new use or Edit to modify a selected user.
- Select System Admin checkbox and click the edit icon.
- In the Edit User dialog box, enter and confirm a password for a new user.
- Select the Second Factor check-box.
- Select the 2-factor authentication profile created in Step 1 above.
- Select a Default Role from the drop-down list.
- Click Save.
Log in to FortiSIEM Using 2-Factor Authentication
Before logging in to FortiSIEM with 2-factor authentication, make sure that these steps are completed.
- Obtain keys for FortiSIEM to communicate with Duo Security.
- Create and Manage FortiSIEM users in Duo Security.
- Add 2-factor authentication option for FortiSIEM users.
Follow these steps:
- Log on to FortiSIEM normally (first factor) using the credential defined in FortiSIEM - local or external in LDAP.
- If the 2-factor authentication is enabled, the user will now be redirected to the 2-factor step.
- If the user is not created in the Duo system (by the Duo admin), a setup wizard will let you set some basic information like phone number and ask you to download the Duo app.
- If the user already exists in FortiSIEM, then follow the authentication method and click Log in.
Authenticating Users Against FortiAuthenticator (FAC)
FortiSIEM authenticates users against FortiAuthenticator (FAC) via RADIUS. User credentials are either stored in the FAC local database, or in an external credential store such as Active Directory (AD), accessed via LDAP. FAC optionally applies 2-factor authentication to users with the FortiToken.
The following sections provide information about the configurations and steps to log in and troubleshoot:
Configure AD Users
- Install AD Domain Services following the steps here.
- Configure the test domain users:
- Server Manager > Tools > Active Directory Users and Computers.
- Expand the Domain, right-click Users, select New > User.
Configure FortiAuthenticator
- Perform the basic FAC setup following the steps in the FortiAuthenticator Administration Guide: Section: FortiAuthenticator-VM
image
installation
and
initial
setup here.
- Use the default credentials:
- user name:
admin - password: <blank>
- user name:
- At the CLI prompt enter the following commands:
set port1-ip 192.168.1.99/24set default-gw 192.168.1.2
- Log in to the FAC GUI (default credentials user name / password:
admin/<blank>). - Set the time zone under System > Dashboard > Status > System Information > System Time.
- Change the GUI idle timeout for ease of use during configuration, if desired: System Administration > GUI Access > Idle Timeout.
- Use the default credentials:
- Configure the DC as a remote LDAP server under Authentication > Remote Authentication Servers > LDAP.
Follow the Fortinet Single Sign-On instructions in the appropriate FortiAuthenticator Administration Guide. Note that the user must have appropriate privileges. The Domain Admin account can be used for testing in a lab environment. The ‘Remote LDAP Users’ section will be blank at this stage, users are imported later. - Configure an external Realm to reference the LDAP store:
- Select Authentication > User Management > Realms > Create New.
- Choose the LDAP source from the drop-down and click OK.
- Configure the FortiSIEM as a RADIUS Client:
- Select Authentication > RADIUS Service > Clients > Create New.
- Enter the IP address of FortiSIEM and a shared secret.
- Choose the realms as required.
- Click 'add a realm' to include multiple realms.
Note the FAC evaluation license only supports 2 realms. - Click Save.
- Import users from LDAP to FortiSIEM to allow FortiToken to be used:
- Select Authentication > User Management > Remote Users.
- Select the Import button.
- Choose and import the test users configured in AD. Note that the FAC Evaluation license is limited to 5 users.
- (Optional) Configure local users in the FAC database for local authentication under Authentication > User Management > Local Users.
- Provision the FortiToken:
- Select and edit the user in Authentication > User Management > Remote Users (or Local Users as appropriate).
- Select the Token Based Authentication check box, and assign an available FortiToken Mobile.
FAC evaluation includes 2 demo FortiTokens. - Choose Email delivery method and enter an email address in user information.
The email address doesn’t have to be valid for basic testing, the provisioning code is visible in the FAC logs. - Click OK.
- Configure the FortiToken iPhone app:
- Install the FortiToken app from the app store.
- Open the app and select the + icon in the top right corner.
- Choose enter manually from the bottom of the screen.
- Select and edit the user in Authentication > User Management > Remote Users (or Local Users as appropriate).
- Select the Token Based Authentication check box, and assign an available FortiToken Mobile. FAC eval includes 2 demo FortiTokens.
- Choose Email delivery method and enter an email address in user information. The email address doesn’t have to be valid for basic testing, the provisioning code is visible in the FAC logs.
- Click OK.
Configure FortiSIEM
Step 1: Configure an External Authentication Source
- Go to ADMIN > Settings > General > External Authentication.
- Click New.
- Enter the following settings:
- Click Save.
- Click Test to test the authentication settings.
Step 2: Configure Users in FortiSIEM Database
- Go to CMDB > Users and click New.
- Enter the user name to match the user configured in FSM/AD. (Use the format: user@domain.com)
- Select the System Admin checkbox.
- Select the Mode as External.
- Select the RADIUS profile previously configured from Authentication Profiles.
- Select the Default Role from the list.
- Click Save.
Logging In
The User Name must be entered in the format user@domain.xyz. For 2-factor authentication, the password and FortiToken value must be concatenated and entered directly into the Password field.
For example:
- Username:
user123@testdomain.local - Password :
testpass123456; where123456is the current FortiToken value
Troubleshooting
FortiAuthenticator logs are accessible by opening the Logging tab. Select a log entry to see more details.
Modifying External Authentication Settings
Complete these steps to modify External Authentication settings:
- Use the following buttons to modify External Authentication settings:
- Edit - to modify an External Authentication setting.
- Delete - to delete an External Authentication setting.
- Click Save.
Copyright © 2024 Fortinet, Inc. All Rights Reserved. | Terms of Service | Privacy Policy
