Configuring Storage
- Overview
- Configuring Online Event Database on Local Disk
- Configuring Online Event Database on NFS
- Configuring Online Event Database on Elasticsearch
- Configuring Online Event Database on ClickHouse
- Configuring Archive Event Database on NFS
- Configuring Archive Event Database on HDFS
- Changing Event Storage Options
- Changing NFS Server IP
- Custom Organization Index for Elasticsearch
- Disk Space Management
Overview
FortiSIEM provides a wide array of event storage options. Upon arrival in FortiSIEM, events are stored in the Online event database. The user can define retention policies for this database. When the Online event database becomes full, FortiSIEM will move the events to the Archive Event database. Similarly, the user can define retention policies for the Archive Event database. When the Archive becomes full, events are discarded.
The Online event database can be one of the following:
- FortiSIEM EventDB
- On local disk for All-in-one installation
- On NFS for cluster installation
- Elasticsearch
- Native installation
- AWS OpenSearch (Previously known as AWS Elasticsearch)
- ClickHouse
- Native installation
The Archive event database can be one of the following:
- FortiSIEM EventDB on NFS
- HDFS
Note the various installation documents for 3rd party databases, for example.
In this release, the following combinations are supported:
| Event DB | Retention | ||
| Online | Archive | Online | Archive |
| FortiSIEM
EventDB (local or NFS) |
FortiSIEM
EventDB (NFS) |
Policy-based and Space-based | Policy-based and Space-based |
| Elasticsearch | FortiSIEM EventDB (NFS) | Space-based | Policy-based and Space-based |
| Elasticsearch | HDFS | Space-based | Space-based |
|
ClickHouse |
FortiSIEM EventDB (NFS) |
Space-based |
Policy-based and Space-based |
Database Storage Efficiency, Query Performance, Ingestion Speed Comparison
|
Database / Search Engine |
Storage Efficiency |
Query Performance |
Ingestion Speed |
|---|---|---|---|
| EventDB | Medium/High | Medium | Medium |
| Elasticsearch | Low | High | Medium |
| Spark/HDFS | High | Medium | Medium |
| ClickHouse | High | High | High |
Configuring Online Event Database on Local Disk
This section describes how to configure the Online Event database on local disk. Use this option when you have an all-in-one system, with only the Supervisor and no Worker nodes deployed.
Setting Up the Database
- Go to ADMIN > Setup > Storage.
- Click Online > Local Disk.
- Enter the following parameters :
Settings Guidelines Disk Name [Required] Local disk name.
During FortiSIEM installation, you can add a 'Local' data disk of appropriate size as the 4th or 5th disk (Refer to your specific Installation Guide in the FortiSIEM Document Library). Use the commandfdisk -lto find the disk name.
If you want to configure Local Disk for the physical 2000F or 3500F appliances, enter "hardware" in this field. This prompts a script to run that will configure local storage. - Click Test.
- If the test succeeds, click Deploy.
Setting Up Retention
When Online database becomes full, then events have to be deleted to make room for new events. This can be Space-based or Policy-based.
- Setting Up Space-Based Retention
- Setting Up Policy-Based Retention
- How Space-Based and Policy-Based Retention Work Together
Setting Up Space-Based Retention
Space-based retention is based on two thresholds defined in the phoenix_config.txt file on the Supervisor node.
[BEGIN phDataPurger]
online_low_space_action_threshold_GB=10
online_low_space_warning_threshold_GB=20
[END]
When the Online Event database size in GB falls below the value of online_low_space_action_threshold_GB, events are deleted until the available size in GB goes slightly above the online_low_space_action_threshold_GB value. If Archive is defined, then the events are archived. Otherwise, they are purged.
If you want to change these values, then change them on the Supervisor and restart phDataManager and phDataPurger modules.
Setting Up Policy-Based Retention
Policies can be used to enforce which types of event data remains in the Online event database.
For information on how to create policies, see Creating Online Event Retention Policy. Note: This is a CPU, I/O, and memory-intensive operation. For best performance, try to write as few retention policies as possible.
How Space-Based and Policy-Based Retention Work Together
- First, Policy-based retention policies are applied.
- If the available space is still below the value of
online_low_space_action_threshold_GB, then Space-based policies are enforced.
Viewing Online Data
For more information, see Viewing Online Event Data Usage.
Configuring Online Event Database on NFS
The following sections describe how to configure the Online database on NFS.
Setting Up the Database
You must choose this option when you have multiple Workers deployed and you plan to use FortiSIEM EventDB.
The NFS Storage should be configured as NFS version 3 with these options: “rw,sync,no_root_squash”.
- Go to ADMIN > Setup > Storage.
- Click Online > NFS
- Enter the following parameters :
Settings Guidelines Server IP/Host [Required] the IP address/Host name of the NFS server Exported Directory [Required] the file path on the NFS Server which will be mounted - Click Test.
- If the test succeeds, click Deploy.
Setting Up Retention
When the Online database becomes full, then events must be deleted to make room for new events. This can be Space-based or Policy-based.
- Setting Up Space-Based Retention
- Setting Up Policy-Based Retention
- How Space-Based and Policy-Based Retention Work Together
Setting Up Space-Based Retention
Space-based retention is based on two thresholds defined in the phoenix_config.txt file on the Supervisor node.
[BEGIN phDataPurger]
online_low_space_action_threshold_GB=10
online_low_space_warning_threshold_GB=20
[END]
When the Online Event database size in GB falls below the value of online_low_space_action_threshold_GB, events are deleted until the available size in GB goes slightly above the online_low_space_action_threshold_GB value. If Archive is defined, then the events are archived. Otherwise, they are purged.
If you want to change these values, then change them on the Supervisor and restart the phDataManager and phDataPurger modules.
Setting Up Policy-Based Retention
Policies can be used to enforce which types of event data stays in the Online event database.
For information on how to create policies, see Creating Online Event Retention Policy. Note: This is a CPU, I/O, and memory-intensive operation. For best performance, try to write as few retention policies as possible.
How Space-Based and Policy-Based Retention Work Together
- First, Policy-based retention policies are applied.
- If the available space is still below the
online_low_space_action_threshold_GB, then Space-based policies are enforced.
Viewing Online Data
For more information, see Viewing Online Event Data Usage.
Configuring Online Event Database on Elasticsearch
The following sections describe how to set up the Online database on Elasticsearch:
Setting Up the Database
There are three options for setting up the database:
- Native Elasticsearch Using REST API
- AWS OpenSearch (Previously known as AWS Elasticsearch) Using REST API
- Elastic Cloud Using REST API
Native Elasticsearch Using REST API
Use this option when you want FortiSIEM to use the REST API Client to communicate with Elasticsearch.
- Go to ADMIN > Setup > Storage.
- Click Online > Elasticsearch and for ES Service Type, select Native.
- Enter the following parameters:
Settings Guidelines Org Storage Select one of the following from the drop-down list:
All Orgs in One Index - Select to create one index for all organizations.
Each Org in its own Index - Select to create an index for each organization.
Custom Org Assignment - Select to create, edit or delete a custom organization index. Click Edit to configure. See Custom Organization Index for Elasticsearch for more information. Click Deploy Org Assignment to deploy the currently configured custom org assignment.
Endpoint [Required]
URL: IP address or DNS name of the Elasticsearch cluster Coordinating node. The IP/Host must contain
httporhttps.Ingest: Select if the URL endpoint will be used to handle pipeline processing.
Query: Select if the URL endpoint will be used to query Elasticsearch.
Note: Ingest and Query can both be selected for an endpoint URL.
Click + to add more URL fields to configure any additional Elasticsearch cluster Coordinating nodes.
Click - to remove any existing URL fields.
Port [Required] The port number User Name [Optional] User name Password [Optional] Password associated with the user Shard Allocation - Fixed -Enter the number of Shards and Replicas.
- Dynamic-Dynamically shards data using the Elasticsearch rollover API. Enter the number of Starting Shards and Replicas.
Event Attribute Template - Default-Select if you wish to cover FortiSIEM Event attributes covering all event attribute types.
- Custom-Select if you wish to cover specific FortiSIEM Event attributes. A reduced list of Event Attributes can improve Elasticsearch performance. After selecting Custom, click Select, and select your CSV file with your FortiSIEM Event attributes.
For information on thelistElasticEventAttributes.shtool that gathers Event Attributes so you can build a custom event attribute template, see Administrator Tools.
- Click Test.
- If the test succeeds, click Deploy.
AWS OpenSearch (Previously known as AWS Elasticsearch) Using REST API
Use this option when you have FortiSIEM deployed in AWS Cloud and you want to use AWS OpenSearch (Previously known as AWS Elasticsearch).
- Go to ADMIN > Setup > Storage.
- Click Online > Elasticsearch and for ES Service Type, select Amazon.
- Enter the following parameters:
Settings Guidelines Org Storage Select one of the following from the drop-down list:
All Orgs in One Index - Select to create one index for all organizations.
Each Org in its own Index - Select to create an index for each organization.
Custom Org Assignment - Select to create, edit or delete a custom organization index. Click Edit to configure. See Custom Organization Index for Elasticsearch for more information. Click Deploy Org Assignment to deploy the currently configured custom org assignment.
Endpoint [Required]
URL: IP address or DNS name of the Elasticsearch cluster Coordinating node. The IP/Host must contain
httporhttps.Ingest: Select if the URL endpoint will be used to handle pipeline processing.
Query: Select if the URL endpoint will be used to query Elasticsearch.
Note: Ingest and Query can both be selected for an endpoint URL.
Click + to add more URL fields.
Click - to remove any existing URL fields.
Port [Required] The port number Access Key ID [Required] Provide your AWS access key id. Secret Key [Required] Provide your AWS secret key. Shard Allocation - Fixed -Enter the number of Shards and Replicas.
- Dynamic-Dynamically shards data using the Elasticsearch rollover API. Enter the number of Starting Shards and Replicas.
Event Attribute Template - Default-Select if you wish to cover FortiSIEM Event attributes covering all event attribute types.
- Custom-Select if you wish to cover specific FortiSIEM Event attributes. A reduced list of Event Attributes can improve Elasticsearch performance. After selecting Custom, click Select, and select your CSV file with your FortiSIEM Event attributes.
For information on thelistElasticEventAttributes.shtool that gathers Event Attributes so you can build a custom event attribute template, see Administrator Tools.
- Click Test.
- If the test succeeds, click Deploy.
Elastic Cloud Using REST API
- Go to ADMIN > Setup > Storage.
- Click Online > Elasticsearch and and for ES Service Type, select Elastic Cloud.
- Enter the following parameters:
Settings Guidelines Org Storage Select one of the following from the drop-down list:
All Orgs in One Index - Select to create one index for all organizations.
Each Org in its own Index - Select to create an index for each organization.
Custom Org Assignment - Select to create, edit or delete a custom organization index. Click Edit to configure. See Custom Organization Index for Elasticsearch for more information. Click Deploy Org Assignment to deploy the currently configured custom org assignment.
Endpoint [Required]
URL: IP address or DNS name of the Elasticsearch cluster Coordinating node. The IP/Host must contain
httporhttps.Ingest: Select if the URL endpoint will be used to handle pipeline processing.
Query: Select if the URL endpoint will be used to query Elasticsearch.
Note: Ingest and Query can both be selected for an endpoint URL.
Click + to add more URL fields to configure any additional Elasticsearch cluster Coordinating nodes.
Click - to remove any existing URL fields.
Port [Required] The port number User Name [Optional] User name Password [Optional] Password associated with the user Shard Allocation - Fixed -Enter the number of Shards and Replicas.
- Dynamic-Dynamically shards data using the Elasticsearch rollover API. Enter the number of Starting Shards and Replicas.
Event Attribute Template - Default-Select if you wish to cover FortiSIEM Event attributes covering all event attribute types.
- Custom-Select if you wish to cover specific FortiSIEM Event attributes. A reduced list of Event Attributes can improve Elasticsearch performance. After selecting Custom, click Select, and select your CSV file with your FortiSIEM Event attributes.
For information on thelistElasticEventAttributes.shtool that gathers Event Attributes so you can build a custom event attribute template, see Administrator Tools.
- Click Test.
- If the test succeeds, click Deploy.
Setting Up Space-Based / Age-Based Retention
Depending on whether you use Native Elasticsearch, AWS OpenSearch (Previously known as AWS Elasticsearch), or ElasticCloud, Elasticsearch is installed using Hot (required), Warm (optional), and Cold (optional, availability depends on Elasticsearch type) nodes and Index Lifecycle Management (ILM) (availability depends on Elasticsearch type). Similarly, the space is managed by Hot, Warm, Cold node thresholds and time age duration, whichever occurs first, if ILM is available. See What's New for the latest information on elasticsearch retention threshold compatibility. For steps, see here.
- When the Hot node cluster storage capacity falls below the lower threshold or meets the time age duration, then:
- if Warm nodes are defined, the events are moved to Warm nodes,
- else if Warm nodes are not defined, but Cold nodes are defined, the events are moved to Cold nodes,
- else, if Archive is defined then they are archived,
- otherwise, events are purged
This is done until storage capacity exceeds the upper threshold.
- If Warm nodes are defined and the Warm node cluster storage capacity falls below lower threshold or meets the time age duration, then:
- if Cold nodes are defined, the events are moved to Cold nodes,
- else if Cold nodes are not defined, and Archive is defined, then they are archived,
- otherwise, events are purged
This is done until storage capacity exceeds the upper threshold.
- If Cold nodes are defined and the Cold node cluster storage capacity falls below lower threshold, then:
- if Archive is defined, then they are archived,
- otherwise, events are purged
This is done until storage capacity exceeds the upper threshold
Viewing Online Data
For more information, see Viewing Online Event Data Usage.
Configuring Online Event Database on ClickHouse
The following sections describe how to set up the Online database on ClickHouse:
Note: Workers are not supported in 6.5.x.
Setting Up the Database
- Go to ADMIN > Setup > Storage.
- Click Online > ClickHouse
- Enter the following parameters :
Settings Guidelines Storage Tiers [Required] From the drop-down list, select the number of storage tiers. 1 tier is for Hot. 2 tiers include Hot and Warm tiers. Hot Tier - Disk Path [Required] the file path on the ClickHouse Server which will be mounted for the configured tiers.
Click + to add a row for another disk path, and - to remove any rows.
During FortiSIEM installation, you can add one or more 'Local' data disk of appropriate size as additional disks, i.e., 5th disk (hot), 6th disk (warm). Use the commandfdisk -lorlsblkfrom the CLI to find the disk names.
When usinglsblkto find the disk name, please note that the path will be ‘/dev/<disk>’. In the below example, running on KVM, the 5th disk (hot) will be ‘/dev/vde’ and the 6th disk (warm) will be ‘/dev/vdf’.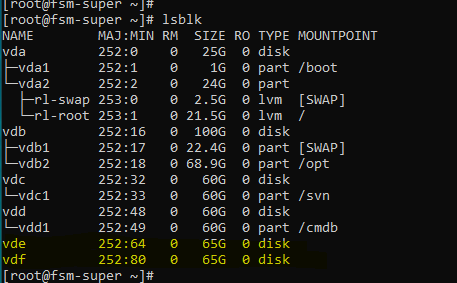
- Click Test.
- If the test succeeds, click Deploy.
Space-Based Retention Information
ClickHouse allows configuration of Hot tier or Hot and Warm tiers. When disk space is less than 10%, data will be purged until a minimum of 20% disk space is available. For example, if there is only the Hot tier, when only 10% space is available, the oldest data will be purged until at least 20% disk space is freed up. If two tiers are configured (Hot and Warm) without an archive, when the Warm tier has less than 10% disk space left, the oldest data is purged from the Warm disk space until 20% free space is available. This space-based retention is hardcoded, and does not need to be set up.
Viewing Online Data
For more information, see Viewing Online Event Data Usage.
Configuring Archive Event Database on NFS
The following sections describe how to set up the Archive database on NFS:
Setting Up the Database
You must choose this option when you have multiple Workers deployed and you plan to use FortiSIEM EventDB.
The NFS Storage should be configured as NFS version 3 with these options: “rw,sync,no_root_squash”.
- Go to ADMIN > Setup > Storage.
- Click Archive > NFS,
- Enter the following parameters:
Settings Guidelines Server IP/Host [Required] the IP address/Host name of the NFS server Exported Directory [Required] the file path on the NFS Server which will be mounted Real Time Archive (Optional) event data is written to NFS archive at the same time it is written to online storage, when enabled. Click the checkbox to enable/disable.
Note: You must click Save in step 5 in order for the Real Time Archive setting to take effect. It is strongly recommended you confirm that the test works, in step 4 before saving. - Click Test.
- If the test succeeds, click Deploy.
Setting Up Retention
When the Archive database becomes full, then events must be deleted to make room for new events. This can be Space-based or Policy-based.
- Space-Based Retention
- Policy-Based Retention
- How Space-Based and Policy-Based Retention Work Together
Space-Based Retention
Space-based retention is based on two thresholds defined in phoenix_config.txt file on the Supervisor node.
[BEGIN phDataPurger]
archive_low_space_action_threshold_GB=10
archive_low_space_warning_threshold_GB=20
[END]
When the Archive Event database size in GB falls below the value of archive_low_space_action_threshold_GB, events are purged until the available size in GB goes slightly above the value set for archive_low_space_action_threshold_GB.
If you want to change these values, then change them on the Supervisor and restart the phDataManager and phDataPurger modules.
Policy-Based Retention
Policies can be used to enforce which types of event data remain in the Archive event database.
For information on how to create policies, see Creating Offline (Archive) Retention Policy. Note - This is a CPU, I/O, and memory-intensive operation. For best performance, try to write as few retention policies as possible.
How Space-Based and Policy-Based Retention Work Together
- First, Policy-based retention policies are applied.
- If the available space is still below
archive_low_space_action_threshold_GB, then Space-based policies are enforced.
Viewing Archive Data
For more information, see Viewing Archive Data.
Configuring Archive Event Database on HDFS
The following sections describe how to set up the Archive database on HDFS:
Setting Up the Database
HDFS provides a more scalable event archive option - both in terms of performance and storage.
- Go to ADMIN > Setup > Storage.
- Click Archive > HDFS.
- Enter the following parameters:
Settings Guidelines Real Time Archive (Optional) event data is written to HDFS archive at the same time it is written to online storage, when enabled. Click the checkbox to enable/disable.
Note: You must click Save in step 5 in order for the Real Time Archive setting to take effect. It is strongly recommended you confirm that the test works, in step 4 before saving.
Spark Master Node IP/Host IP or Host name of the Spark cluster Master node. Port TCP port number for FortiSIEM to communicate to Spark Master node. HDFS Name Node IP/Host IP or Host name of HDFS Name node. This is the machine which stores the HDFS metadata: the directory tree of all files in the file system, and tracks the files across the cluster. Port TCP port number for FortiSIEM to communicate to HDFS Name node. - Click Test.
- If the test succeeds, click Deploy.
Setting Up Space-Based Retention
When the HDFS database becomes full, events have to be deleted to make room for new events.
This is set by Archive Thresholds defined in the GUI. Go to ADMIN > Settings > Database > Online Settings. Change the Low and High settings, as needed.
When the HDFS database size in GB rises above the value of archive_low_space_action_threshold_GB, events are purged until the available size in GB goes slightly above the value set for archive_low_space_action_threshold_GB.
Viewing Archive Data
For more information, see Viewing Archive Data.
Changing Event Storage Options
It is highly recommended to chose a specific event storage option and retain it. However, it is possible to switch to a different storage type.
Note: In all cases of changing storage type, the old event data is not migrated to the new storage. Contact FortiSIEM Support if this is needed - some special cases may be supported.
For the following cases, simply choose the new storage type from ADMIN > Setup > Storage.
- Local to Elasticsearch
- NFS to Elasticsearch
- Elasticsearch to Local
The following storage change cases need special considerations:
- Elasticsearch to NFS
- Local to NFS
- NFS to Local
- EventDB to ClickHouse
- Elasticsearch to ClickHouse
- ClickHouse to EventDB
- ClickHouse to Elasticsearch
Elasticsearch to NFS
- Log in to FortiSIEM GUI.
- Select and delete the existing Workers from ADMIN > License > Nodes > Delete.
- Go to ADMIN > Setup > Storage and update the Storage type as NFS server
- Go to ADMIN > License > Nodes and Add the recently deleted Workers in step #2.
Local to NFS
- SSH to the Supervisor and stop FortiSIEM processes by running:
phtools --stop all - Unmount /data by running:
umount /data - Validate that /data is unmounted by running:
df –h - Edit /etc/fstab and remove /data mount location.
- Log in to FortiSIEM GUI, go to ADMIN > Setup > Storage and update the Storage type as NFS server.
NFS to Local
- SSH to the Supervisor and stop FortiSIEM processes by running:
phtools --stop all - Unmount /data by running:
umount /data - Validate that /data is unmounted by running:
df –h - Edit /etc/fstab and remove /data mount location.
- Connect the new disk to Supervisor VM.
- Log in to FortiSIEM GUI, go to ADMIN > Setup > Storage and update the Storage type as Local Disk.
EventDB to ClickHouse
Assuming you are running FortiSIEM EventDB on a single node deployment (e.g. 2000F, 2000G, 3500G and VMs), the following steps shows how to migrate your event data to ClickHouse.
Follow these steps to migrate events from EventDB to ClickHouse.
-
Stop all the processes on Supervisor by running the following command.
phtools –-stop allNote: This will also stop all events from coming into Supervisor.
-
Edit
/etc/fstaband remove all /data entries for EventDB. -
If the same disk is going to be used by ClickHouse (e.g. in hardware Appliances), then copy out events from FortiSIEM EventDB to a remote location. You can bring back the old data if needed (See Step 7).
-
Mount a new remote disk for the appliance, assuming the remote server is ready, using the following command.
# mount -t nfs <remote server ip>:<remote share point> <local path> -
Copy the data, using the following command.
# rsync -av --progress /data /<local path>
Example:
# rsync -av --progress /data /mnt/eventdb
-
-
If the same disk is going to be used by ClickHouse (e.g. in hardware Appliances), then delete old data from FortiSIEM, by taking the following steps.
-
Remove the data by running the following command.
# rm -rf /data/* -
Unmount, by running the following commands.
# note mount path for /data# umount /data -
For 2000G, run the following additional command.
# lvremove /dev/mapper/FSIEM2000G-phx_eventdbcache: y
-
-
For VM based deployments, create new disks for use by ClickHouse by taking the following steps.
-
Edit your Virtual Machine on your hypervisor.
-
Add a new disk to the current disk controller.
-
Run the following in your FortiSIEM Supervisor Shell if the disk is not automatically added.
# echo "- - -" > /sys/class/scsi_host/host0/scan# echo "- - -" > /sys/class/scsi_host/host1/scan# echo "- - -" > /sys/class/scsi_host/host2/scan# lsblk
-
-
Log into the GUI as a full admin user and change the storage to ClickHouse by taking the following steps.
-
Navigate to ADMIN > Setup > Storage > Online.
-
From the Event Database drop-down list, select ClickHouse.
-
From the Storage Tiers drop-down list, select 1.
-
In the Disk Path field, select the disk path.
Example:
/dev/sde -
Click Test.
-
Click Deploy.
-
-
(Optional) Import old events. For appliances they were copied out in Step 3 above. For VMs, they may be mounted remotely. To do this, run the following command from FortiSIEM.
# /opt/phoenix/bin/phClickHouseImport --src [Source Dir] --starttime [Start Time] --endtime [End Time] --host [IP Address of ClickHouse - default 127.0.0.1] --orgid [Organization ID (0 – 4294967295)More information on
phClickHouseImportcan be found here.Note the valid time format:
<time> : "YYYY-MM-DD hh:mm:ss" (notice the quotation marks, they need to be included.)
Example:
phClickHouseImport --src /test/sample --starttime "2022-01-27 10:10:00" --endtime "2022-02-01 11:10:00"
Example with import all organizations:
[root@SP-191 mnt]# /opt/phoenix/bin/phClickHouseImport --src /mnt/eventdb/ --starttime "2022-01-27 10:10:00" --endtime "2022-03-9 22:10:00"
Found 32 days' Data
[█ ] 3% 3/32 [283420]█ -
Log into FortiSIEM GUI and use the ANALYTICS tab to verify events are being ingested.
Elasticsearch to ClickHouse
To switch your Elasticsearch database to ClickHouse, take the following steps.
Note: Importing events from Elasticsearch to ClickHouse is currently not supported
-
Stop all the processes on Supervisor by running the following command.
phtools –-stop all
Note: This command will also stop all events from coming into the Supervisor. Make sure
phMonitorprocess is running. -
Log into your hypervisor and add disks for ClickHouse by taking the following steps. You can have 2 Tiers of disks with multiple disks in each Tier. You must have at least one Tier 1 disk.
-
Edit your Virtual Machine on your hypervisor.
-
Add a new disk to the current disk controller.
-
Run the following in your FortiSIEM Supervisor Shell if the disk is not automatically added.
# echo "- - -" > /sys/class/scsi_host/host0/scan
# echo "- - -" > /sys/class/scsi_host/host1/scan
# echo "- - -" > /sys/class/scsi_host/host2/scan
# lsblk
-
-
Set up ClickHouse as the online database by taking the following steps.
-
Navigate to ADMIN > Setup > Storage > Online.
-
From the Event Database drop-down list, select ClickHouse.
-
From the Storage Tiers drop-down list, select 1.
Note: If you wish to have a warm tier or multiple hot tier disks, additional disks are required
-
Provide the disk path.
-
Click Test.
-
Click Deploy when the test is successful.
Events can now come in.
-
-
Log into FortiSIEM GUI and use the ANALYTICS tab to verify events are being ingested.
ClickHouse to EventDB
To switch your ClickHouse database to EventDB, take the following steps.
Note: Importing events from ClickHouse to EventDB is currently not supported.
-
Stop all the processes on the Supervisor by running the following command.
phtools –-stop allNote: This is will also stop all the events from coming into Supervisor.
-
Stop ClickHouse Service by running the following commands.
systemctl stop clickhouse-serversystemctl stop phClickHouseMonitor -
Edit
phoenix_config.txtin/opt/phoenix/configon Supervisor and setenable = falsefor ClickHouse. -
Edit and remove any mount entries in
/etc/fstabthat relates to ClickHouse. -
Unmount data by taking the following step depending on whether you are using a VM (hot and/or warm disk path) or hardware (2000F, 2000G, 3500G).
-
For VM, run the following command.
umount /data-clickhouse-hot-1
If multiple tiers are used, the disks will be denoted by a number.
Example:
/data-clickhouse-hot-2/data-clickhouse-warm-1/data-clickhouse-warm-2
-
For hardware, run the following command.
umount /data-clickhouse-hot-1 -
For 2000G, run the following additional commands.
umount /data-clickhouse-warm-1lvremove /dev/mapper/FSIEM2000Gphx_hotdata : y
-
-
Delete old ClickHouse data by taking the following steps.
-
Remove old ClickHouse configuration by running the following commands.
# rm -f /etc/clickhouse-server/config.d/*# rm -f /etc/clickhouse-server/users.d/*
-
-
Clean up "incident" in psql, by running the following commands.
psql -U phoenix -d phoenixdb
truncate ph_incident;truncate ph_incident_detail; -
Configure storage for EventDB by taking the following steps.
-
Set up EventDB as the online database by taking the following steps for EventDB Local Disk OR EventDB on NFS.
-
For EventDB Local Disk configuration, take the following steps.
-
Create a new disk for the VM by logging into the hypervisor and create a new disk.
-
Log into the FortiSIEM Supervisor GUI as a full admin user.
-
Navigate to ADMIN > Setup > Storage > Online.
-
From the Event Database drop-down list, select EventDB Local Disk.
-
Target the new local disk.
-
Click Test.
-
Click Deploy.
-
Proceed to Step 11.
-
-
For EventDB on NFS configuration, take the following steps.
Note: Make sure remote NFS storage ready.
-
Create a new disk for the VM by logging into the hypervisor and create a new disk.
-
Log into FortiSIEM Supervisor GUI as a full admin user.
-
Navigate to ADMIN > Setup > Storage > Online.
-
From the Event Database drop-down list, select EventDB on NFS.
-
In the IP/Host field, select IP or Host and enter the remote NFS server IP Address or Host name.
-
In the Exported Directory field, enter the share point.
-
Click Test.
-
Click Deploy.
-
Proceed to Step 11.
-
-
-
Set up EventDB as the online database, by taking the following steps.
-
Log into the FortiSIEM Supervisor GUI as a full admin user.
-
Navigate to ADMIN > Setup > Storage > Online.
-
From the Event Database drop-down list, select EventDB.
-
Click Test.
-
Click Deploy.
-
-
Make sure phMonitor process is running. Events can now come in.
-
Verify events are coming in by running Adhoc query in ANALYTICS.
ClickHouse to Elasticsearch
To switch your ClickHouse database to Elasticsearch, take the following steps.
Note: Importing events from ClickHouse to Elasticsearch is currently not supported.
-
Stop all the processes on Supervisor by running the following command.
phtools –-stop allNote: This is will also stop all the events from coming into Supervisor.
-
Stop ClickHouse Service by running the following commands.
systemctl stop clickhouse-serversystemctl stop phClickHouseMonitor -
Edit
phoenix_config.txton the Supervisor and setenable = falsefor ClickHouse. -
Edit and remove any mount entries in
/etc/fstabthat relates to ClickHouse -
Unmount data by taking the following step depending on whether you are using a VM (hot and/or warm disk path) or hardware (2000F, 2000G, 3500G).
-
For VM, run the following command.
umount /data-clickhouse-hot-1
If multiple tiers are used, the disks will be denoted by a number:
Example:
/data-clickhouse-hot-2/data-clickhouse-warm-1/data-clickhouse-warm-2
-
For hardware, run the following command.
umount /data-clickhouse-hot-1 -
For 2000G, run the following additional commands.
umount /data-clickhouse-warm-1lvremove /dev/mapper/FSIEM2000Gphx_hotdata : y
-
-
Delete old ClickHouse data by taking the following steps.
-
Remove old ClickHouse configuration by running the following commands.
# rm -f /etc/clickhouse-server/config.d/*# rm -f /etc/clickhouse-server/users.d/*
-
-
Clean up "incident" in psql, by running the following commands.
psql -U phoenix -d phoenixdb
truncate ph_incident;truncate ph_incident_detail; -
Make sure
phMonitorprocess is running. -
Setup Elasticsearch as online database by taking the following steps.
-
Log into the FortiSIEM Supervisor GUI as a full admin user.
-
Navigate to ADMIN > Setup > Storage > Online.
-
From the Event Database drop-down list, select Elasticsearch.
-
From the ES Service Type drop-down list, select Native, Amazon, or Elastic Cloud.
-
Configure the rest of the fields depending on the ES Service Type you selected.
-
Click Test.
-
Click Deploy.
-
-
Wait for
JavaQuerySeverprocess to start up. -
Start new events.
-
Verify events are coming in by running Adhoc query in ANALYTICS.
Changing NFS Server IP
If you are running a FortiSIEM Cluster using NFS and want to change the IP address of the NFS Server, then take the following steps.
Step 1: Temporarily Change the Event Storage Type from EventDB on NFS to EventDB on Local
- Go to ADMIN > License > Nodes and remove all the Worker nodes.
- SSH to the Supervisor and stop FortiSIEM processes by running:
phtools --stop all - Unmount
/databy running:umount /data - Validate that
/datais unmounted by running:df –h - Edit
/etc/fstaband remove/datamount location. - Attach new local disk to the Supervisor. It is recommended that it is at least 50~80GB.
- Go to ADMIN > Setup > Storage > Online.
- Change the storage type to Local Disk and add the local disk's partition to the Disk Name field. (e.g.
/dev/sde). - Click Test to confirm.
- Click Deploy.
Step 2: Change the NFS Server IP Address
This is a standard system administrator operation. Change the NFS Server IP address.
Step 3: Change the Event Storage Type Back to EventDB on NFS
- SSH to the Supervisor and stop FortiSIEM processes by running:
phtools --stop all - Umount
/databy running:umount /data - Validate that
/datais unmounted by running:df –h - Edit
/etc/fstaband remove/datamount location. - Go to ADMIN > Setup > Storage > Online.
- Change the storage type to NFS.
- In the Server field, with IP selected, enter the new IP address of the NFS server.
- In the Exported Directory field, enter the correct NFS folder's path.
- Click Test to confirm.
- Click Deploy.
- Go to ADMIN > License > Nodes and add back all the Worker nodes.
Custom Organization Index for Elasticsearch
From the Assign Organizations to Groups window, you can create, edit, or delete existing custom Elasticsearch groups. You can use the Search... field to locate any existing custom Elasticsearch groups. This feature is available from ADMIN > Setup > Storage > Online with Elasticsearch selected as the Event Database, and Custom Org Assignment selected for Org Storage. At the Org Storage field, click the Edit button.
Add a Custom Elasticsearch Group
To add a custom Elasticsearch group, take the following steps.
-
Click Add.
-
From the Organization drop-down list, select the organization.
-
From the Group drop-down list, select a group. If an organization is not assigned to a group here, the default group for this organization is set to 50,000.
-
Click Done.
-
Click Save.
Note: Saving here only save the custom Elasticsearch group. -
Click Deploy Org Assignment to make the change take effect.
Note: Test and Deploy are needed after switching org storage from other options to Custom Org Assignment, and vice versa.
Edit a Custom Elasticsearch Group
-
Select a Custom Elasticsearch Group.
-
Click Edit.
-
From the Organization drop-down list, select the organization.
Note: If only one Organization exists, the drop-down list is not accessible.
-
From the Group drop-down list, select a group.
-
Click Done.
-
Click Save.
-
Click Deploy Org Assignment to make the change take effect.
Delete a Custom Elasticsearch Group
-
Select a Custom Elasticsearch Group.
-
Click Delete.
-
Click Yes to confirm.
-
Click Save.
-
Click Deploy Org Assignment to make the change take effect.
Disk Space Management
When the Online storage is nearly full, events must either be archived or purged to make room for new events. Similarly, when the Archive storage is nearly full, events are purged to make room for new events from Online storage. This strategy keeps FortiSIEM running continuously.
This section provides details for the various storage options.
- Online Event Database on Local Disk or on NFS
- Online Event Database on Elasticsearch
- Archive Event Database on NFS
- Archive Event Database on HDFS
Online Event Database on Local Disk or on NFS
There are two parameters in the phoenix_config.txt file on the Supervisor node that determine the operations. They appear under the phDataPurger section.
[BEGIN phDataPurger]
- online_low_space_action_threshold_GB (default 10GB)
- online_low_space_warning_threshold_GB (default 20GB)
[END]
When Online disk space reaches the low threshold (online_low_space_action_threshold_GB) value, then events are archived (if archive directory is set) or purged. This operation continues until the Online disk space reaches the online_low_space_warning_threshold_GB value. This check is done hourly.
You can change these parameters to suit your environment and they will be preserved after upgrade. You must restart phDataPurger module to pick up your changes.
Online Event Database on Elasticsearch
Log in to the FortiSIEM GUI and go to ADMIN > Settings > Online Settings. If Elasticsearch is chosen as Online storage, depending on your elasticsearch type, and whether you have archive configured, the following choices will be available in the GUI.
- Hot Node - Low Threshold (default 25%), High Threshold (35%), Age 90 days
- Warm Node - Low Threshold (default 20%), High Threshold (30%), Age 90 days
- Cold Node - Low Threshold (default 20%), High Threshold (30%)
- Archive - Low Threshold (default 10%), High Threshold (20%)
When Hot Node disk free space reaches the Low Threshold value, events are moved until the Hot Node disk free space reaches the High Threshold value. Event destination can be one of the following:
- Warm Node
- Cold Node - if Warm Nodes are not defined
- Archive - if prior nodes (Warm, Cold) are not defined
- Purged - if neither Warm Node, Cold Node, nor Archive is defined
When Warm Node disk free space reaches the Low Threshold value, events are moved to Cold node. If Cold node is not defined, events are moved to Archive or purged (if Archive is not defined) until Warm disk free space reaches High Threshold.
When Cold Node disk free space reaches the Low Threshold value, events are moved to Archive or purged (if Archive is not defined), until Cold disk free space reaches High Threshold.
Archive Event Database on NFS
There are two parameters in the phoenix_config.txt file on the Supervisor node that determine when events are deleted. They appear under the phDataPurger section:
[BEGIN phDataPurger]
- archive_low_space_action_threshold_GB (default 10GB)
- archive_low_space_warning_threshold_GB (default 20GB)
[END]
When the Archive disk space reaches the low threshold (archive_low_space_action_threshold_GB) value, events are purged until the Archive disk space reaches the high threshold (online_low_space_warning_threshold_GB) value. This check is done hourly.
You can change these parameters to suit your environment and they will be preserved after upgrade. You must restart phDataPurger module to pick up your changes.
Archive Event Database on HDFS
This is set by configuring the Archive Threshold fields in the GUI at ADMIN > Settings > Database > Online Settings. Elasticsearch must be configured as online storage, and HDFS as offline storage in order for the Archive Threshold option/field to appear in the configuration. This is the only way to purge data from HDFS. For more information on configuring thresholds, see Setting Elasticsearch Retention Threshold.
Copyright © 2024 Fortinet, Inc. All Rights Reserved. | Terms of Service | Privacy Policy
