
Example configuration: Inter-VDOM routing
This example shows how to configure a FortiGate unit to use inter-VDOM routing.
This section contains the follow topics:
- Network topology and assumptions
- Creating the VDOMs
- Configuring the physical interfaces
- Configuring the VDOM links
- Configuring the firewall and Security Profile settings
- Testing the configuration
Network topology and assumptions
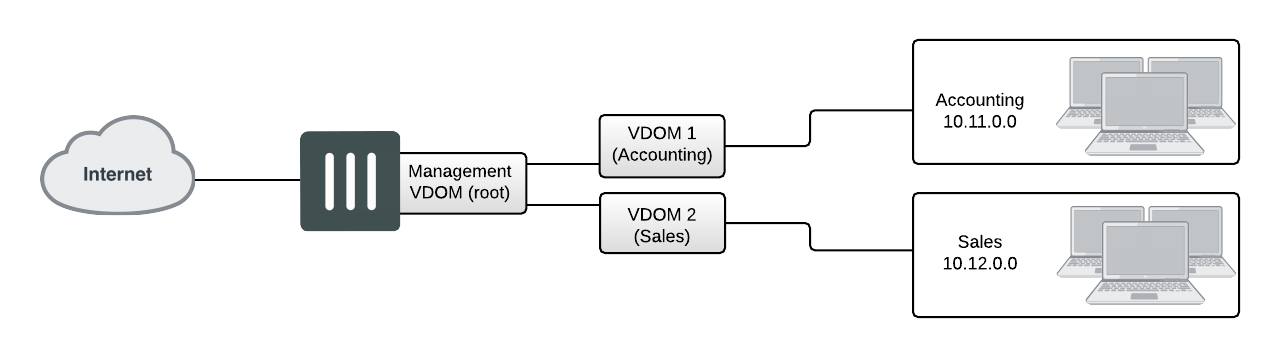
Two departments of a company, Accounting and Sales, are connected to one FortiGate 800 unit. To do its work, the Sales department receives a lot of email from advertising companies that would appear to be spam if the Accounting department received it. For this reason, each department has its own VDOM to keep firewall policies and other configurations separate. A management VDOM makes sense to ensure company policies are followed for traffic content.
The traffic between Accounting and Sales will be email and HTTPS only. It could use a VDOM link for a meshed configuration, but we will keep from getting too complex. With the configuration, inter-VDOM traffic will have a slightly longer path to follow than normal—from one department VDOM, through the management VDOM, and back to the other department VDOM. Since inter-VDOM links are faster than physical interfaces, this longer path should not be noticed.
Firewall policies will be in place. For added security, firewall policies will allow only valid office services such as email, web browsing, and FTP between either department and the Internet. Any additional services that are required can be added in the future.
The company uses a single ISP to connect to the Internet. The ISP uses DHCP to provide an IP address to the FortiGate unit. Both departments use the same ISP to reach the Internet.
Other assumptions for this example are as follows:
- Your FortiGate unit has interfaces labelled port1 through port4 and VDOMs are not enabled.
- You are using the super_admin account.
- You have the FortiClient application installed.
- You are familiar with configuring interfaces, firewalls, and other common features on your FortiGate unit.
General configuration steps
This example includes the following general steps. For best results, follow the steps in the order given. Also, note that if you perform any additional actions between procedures, your configuration may have different results.
- Creating the VDOMs
- Configuring the physical interfaces
- Configuring the VDOM links
- Configuring the firewall and Security Profile settings
- Testing the configuration
Creating the VDOMs
This procedure enables VDOMs and creates the Sales and Accounting VDOMs.
To create the VDOMs - GUI:
- Log in as the super_admin administrator.
- Go to the Dashboard and locate the System Information widget. Enable Virtual Domain.
- Log in again.
- Go to Global > System > VDOM.
- Select Create New, enter
Accountingfor the VDOM Name, and select OK. - Select Create New, enter
Salesfor the VDOM Name, and select OK.
To create the VDOMs - CLI:
config system global
set vdom enable
end
config system vdom
edit Accounting
next
edit Sales
next
end
Configuring the physical interfaces
Next, the physical interfaces must be configured. This example uses three interfaces on the FortiGate unit - port2 (internal), port3(dmz), and port1(external). port2 and port3 interfaces each have a department’s network connected. port1 is for all traffic to or from the Internet and will use DHCP to configure its IP address, which is common with many ISPs.
To configure the physical interfaces - GUI:
- Go to Global > Network > Interfaces.
- Select Edit for the port2 interface, enter the following information, and select OK.
| Alias | AccountingLocal |
| Virtual Domain | Accounting |
| Addressing mode | Manual |
| IP/Netmask | 172.100.1.1/255.255.0.0 |
| Administrative Access | HTTPS, PING, SSH |
| Description | This is the accounting department internal interface. |
- Select Edit for the port3 interface, enter the following information, and select OK.
| Alias | SalesLocal |
| Virtual Domain | Sales |
| Addressing mode | Manual |
| IP/Netmask | 192.168.1.1/255.255.0.0 |
| Administrative Access | HTTPS, PING, SSH |
| Description | This is the sales department internal interface. |
- Select Edit for the port1 interface, enter the following information, and select OK.
| Alias | ManagementExternal |
| Virtual Domain | root |
| Addressing Mode | DHCP |
| Distance | 5 |
| Retrieve default gateway from server | Enable |
| Override internal DNS | Enable |
| Administrative Access | HTTPS, SSH, SNMP |
| Description | This is the accounting department internal interface. |
|
|
When the mode is set to DHCP or PPoE on an interface you can set the distance field. This is the administrative distance for any routes learned through the gateway for this interface. The gateway is added to the static route table with these values. A lower distance indicates a preferred route. |
To configure the physical interfaces - CLI:
config global
config system interface
edit port2
set alias AccountingLocal
set vdom Accounting
set mode static
set ip 172.100.1.1 255.255.0.0
set allowaccess https ping ssh
set description "The accounting dept internal interface"
next
edit port3
set alias SalesLocal
set vdom Sales
set mode static
set ip 192.168.1.1 255.255.0.0
set allowaccess https ping ssh
set description "The sales dept. internal interface"
next
edit port1
set alias ManagementExternal
set vdom root
set mode DHCP
set distance 5
set gwdetect enable
set dns-server-override enable
set allowaccess https ssh snmp
set description “The systemwide management interface.”
end
Configuring the VDOM links
To complete the connection between each VDOM and the management VDOM, you need to add the two VDOM links; one pair is the Accounting - management link and the other is for Sales - management link.
When configuring inter-VDOM links, you do not have to assign IP addresses to the links unless you are using advanced features such as dynamic routing that require them. Not assigning IP addresses results in faster configuration, and more available IP addresses on your networks.
If you require them, or if you simply want to assign IP addresses for clarity can do so.
To configure the Accounting and management VDOM link - GUI:
- Go to Global > Network > Interfaces.
- Select the expand arrow to select Create New > VDOM link.
- Enter the following information, and select OK.
| Name | AccountVlnk | |
| Interface #0 | ||
| Virtual Domain | Accounting | |
| IP/Netmask | 0.0.0.0/0.0.0.0 | |
| Administrative Access | HTTPS, PING, SSH | |
| Description | The Accounting VDOM side of the link. | |
| Interface #1 | ||
| Virtual Domain | root | |
| IP/Netmask | 0.0.0.0/0.0.0.0 | |
| Administrative Access | HTTPS, PING, SSH | |
| Description | The Management VDOM side of the link. | |
To configure the Accounting and management VDOM link - CLI:
config global
config system vdom-link
edit AccountVlnk
next
end
config system interface
edit AccountVlnk0
set vdom Accounting
set ip 0.0.0.0 0.0.0.0
set allowaccess https ping ssh
set description “Accounting side of the VDOM link“
next
edit AccountVlnk1
set vdom root
set ip 0.0.0.0 0.0.0.0
set allowaccess https ping ssh
set description “Management side of the VDOM link“
end
To configure the Sales and management VDOM link - GUI:
- Go to Global > Network > Interfaces.
- Select the expand arrow and select Create New > VDOM link.
- Enter the following information, and select OK.
| Name | SalesVlnk | |
| Interface #0 | ||
| Virtual Domain | Sales | |
| IP/Netmask | 0.0.0.0/0.0.0.0 | |
| Administrative Access | HTTPS, PING, SSH | |
| Description | The Sales VDOM side of the link. | |
| Interface #1 | ||
| Virtual Domain | root | |
| IP/Netmask | 0.0.0.0/0.0.0.0 | |
| Administrative Access | HTTPS, PING, SSH | |
| Description | The Management VDOM side of the link. | |
To configure the Sales and management VDOM link - CLI:
config global
config system vdom-link
edit SalesVlnk
end
config system interface
edit SalesVlnk0
set vdom Accounting
set ip 0.0.0.0 0.0.0.0
set allowaccess https ping ssh
set description "Sales side of the VDOM link"
next
edit SalesVlnk1
set vdom root
set ip 0.0.0.0 0.0.0.0
set allowaccess https ping ssh
set description "Management side of the VDOM link"
end
end
Configuring the firewall and Security Profile settings
With the VDOMs, physical interfaces, and VDOM links configured the firewall must now be configured to allow the proper traffic. Firewalls are configured per-VDOM, and firewall objects must be created for each VDOM separately.
For this example, the firewall group of services allowed between the internal networks and the Internet are the basic services for web browsing, file transfer, and email. These include: HTTP, HTTPS, SSL, FTP, DNS, NTP, POP3, and SMTP.
The only services allowed between Sales and Accounting are secure web browsing (HTTPS) and email (POP3 and SMTP).
|
|
The limited number of services ensures security between departments. The list of services can be expanded in the future if needed. |
Security profile settings will block all non-essential business websites while logging all web traffic, scan and file filter all web and email protocols, and block game and peer-to-peer applications using application control.
For added security, FortiClient is required on internal computers with AntiVirus scanning configured. This is enforced by Endpoint NAC in firewall policies.
Using firewall addresses makes the firewall policies easier to read. Also if any changes need to be made in the future, you can simply update the addresses without changing the firewall policies. The addresses required are:
AccountingLocal- all traffic from the internal accounting networkAccountingVlnk- all traffic from the VDOM link between accounting and management VDOMsSalesLocal- all traffic from the internal sales networkSalesVlnk- all traffic from the VDOM link between sales and management VDOM.
The Accounting VDOM requires AccountingLocal, AccountingVlnk, and SalesLocal. The Sales VDOM requires SalesLocal, SalesVlnk, and AccountingLocal.
This section includes the following topics:
- Configuring firewall service groups
- Configuring Security Profile settings for the Accounting VDOM
- Configuring firewall settings for the Accounting VDOM
- Configuring Security Profile settings for the Sales VDOM
- Configuring firewall settings for the Sales VDOM
- Configuring firewall settings between the Accounting and Sales VDOMs
Configuring firewall service groups
Service groups are an easy way to manage multiple services, especially if the same services are used on different networks.
The two service groups used here are intended for normal office traffic to the Internet, and for restricted traffic between departments. In both cases network traffic will be limited to the services listed to prevent any potential security risks or bandwidth-robbing applications.
These service groups can be changed as needed to either include additional valid services that are being used on the network, or to exclude services that are not required. Also, custom services can be created as needed for applications that are not listed.
To configure two firewall service groups - GUI:
- Open the Accounting VDOM.
- Go to Policy & Objects > Services and select Create New > Service Group.
- Select Create New, enter the following information, and select OK.
| Group Name | OfficeServices |
| Members | HTTP, HTTPS, SSL, FTP, DNS, NTP, POP3, PING, SMTP |
- Select Create New, enter the following information, and select OK.
| Group Name | AccountingSalesServices |
| Members | HTTPS, POP3, PING, SMTP |
To configure two firewall service groups - CLI:
config vdom
edit Accounting
config firewall service group
edit OfficeServices
set member HTTP HTTPS SSH FTP DNS NTP POP3 PING SMTP
next
edit AccountingSalesServices
set member HTTPS POP3 PING SMTP
end
end
Configuring Security Profile settings for the Accounting VDOM
Security Profile settings include web filtering, antivirus, application control, and other features. This example just uses those three features to ensure that
- the business environment is free from viruses
- employees do not surf grossly inappropriate websites, and
- employees do not use games or peer-to-peer applications at work.
To configure web filtering for the Accounting VDOM - GUI:
- Open the Accounting VDOM.
- Go to Security Profiles > Web Filter.
- Select Create New.
- Enter
webStrictfor the Name. - Select the arrow to expand the FortiGuard Web Filtering section.
- Block all Categories except Business Oriented, Other, and Unrated.
- Block all Classifications except Image Search..
- Log all Categories and Classifications.
- Select OK.
To configure AntiVirus for the Accounting VDOM - GUI:
- Open the Accounting VDOM.
- Go to Security Profiles > AntiVirus.
- Select Create New.
- Enter
avStrictfor the Name. - Set Detect Virues to Block and enable all Inspected Protocols.
- Select OK.
To configure application control for the Accounting VDOM - GUI:
- Open the Accounting VDOM.
- Go to Security Profiles > Application Control.
- Select Create New (+ button at top right of page).
- Enter
appStrictfor Name and select OK. - Select Create New.
- In Filters, set Category to game.
- In Applications/Settings, enter the following, and select OK.
| Action | Block |
| Packet Logging | Enable |
- Select Create New.
- In Filters, set Category to p2p.
- In Applications/Settings, enter the following, and select OK.
| Action | Block |
| Packet Logging | Enable |
- Select Apply.
To configure application control for the Accounting VDOM - CLI:
config vdom
edit Accounting
config application list
edit appStrict
config entries
edit 1
set category 2
next
edit 2
set category 8
end
end
end
Configuring firewall settings for the Accounting VDOM
This configuration includes two firewall addresses and two firewall policies for the Accounting VDOM - one for the internal network, and one for the VDOM link with the management VDOM (root).
For added security, all traffic allowed will be scanned. Only valid office traffic will be allowed using the service group OfficeServices.
Note the spelling of AccountVlnk which is due to the eleven character limit on VDOM link names.
To configure firewall addresses - GUI:
- Open the Accounting VDOM.
- Select Policy & Objects > Addresses.
- Select Create New, enter the following information, and select OK.
| Address Name | AccountingLocal |
| Type | Subnet/ IP Range |
| Subnet / IP Range | 172.100.0.0 |
| Interface | port1 |
- Select Create New, enter the following information, and select OK.
| Address Name | AccountManagement |
| Type | Subnet/ IP Range |
| Subnet / IP Range | 10.0.1.0 |
| Interface | AccountVlnk |
To configure firewall addresses - CLI:
config vdom
edit Accounting
config firewall address
edit AccountingLocal
set type iprange
set subnet 172.100.0.0
set associated-interface port1
next
edit AccountManagement
set type iprange
set subnet 10.0.1.0
set associated-interface AccountVlnk
end
end
To configure the firewall policies from AccountingLocal to the Internet - GUI:
- Open the Accounting VDOM.
- Go to Policy & Objects > IPv4 Policy.
- Select Create New, enter the following information, and then select OK.
| Name | Accounting-Local-to-Management | |
| Incoming Interface | port2 | |
| Outgoing Interface | AccountVlnk | |
| Source Address | AccountingLocal | |
| Destination Address | AccountManagement | |
| Schedule | always | |
| Service | OfficeServices | |
| Action | ACCEPT | |
| Enable NAT | enable | |
| Security Features | enabled | |
| Web Filtering | webStrict | |
| AntiVirus Filtering | avStrict | |
| Application Control | appStrict | |
- Open the root VDOM.
- Go to Policy & Objects > IPv4 Policy.
- Select Create New, enter the following information, and then select OK.
| Name | Accounting-VDOM-to-Internet | |
| Incoming Interface | AccountVlnk | |
| Outgoing Interface | ManagementExternal | |
| Source Address | AccountManagement | |
| Destination Address | all | |
| Schedule | always | |
| Service | OfficeServices | |
| Action | ACCEPT | |
| Enable NAT | enable | |
| Security Features | enabled | |
| Web Filtering | webStrict | |
| AntiVirus Filtering | avStrict | |
| Application Control | appStrict | |
To configure the firewall policies from AccountingLocal to Internet - CLI:
config vdom
edit Accounting
config firewall policy
edit 1
set name "Accounting-Local-to-Management"
set srcintf port2
set dstintf AccountVlnk
set srcaddr AccountingLocal
set dstaddr AccountManagement
set action accept
set schedule always
set service OfficeServices
set nat enable
set av-profile avStrict
set webfilter-profile webStrict
set application-list appStrict
end
end
config vdom
edit root
config firewall policy
edit 2
set name "Accounting-VDOM-to-Internet"
set srcintf AccountVlnk
set dstintf port1
set srcaddr AccountManagement
set dstaddr all
set action accept
set schedule always
set service OfficeServices
set nat enable
set av-profile scan
set webfilter-profile scan
set application-list AppControlList
end
end
To configure the firewall policies from Internet to AccountingLocal - GUI:
- Open the root VDOM.
- Go to Policy & Objects > IPv4 Policy.
- Select Create New, enter the following information, and select OK.
| Name | Internet-access-to-Accounting-VDOM | |
| Incoming Interface | port1 | |
| Outgoing Interface | AccountVlnk | |
| Source Address | all | |
| Destination Address | AccountManagement | |
| Schedule | always | |
| Service | OfficeServices | |
| Action | ACCEPT | |
| Enable NAT | enable | |
| Security Features | enabled | |
| Web Filtering | webStrict | |
| AntiVirus Filtering | avStrict | |
| Application Control | appStrict | |
- Open the Accounting VDOM.
- Go to Policy & Objects > IPv4 Policy.
- Select Create New, enter the following information, and select OK.
| Name | Management-access-to-Accounting-local | |
| Incoming Interface | AccountVlnk | |
| Outgoing Interface | port2 | |
| Source Address | AccountManagement | |
| Destination Address | AccountingLocal | |
| Schedule | always | |
| Service | OfficeServices | |
| Action | ACCEPT | |
| Enable NAT | enable | |
| Security Features | enabled | |
| Web Filtering | webStrict | |
| AntiVirus Filtering | avStrict | |
| Application Control | appStrict | |
To configure the firewall policies from Internet to AccountingLocal - CLI:
config vdom
edit root
config firewall policy
edit 3
set name "Internet-access-to-Accounting-VDOM"
set srcintf port1
set dstintf AccountVlnk
set srcaddr all
set dstaddr AccountManagement
set action accept
set schedule always
set service OfficeServices
set nat enable
set av-profile avStrict
set webfilter-profile webStrict
set application-list appstrict
end
end
config vdom
edit Accounting
config firewall policy
edit 4
set name "Management-access-to-Accounting-local"
set srcintf AccountVlnk
set dstintf port2
set srcaddr AccountManagement
set dstaddr AccountingLocal
set action accept
set schedule always
set service OfficeServices
set nat enable
set av-profile avStrict
set webfilter-profile webStrict
set application-list appstrict
end
end
Configuring Security Profile settings for the Sales VDOM
Security profile settings include web filtering, antivirus, application control, and other features. This example just uses those three features to ensure that
- the business environment is free from viruses
- employees do not surf grossly inappropriate websites, and
- employees do not use games or peer-to-peer applications at work.
Note that Sales web traffic is different from Accounting, and web filtering is different to account for this.
To configure web filtering for the Sales VDOM - GUI:
- Open the Sales VDOM.
- Go to Security Profiles > Web Filter.
- Select Create New.
- Enter
webStrictfor the Name. - In FortiGuard Categories, select all of the categories except Bandwidth Consuming, General Interest - Business and Unrated.
- In Change Action for Selected Categories select Block.
- Select Apply.
To configure web filtering for the Sales VDOM - CLI:
config vdom
edit Sales
config webfilter profile
edit webStrict
config ftgd-wf
set allow g07 g08 g21 g22 c01 c03
set deny g01 g02 g03 g04 g05 g06 c02 c04 c05 c06 c07
end
set web-ftgd-err-log enable
end
end
To configure AntiVirus for the Sales VDOM - GUI:
- Open the Sales VDOM.
- Go to Security Profiles > AntiVirus.
- Select Create New.
- Enter
avStrictfor the Name. - Set Detect Virues to Block and enable all Inspected Protocols.
- Select Apply.
To configure AntiVirus for the Sales VDOM - CLI:
config vdom
edit Sales
config antivirus profile
edit "avStrict"
config http
set options scan file-filter
end
config ftp
set options scan file-filter
end
config imap
set options scan file-filter
end
config pop3
set options scan file-filter
end
config smtp
set options scan file-filter
end
config nntp
set options scan file-filter
end
config im
set options scan file-filter
end
set filepattable 1
set av-virus-log enable
set av-block-log enable
end
end
To configure application control for the Sales VDOM - GUI:
- Open the Accounting VDOM.
- Go to Security Profiles > Application Control.
- Select Create New (+ button at top right of page).
- Enter
appStrictfor Name and select OK. - Select Create New.
- In Filters, set Category to game.
- In Applications/Settings, enter the following, and select OK.
| Action | Block |
| Packet Logging | Enable |
- Select Create New.
- In Filters, set Category to p2p.
- In Applications/Settings, enter the following, and select OK.
| Action | Block |
| Packet Logging | Enable |
- Select Apply.
To configure application control for the Sales VDOM - CLI:
config vdom
edit Sales
config application list
edit "appStrict"
config entries
edit 1
set category 2
next
edit 2
set category 8
end
end
end
Configuring firewall settings for the Sales VDOM
Like the Accounting firewall settings, this configuration includes two firewall addresses and two firewall policies for the sales VDOM: one for the internal network, and one for the VDOM link with the management VDOM.
When entering the CLI commands, the number of the firewall policies must be high enough to be a new policy. Depending on the number of firewall policies on your FortiGate unit, this may require starting at a higher number than the 6 required for the default configuration. This number is added automatically when you configure firewall policies using the web manager interface.
The FortiClient application must be used on Sales network computers to ensure additional protection for the sensitive information and for protection against spam.
To configure firewall addresses - GUI:
- Open the Sales VDOM.
- Go to Policy & Objects > Addresses.
- Select Create New, enter the following information, and select OK.
| Address Name | SalesLocal |
| Type | Subnet / IP Range |
| Subnet / IP Range | 172.100.0.0 |
| Interface | port3 |
- Go to Policy & Objects > Addresses.
- Select Create New, enter the following information, and select OK.
| Address Name | SalesManagement |
| Type | Subnet / IP Range |
| Subnet / IP Range | 10.0.1.0 |
| Interface | SalesVlnk |
To configure the firewall addresses - CLI:
config vdom
edit Sales
config fireall address
edit SalesLocal
set type iprange
set subnet 172.100.0.0
set associated-interface port2
next
edit SalesManagement
set type iprange
set subnet 10.0.1.0
set associated-interface SalesVlnk
end
end
To configure the firewall policies from SalesLocal to the Internet - GUI:
- Open the Sales VDOM.
- Go to Policy & Objects > IPv4 Policy.
- Select Create New, enter the following information, and select OK.
| Name | Sales-local-to-Management |
| Incoming Interface | port3 |
| Outgoing Interface | SalesVlnk |
| Source Address | SalesLocal |
| Destination Address | SalesManagement |
| Schedule | always |
| Service | OfficeServices |
| Action | ACCEPT |
| Log Allowed Traffic | enabled |
- Open the root VDOM.
- Go to Policy & Objects > IPv4 Policy.
- Select Create New, enter the following information, and select OK.
| Name | Sales-VDOM-to-Internet |
| Incoming Interface | SalesVlnk |
| Outgoing Interface | ManagementExternal |
| Source Address | SalesManagement |
| Destination Address | all |
| Schedule | always |
| Service | OfficeServices |
| Action | ACCEPT |
| Log Allowed Traffic | enabled |
To configure the firewall policies from SalesLocal to the Internet - CLI:
config vdom
edit root
config firewall policy
edit 6
set name "Sales-local-to-Management"
set srcintf port2
set srcaddr SalesLocal
set dstintf SalesVlnk
set dstaddr SalesManagement
set schedule always
set service OfficeServices
set action accept
set logtraffic enable
end
end
config vdom
edit Sales
config firewall policy
edit 7
set name "Sales-VDOM-to-Internet"
set srcintf SalesVlnk
set srcaddr SalesManagement
set dstintf external
set dstaddr all
set schedule always
set service OfficeServices
set action accept
set logtraffic enable
end
end
To configure the firewall policies from the Internet to SalesLocal - GUI:
- Open the root VDOM.
- Go to Policy & Objects > IPv4 Policy.
- Select Create New, enter the following information, and select OK.
| Name | Internet-access-to-Sales-VDOM |
| Incoming Interface | ManagementExternal |
| Outgoing Interface | SalesVlnk |
| Source Address | all |
| Destination Address | SalesManagement |
| Schedule | always |
| Service | OfficeServices |
| Action | ACCEPT |
| Protection Profile | scan |
| Log Allowed Traffic | enabled |
- Open the Sales VDOM.
- Go to Policy & Objects > IPv4 Policy.
- Select Create New, enter the following information, and select OK.
| Name | Management-access-to-Sales-local |
| Incoming Interface | SalesVlnk |
| Outgoing Interface | port2 |
| Source Address | SalesManagement |
| Destination Address | SalesLocal |
| Schedule | always |
| Service | OfficeServices |
| Action | ACCEPT |
| Log Allowed Traffic | enabled |
To configure the firewall policies from the Internet to SalesLocal - CLI:
config vdom
edit root
config firewall policy
edit 8
set name "Internet-access-to-Sales-VDOM"
set srcintf external
set srcaddr all
set dstintf SalesVlnk
set dstaddr SalesManagement
set schedule always
set service OfficeServices
set action accept
set logtraffic enable
end
end
config vdom
edit Sales
config firewall policy
edit 9
set name "Management-access-to-Sales-local"
set srcintf SalesVlnk
set srcaddr SalesManagement
set dstintf port2
set dstaddr SalesLocal
set schedule always
set service OfficeServices
set action accept
set logtraffic enable
end
end
Configuring firewall settings between the Accounting and Sales VDOMs
Firewall policies are required for any communication between each internal network and the Internet. Policies are also required for the two internal networks to communicate with each other through the management VDOM.
The more limited AccountingSalesServices group of services will be used between Sales and Accounting to ensure the traffic is necessary business traffic only. These policies will result in a partially meshed VDOM configuration. The FortiClient application must be used to ensure additional protection for the sensitive accounting information.
Two firewall policies are required to allow traffic in both directions between Sales and Accounting.
To configure the firewall policy between Sales and Accounting on the management VDOM - GUI:
- Open the root VDOM.
- Go to Policy & Objects > IPv4 Policy.
- Select Create New, enter the following information, and select OK.
| Name | Sales-VDOM-to-Accounting-VDOM |
| Incoming Interface | SalesVlnk |
| Outgoing Interface | AccountVlnk |
| Source Address | SalesManagement |
| Destination Address | AccountingManagement |
| Schedule | always |
| Service | AccountingSalesServices |
| Action | ACCEPT |
| Protection Profile | scan |
| Log Allowed Traffic | enabled |
- Go to Policy & Objects > IPv4 Policy.
- Select Create New, enter the following information, and select OK.
| Name | Accounting-VDOM-to-Sales-VDOM |
| Incoming Interface | AccountVlnk |
| Outgoing Interface | SalesVlnk |
| Source Address | AccountingManagement |
| Destination Address | SalesManagement |
| Schedule | always |
| Service | AccountingSalesServices |
| Action | ACCEPT |
| Log Allowed Traffic | enabled |
To configure the firewall policy between Sales and Accounting on the management VDOM - CLI:
config vdom
edit root
config system firewall policy
edit 9
set name "Sales-VDOM-to-Accounting-VDOM"
set srcintf SalesVlnk
set srcaddr SalesManagement
set dstintf AccountVlnk
set dstaddr AccountManagement
set schedule always
set service AccountingSalesServices
set action accept
set logtraffic enable
next
edit 10
set name "Accounting-VDOM-to-Sales-VDOM"
set srcintf AccountVlnk
set srcaddr AccountManagement
set dstintf SalesVlnk
set dstaddr SalesManagement
set schedule always
set service AccountingSalesServices
set action accept
set logtraffic enable
end
end
Testing the configuration
Once the inter-VDOM routing has been configured, tests must be conducted to confirm proper operation. If there are any problems, use the troubleshooting tips to resolve them.
This section includes the following topics:
Testing connectivity
Testing connectivity ensures that physical networking connections as well as FortiGate unit interface configurations, including firewall policies, are properly configured.
The easiest way to test connectivity is to use the ping and traceroute commands to confirm the connectivity of different routes on the network. Include testing:
- from AccountingLocal to Internet
- from Internet to AccountingLocal
- from SalesLocal to Internet
- from Internet to SalesLocal
- from AccountingLocal to SalesLocal.
When using the commands on a Windows computer, go to a command line prompt and enter either ping <IP address> or tracert <IP address>.
When using the commands on a FortiGate unit, go to the CLI and enter either exec ping <IP address> or exec traceroute <IP address>.
Troubleshooting Tips
When there are problems with connectivity, the following troubleshooting tips will help resolve the issues.
- If a multiple hop test, such as traceroute, is not successful then reduce it to a single hop to simplify the test. Test each link of the path to see which hop is down. If all hops are up, check the FortiGate unit policies to ensure they allow basic traffic to flow as expected.
- If ping does not work, confirm that the FortiGate unit interfaces have Ping enabled and also ensure Ping is enabled in the firewall policies. Otherwise the Ping traffic will be blocked.
- If one protocol does not work but others do work, check the FortiGate unit firewall policies for that one protocol to ensure it is allowed.
- If there are unexplained connectivity problems, check the local computer to ensure it does not have a software firewall running that may be blocking traffic. MS Windows computers have a firewall running by default that can cause problems.
For additional troubleshooting, see Troubleshooting Virtual Domains.
Copyright © 2021 Fortinet, Inc. All Rights Reserved. | Terms of Service | Privacy Policy
