
Configure FortiGate without Internet connectivity to access a local FortiManager as FDN
By default, FortiGate connects to the public FDN to validate its license and download security feature updates, including databases and engines for security feature updates such as AntiVirus and IPS. Your FortiGate can be configured to use a local FortiManager for both license validation and FDN updates.
In the case of a FortiGate without Internet access, the full configuration must be done before the license is uploaded. The moment the FortiGate receives a license file (from the GUI or CLI), it immediately attempts to access the public FDN to validate the license. Until the license is validated, an administrator cannot log in to the GUI and some CLI commands are unavailable, including those needed to define a local FDN server. This makes it very difficult to add the necessary commands to point the FortiGate to a local FortiManager for license validation.
This document describes how to configure a FortiGate for local FDN access, and provides a workaround to fix a FortiGate that is unable to access a public license validation server.
Follow this procedure to configure a FortiGate to use a local FortiManager for FDN access:
|
|
Completing these steps in a different order may cause the process to fail, and make the FortiGate unable to validate its license. |
From the FortiGate CLI:
- Configure central management settings:
config system central-management
config server-list
edit 1
set server-type update rating
set server-address <fortimanager_ip>
next
end
set include-default-servers disable
end
- Upload the license using TFTP using the CLI:
execute restore vmlicense tftp <filename>.lic <tftp_ip>
The FortiGate will reboot.
- Complete the central management configuration:
config system central-management
set fmg <fortimanager_ip>
end
From the FortiManager GUI:
You must manually add devices to the FortiManager unit.
As a result of the CLI commands entered on your FortiGate unit, the device is displayed on the FortiManager GUI in the Unregistered Devices list. located in he Device Manager pane for the root ADOM.
When ADOMs are enabled, the device must be assigned to an ADOM when it is registered.
To manually add devices:
- Confirm that central management is enabled for the device (as above).
- In FortiManager, select the root ADOM, and go to Device Manager.
- In the tree menu, click Unregistered Devices. The content pane displays the unregistered devices.
- Select the unregistered device or devices, then click Add. The Add Device dialog box opens.
- If ADOMs are enabled, select the ADOM in the Add the following device(s) to ADOM list. If ADOMs are disabled, select root.
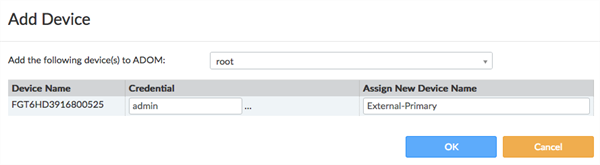
- Type the login and password for the device(s).
- Click OK to register the device(s).
The devices are added.
Copyright © 2021 Fortinet, Inc. All Rights Reserved. | Terms of Service | Privacy Policy
