
FortiLink Configuration Using FortiGate GUI
This section describes the configuration steps to establish a FortiLink between a FortiSwitch and a FortiGate unit.
You can configure FortiLink using the FortiGate web-based manager (GUI) or the FortiGate CLI. We recommend using the FortiGate GUI, because the CLI steps are more complex (and therefore more prone to error).
If you use one of the auto-discovery FortiSwitch ports, you can establish the FortiLink connection (single port or LAG) with zero configuration steps on the FortiSwitch, and with a few simple configuration steps on the FortiGate.
Summary of the Steps
- On the FortiGate, configure the FortLink port or create a logical FortLink interface.
- Authorize the managed FortiSwitch.
Configure FortiLink as a Single Link
Configure the FortiLink port on the FortiGate using the following steps:
- Go to Network > Interfaces
- (Optional) If the FortiLink physical port is currently included in the internal interface, edit the internal interface and remove the desired port from the Physical Interface Members.
- Edit the FortiLink port.
- Enter the following fields in the Edit Interface form:
- Addressing mode: Set to Dedicated to FortiSwitch.
- IP/Network Mask: system automatically sets the IP address and network mask.
- (Optional) Automatically authorize devices: disable to manually authorize the FortiSwitch.
- Click OK.
Configure FortiLink as a Logical Interface
You can configure the FortiLink as a logical interface: link-aggregation group (LAG), hardware switch or software switch).
NOTE: LAG is supported on all FortiSwitch models and on FortiGate models FGT-100D and above. Hardware switch is supported on some FortiGate models.
Connect any of the FortiLink-capable ports on the FortiGate to the FortiSwitch. Make sure that you configure auto-discovery on the FortiSwitch ports (unless the port is a default auto-discovery port).
- Go to Network> Interfaces
- (Optional) If the FortiLink physical ports are currently included in the internal interface, edit the internal interface and remove the desired ports from the Physical Interface Members.
- Click Create New
- Enter the following fields in the Add Interface form:
- Interface name: enter a name for the interface (11 characters maximum).
- Type: select 802.3ad Aggregate, Hardware Switch, or Software Switch.
- Physical Interface Members : select the FortiGate ports for the logical interface.
- Addressing mode: set to Dedicated to FortiSwitch.
- IP/Network Mask: system automatically sets the IP address and network mask.
- (Optional) Automatically authorize devices: disable to manually authorize the FortiSwitch.
- Click OK.
FortiLink Split-Interface
You can create a FortiLink Split-Interface, which connects a FortiLink aggregate interface from one FortiGate to two FortiSwitches.
NOTE: The aggregate interface for this configuration must contain exactly two physical ports (one for each FortiSwitch).
You must enable the Split-Interface option on the FortiLink aggregate interface. From the FortiGate CLI, enter the following commands:
config system interface
edit <name of the FortiLink interface>
set fortilink-split-interface enable
end
Authorizing the FortiSwitch
If you configured the FortiLink interface to manually authorize the FortiSwitch as a managed switch, perform the following steps:
- Go to WiFi & Switch Controller > Managed FortiSwitch.
- (Optional)Click on the FortiSwitch faceplate and click Authorize. This step is required only if you disabled the automatic authorization field of the interface.
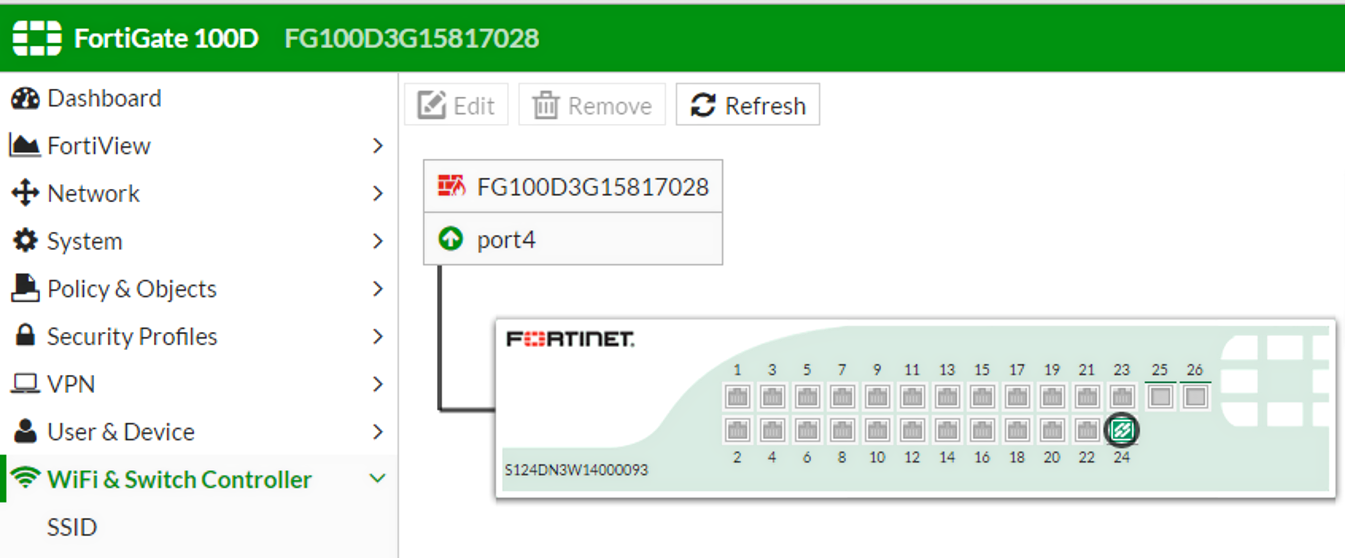
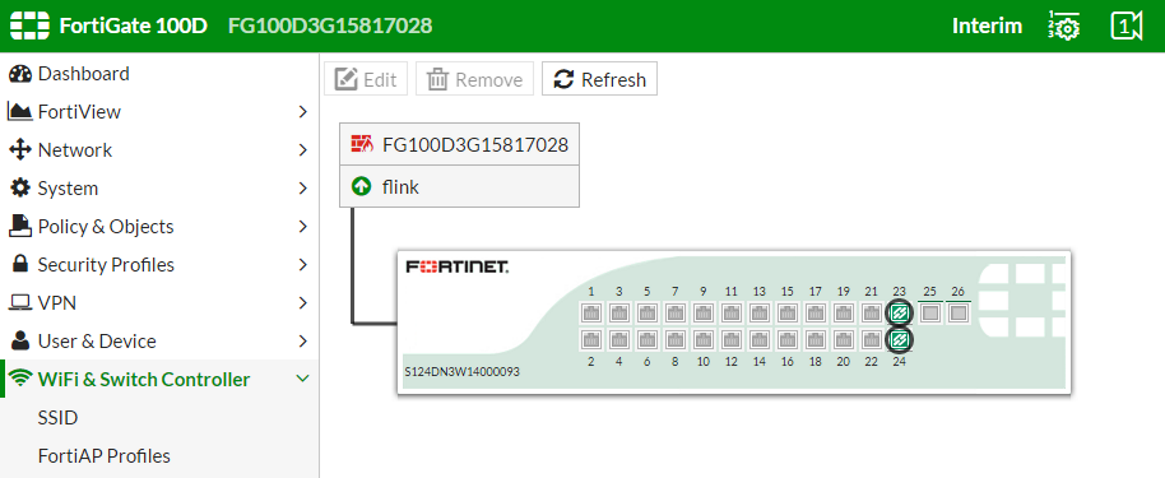
Managed FortiSwitch Display
The Managed FortiSwitch page displays the FortiGate name and its FortiLink interface, and the faceplate for the connected switch.
When the FortiLink is established successfully, the status is green (next to the FortiGate interface name and on the FortiSwitch faceplate) and the link between the ports is a solid line.
FortiLink as Single Link
The page displays the FortiLink port number on the FortiGate and the FortiLink port is highlighted in green on the FortiSwitch faceplate.
FortiLink as Logical Interface
The page displays the FortiLink interface name on the FortiGate and the FortiLink ports are highlighted in green on the FortiSwitch faceplate.
Edit Managed FortiSwitch
To edit the managed FortiSwitch, perform the following steps:
- Go to WiFi & Switch Controller > Managed FortiSwitch.
- Click on the FortiSwitch faceplate and click Edit.
- In the Edit Managed FortiSwitch form, you can input a name and a description for this switch.
- Click OK to save the changes.
From the Edit Managed FortiSwitch form, you can also perform the following actions:
- Click Restart to restart the FortiSwitch.
- Click De-authorize to stop the FortiSwitch from being managed by this FortiGate.
- Click Upgrade to upgrade the switch. The system will prompt you for the new image file to upload and install.
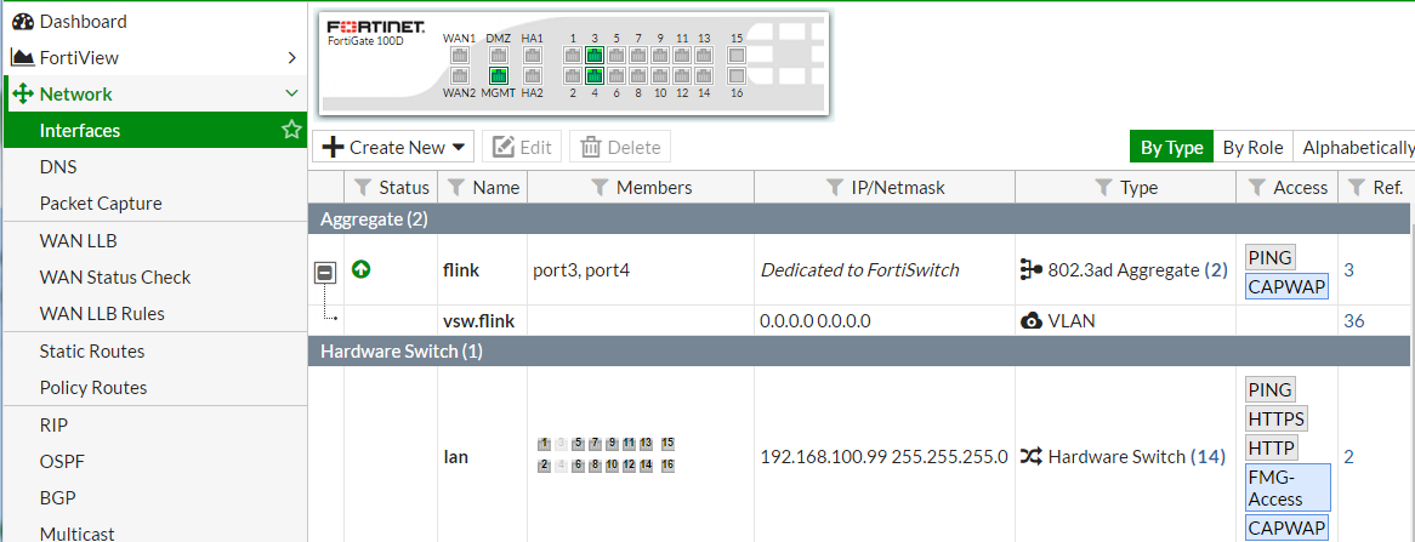
Network Interface Display
In System > Network > Interfaces, the system displays the interface type, and displays Dedicated to FortiSwitch in the IP/Netmask field.
The following figure shows the Interfaces table entry for a FortiLink LAG. The table also displays the VLANs associated with the interface.
Copyright © 2020 Fortinet, Inc. All Rights Reserved. | Terms of Service | Privacy Policy
