
Load balancing configuration examples
Example HTTP load balancing to three real web servers
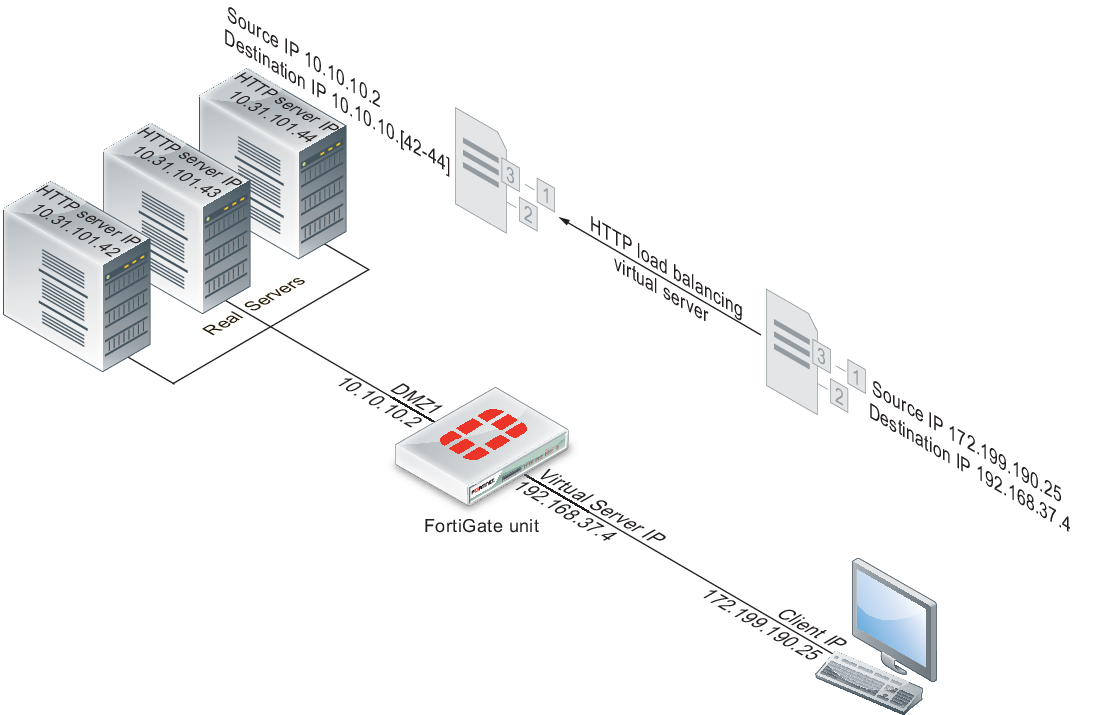
In this example, a virtual web server with IP address 192.168.37.4 on the Internet, is mapped to three real web servers connected to the FortiGate unit dmz1 interface. The real servers have IP addresses 10.10.123.42, 10.10.123.43, and 10.10.123.44. The virtual server uses the First Alive load balancing method. The configuration also includes an HTTP health check monitor that includes a URL used by the FortiGate unit for get requests to monitor the health of the real servers.
Connections to the virtual web server at IP address 192.168.37.4 from the Internet are translated and load balanced to the real servers by the FortiGate unit. First alive load balancing directs all sessions to the first real server. The computers on the Internet are unaware of this translation and load balancing and see a single virtual server at IP address 192.168.37.4 rather than the three real servers behind the FortiGate unit.
Virtual server configuration example
Web-based manager configuration
Use the following procedures to configure this load balancing setup from the web-based manager.
To add an HTTP health check monitor
In this example, the HTTP health check monitor includes the URL “/index.html” and the Matched Phrase “Fortinet products”.
- Go to Policy & Objects > Health Check.
- Select Create New.
- Add an HTTP health check monitor that sends get requests to http://<real_server_IP_address>/index.html and searches the returned web page for the phrase “Fortinet products”.
| Name | HTTP_health_chk_1 |
| Type | HTTP |
| Port | 80 |
| URL | /index.html |
| Matched Content | Fortinet products |
| Interval | 10 seconds |
| Timeout | 2 seconds |
| Retry | 3 |
- Select OK.
To add the HTTP virtual server
- Go to Policy & Objects > Virtual Servers.
- Select Create New.
- Add an HTTP virtual server that allows users on the Internet to connect to the real servers on the internal network. In this example, the FortiGate wan1 interface is connected to the Internet.
| Name | Load_Bal_VS1 |
| Type | HTTP |
| Interface | wan1 |
| Virtual Server IP | 192.168.37.4 The public IP address of the web server. The virtual server IP address is usually a static IP address obtained from your ISP for your web server. This address must be a unique IP address that is not used by another host and cannot be the same as the IP address of the external interface the virtual IP will be using. However, the external IP address must be routed to the selected interface. The virtual IP address and the external IP address can be on different subnets. When you add the virtual IP, the external interface responds to ARP requests for the external IP address. |
| Virtual Server Port | 80 |
| Load Balance Method | First Alive |
| Persistence | HTTP cookie |
| HTTP Multiplexing | Select. The FortiGate unit multiplexes multiple client into a few connections between the FortiGate unit and each real HTTP server. This can improve performance by reducing server overhead associated with establishing multiple connections. |
| Preserve Client IP | Select The FortiGate unit preserves the IP address of the client in the X-Forwarded-For HTTP header. |
| Health Check | Move the HTTP_health_chk_1 health check monitor to the Selected list. |
- Select OK.
To add the real servers and associate them with the virtual server
- Go to Policy & Objects > Real Servers.
- Select Create New.
- Configure three real servers that include the virtual server Load_Bal_VS1. Each real server must include the IP address of a real server on the internal network.
Configuration for the first real server.
| Virtual Server | Load_Bal_VS1 |
| IP Address | 10.10.10.42 |
| Port | 80 |
| Weight | Cannot be configured because the virtual server does not include weighted load balancing. |
| Maximum Connections | 0 Setting Maximum Connections to 0 means the FortiGate unit does not limit the number of connections to the real server. Since the virtual server uses First Alive load balancing you may want to limit the number of connections to each real server to limit the traffic received by each server. In this example, the Maximum Connections is initially set to 0 but can be adjusted later if the real servers are getting too much traffic. |
Configuration for the second real server.
| Virtual Server | Load_Bal_VS1 |
| IP Address | 10.10.10.43 |
| Port | 80 |
| Weight | Cannot be configured because the virtual server does not include weighted load balancing. |
| Maximum Connections | 0 Setting Maximum Connections to 0 means the FortiGate unit does not limit the number of connections to the real server. Since the virtual server uses First Alive load balancing you may want to limit the number of connections to each real server to limit the traffic received by each server. In this example, the Maximum Connections is initially set to 0 but can be adjusted later if the real servers are getting too much traffic. |
Configuration for the third real server.
| Virtual Server | Load_Bal_VS1 |
| IP Address | 10.10.10.44 |
| Port | 80 |
| Weight | Cannot be configured because the virtual server does not include weighted load balancing. |
| Maximum Connections | 0 Setting Maximum Connections to 0 means the FortiGate unit does not limit the number of connections to the real server. Since the virtual server uses First Alive load balancing you may want to limit the number of connections to each real server to limit the traffic received by each server. In this example, the Maximum Connections is initially set to 0 but can be adjusted later if the real servers are getting too much traffic. |
To add the virtual server to a security policy
Add a wan1 to dmz1 security policy that uses the virtual server so that when users on the Internet attempt to connect to the web server’s IP address, packets pass through the FortiGate unit from the wan1 interface to the dmz1 interface. The virtual IP translates the destination address of these packets from the virtual server IP address to the real server IP addresses.
- Go to Policy & Objects > IPv4 Policy.
- Select Create New.
- Configure the security policy:
| Policy Type | Firewall |
| Policy Subtype | Address |
| Incoming Interface | wan1 |
| Source Address | all (or a more specific address) |
| Outgoing Interface | dmz1 |
| Destination Address | Load_Bal_VS1 |
| Schedule | always |
| Service | HTTP |
| Action | ACCEPT |
| Log Allowed Traffic | Select to log virtual server traffic |
| Enable NAT | Select this option and select Use Destination Interface Address. |
- Select other security policy options as required.
- Select OK.
CLI configuration
Use the following procedure to configure this load balancing setup from the CLI.
To configure HTTP load balancing
- Use the following command to add an HTTP health check monitor that sends get requests to http://<real_server_IP_address>/index.html and searches the returned web page for the phrase “Fortinet products”.
config firewall ldb-monitor
edit HTTP_health_chk_1
set type http
set port 80
set http-get /index.html
set http-match “Fortinet products”
set interval 10
set timeout 2
set retry 3
end
- Use the following command to add an HTTP virtual server that allows users on the Internet to connect to the real servers on the internal network. In this example, the FortiGate wan1 interface is connected to the Internet.
config firewall vip
edit Load-Bal_VS1
set type server-load-balance
set server-type http
set ldb-method first-alive
set http-multiplex enable
set http-ip-header enable
set extip 192.168.37.4
set extintf wan1
set extport 80
set persistence http-cookie
set monitor HTTP_health_chk_1
config realservers
edit 1
set ip 10.10.10.42
set port 80
next
edit 2
set ip 10.10.10.43
set port 80
next
edit 3
set ip 10.10.10.44
set port 80
end
end
- Use the following command to add a security policy that includes the load balance virtual server as the destination address.
config firewall policy
edit 0
set srcintf wan1
set srcaddr all
set dstintf dmz1
set dstaddr Load-Bal_VS1
set action accept
set schedule always
set service ALL
set nat enable
end
Configure other security policy settings as required.
Example Basic IP load balancing configuration
This example shows how to add a server load balancing virtual IP that load balances all traffic among 3 real servers. In the example the Internet is connected to port2 and the virtual IP address of the virtual server is 192.168.20.20. The load balancing method is weighted. The IP addresses of the real servers are 10.10.10.1, 10.10.10.2, and 10.10.10.3. The weights for the real servers are 1, 2, and 3. The default weight is 1 and does not have to be changed for the first real server.
config firewall vip
edit All_Load_Balance
set type server-load-balance
set server-type ip
set extintf port2
set extip 192.168.20.20
set ldb-method weighted
config realservers
edit 1
set ip 10.10.10.1
next
edit 2
set ip 10.10.10.2
set weight 2
next
edit 3
set ip 10.10.10.3
set weight 3
end
end
Example Adding a server load balance port forwarding virtual IP
In this example, a virtual web server with IP address 192.168.37.4 on the Internet, is mapped to three real web servers connected to the FortiGate unit dmz1 interface. The real servers have IP addresses 10.10.123.42, 10.10.123.43, and 10.10.123.44. The virtual server uses the First Alive load balancing method.
Each real server accepts HTTP connections on a different port number. The first real server accepts connections on port 8080, the second on port 8081, and the third on 8082. The configuration also includes an HTTP health check monitor that includes a URL used by the FortiGate unit for get requests to monitor the health of the real servers.
Connections to the virtual web server at IP address 192.168.37.4 from the Internet are translated and load balanced to the real servers by the FortiGate unit. First alive load balancing directs all sessions to the first real server. The computers on the Internet are unaware of this translation and load balancing and see a single virtual server at IP address 192.168.37.4 rather than the three real servers behind the FortiGate unit.
Server load balance virtual IP port forwarding

To complete this configuration, all of the steps would be the same as in Example HTTP load balancing to three real web servers except for configuring the real servers.
To add the real servers and associate them with the virtual server
Use the following steps to configure the FortiGate unit to port forward HTTP packets to the three real servers on ports 8080, 8081, and 8082.
- Go to Policy & Objects > Real Servers.
- Select Create New.
- Configure three real servers that include the virtual server Load_Bal_VS1. Each real server must include the IP address of a real server on the internal network and have a different port number.
Configuration for the first real server.
| Virtual Server | Load_Bal_VS1 |
| IP | 10.10.10.42 |
| Port | 8080 |
| Weight | Cannot be configured because the virtual server does not include weighted load balancing. |
| Maximum Connections | 0 |
Configuration for the second real server.
| Virtual Server | Load_Bal_VS1 |
| IP | 10.10.10.43 |
| Port | 8081 |
| Weight | Cannot be configured because the virtual server does not include weighted load balancing. |
| Maximum Connections | 0 |
Configuration for the third real server.
| Virtual Server | Load_Bal_VS1 |
| IP | 10.10.10.44 |
| Port | 8082 |
| Weight | Cannot be configured because the virtual server does not include weighted load balancing. |
| Maximum Connections | 0 |
Example Weighted load balancing configuration
This example shows how to using firewall load balancing to load balances all traffic among 3 real servers. In the example the Internet is connected to port2 and the virtual IP address of the virtual server is 192.168.20.20. The load balancing method is weighted. The IP addresses of the real servers are 10.10.10.1, 10.10.10.2, and 10.10.10.3. The weights for the real servers are 1, 2, and 3.
This configuration does not include a health check monitor.
Web-based manager configuration
Use the following procedures to configure this load balancing setup from the web-based manager.
To add the HTTP virtual server
- Go to Policy & Objects > Virtual Servers.
- Select Create New.
- Add an IP virtual server that allows users on the Internet to connect to the real servers on the internal network. In this example, the FortiGate port2 interface is connected to the Internet.
| Name | HTTP_weghted_LB |
| Type | IP |
| Interface | port2 |
| Virtual Server IP | 192.168.20.20 |
| Load Balance Method | Weighted |
All other virtual server settings are not required or cannot be changed.
- Select OK.
To add the real servers and associate them with the virtual server
- Go to Policy & Objects > Real Servers.
- Select Create New.
- Configure three real servers that include the virtual server All_Load _Balance. Because the Load Balancing Method is Weighted, each real server includes a weight. Servers with a greater weight receive a greater proportion of forwarded connections,
Configuration for the first real server.
| Virtual Server | HTTP_weghted_LB |
| IP Address | 10.10.10.1 |
| Port | Cannot be configured because the virtual server is an IP server. |
| Weight | 1 |
| Maximum Connections | 0 Setting Maximum Connections to 0 means the FortiGate unit does not limit the number of connections to the real server. Since the virtual server uses First Alive load balancing you may want to limit the number of connections to each real server to limit the traffic received by each server. In this example, the Maximum Connections is initially set to 0 but can be adjusted later if the real servers are getting too much traffic. |
Configuration for the second real server.
| Virtual Server | HTTP_weghted_LB |
| IP Address | 10.10.10.2 |
| Port | Cannot be configured because the virtual server is an IP server. |
| Weight | 2 |
| Maximum Connections | 0 Setting Maximum Connections to 0 means the FortiGate unit does not limit the number of connections to the real server. Since the virtual server uses First Alive load balancing you may want to limit the number of connections to each real server to limit the traffic received by each server. In this example, the Maximum Connections is initially set to 0 but can be adjusted later if the real servers are getting too much traffic. |
Configuration for the third real server.
| Virtual Server | HTTP_weghted_LB |
| IP Address | 10.10.10.3 |
| Port | Cannot be configured because the virtual server is an IP server. |
| Weight | 3 |
| Maximum Connections | 0 Setting Maximum Connections to 0 means the FortiGate unit does not limit the number of connections to the real server. Since the virtual server uses First Alive load balancing you may want to limit the number of connections to each real server to limit the traffic received by each server. In this example, the Maximum Connections is initially set to 0 but can be adjusted later if the real servers are getting too much traffic. |
To add the virtual server to a security policy
Add a port2 to port1 security policy that uses the virtual server so that when users on the Internet attempt to connect to the web server’s IP address, packets pass through the FortiGate unit from the wan1 interface to the dmz1 interface. The virtual IP translates the destination address of these packets from the virtual server IP address to the real server IP addresses.
- Go to Policy & Objects > IPv4 Policy.
- Select Create New.
- Configure the security policy:
| Policy Type | Firewall |
| Policy Subtype | Address |
| Incoming Interface | port2 |
| Source Address | all (or a more specific address) |
| Outgoing Interface | port1 |
| Destination Address | HTTP_weghted_LB |
| Schedule | always |
| Service | ALL |
| Action | ACCEPT |
| Enable NAT | Select this option and select Use Destination Interface Address. |
- Select other security policy options as required.
- Select OK.
CLI configuration
Load balancing is configured from the CLI using the config firewall vip command and by setting type to server-load-balance. The default weight is 1 and does not have to be changed for the first real server.
Use the following command to add the virtual server and the three weighted real servers.
config firewall vip
edit HTTP_weghted_LB
set type server-load-balance
set server-type ip
set extintf port2
set extip 192.168.20.20
set ldb-method weighted
config realservers
edit 1
set ip 10.10.10.1
next
edit 2
set ip 10.10.10.2
set weight 2
next
edit 3
set ip 10.10.10.3
set weight 3
end
end
Example HTTP and HTTPS persistence configuration
This example shows how to add a virtual server named HTTP_Load_Balance that load balances HTTP traffic using port 80 and a second virtual server named HTTPS_Load_Balance that load balances HTTPS traffic using port 443. The Internet is connected to port2 and the virtual IP address of the virtual server is 192.168.20.20. Both server load balancing virtual IPs load balance sessions to the same three real servers with IP addresses 10.10.10.2, 10.10.10.2, and 10.10.10.3. The real servers provide HTTP and HTTPS services.
For both virtual servers, persistence is set to HTTP Cookie to enable HTTP cookie persistence.
To add the HTTP and HTTPS virtual servers
- Go to Policy & Objects > Virtual Servers.
- Add the HTTP virtual server that includes HTTP Cookie persistence.
| Name | HTTP_Load_Balance |
| Type | HTTP |
| Interface | port2 |
| Virtual Server IP | 192.168.20.20 |
| Virtual Server Port | 80 In this example the virtual server uses port 8080 for HTTP sessions instead of port 80. |
| Load Balance Method | Static |
| Persistence | HTTP cookie |
- Select OK.
- Select Create New.
- Add the HTTPs virtual server that also includes HTTP Cookie persistence.
| Name | HTTPS_Load_Balance |
| Type | HTTPS |
| Interface | port2 |
| Virtual Server IP | 192.168.20.20 |
| Virtual Server Port | 443 |
| Load Balance Method | Static |
| Persistence | HTTP cookie |
- Select OK.
To add the real servers and associate them with the virtual servers
- Go to Policy & Objects > Real Servers.
- Select Create New.
- Configure three real servers for HTTP that include the virtual server HTTP_Load_Balance.
Configuration for the first HTTP real server.
| Virtual Server | HTTP_Load_Balance |
| IP Address | 10.10.10.1 |
| Port | 80 |
| Weight | Cannot be configured because the virtual server does not include weighted load balancing. |
| Maximum Connections | 0 |
Configuration for the second HTTP real server.
| Virtual Server | HTTP_Load_Balance |
| IP Address | 10.10.10.2 |
| Port | 80 |
| Weight | Cannot be configured because the virtual server does not include weighted load balancing. |
| Maximum Connections | 0 |
Configuration for the third HTTP real server.
| Virtual Server | HTTP_Load_Balance |
| IP Address | 10.10.10.3 |
| Port | 80 |
| Weight | Cannot be configured because the virtual server does not include weighted load balancing. |
| Maximum Connections | 0 |
- Configure three real servers for HTTPS that include the virtual server HTTPS_Load_Balance.
Configuration for the first HTTPS real server.
| Virtual Server | HTTP_Load_Balance |
| IP Address | 10.10.10.1 |
| Port | 443 |
| Weight | Cannot be configured because the virtual server does not include weighted load balancing. |
| Maximum Connections | 0 |
Configuration for the second HTTPS real server.
| Virtual Server | HTTP_Load_Balance |
| IP Address | 10.10.10.2 |
| Port | 443 |
| Weight | Cannot be configured because the virtual server does not include weighted load balancing. |
| Maximum Connections | 0 |
Configuration for the third HTTPS real server.
| Virtual Server | HTTPS_Load_Balance |
| IP Address | 10.10.10.3 |
| Port | 443 |
| Weight | Cannot be configured because the virtual server does not include weighted load balancing. |
| Maximum Connections | 0 |
To add the virtual servers to security policies
Add a port2 to port1 security policy that uses the virtual server so that when users on the Internet attempt to connect to the web server’s IP address, packets pass through the FortiGate unit from the wan1 interface to the dmz1 interface. The virtual IP translates the destination address of these packets from the virtual server IP address to the real server IP addresses.
- Go to Policy & Objects > IPv4 Policy.
- Select Create New.
- Configure the HTTP security policy:
| Policy Type | Firewall |
| Policy Subtype | Address |
| Incoming Interface | port2 |
| Source Address | all |
| Outgoing Interface | port1 |
| Destination Address | HTTP_Load_Balance |
| Schedule | always |
| Service | HTTP |
| Action | ACCEPT |
| Enable NAT | Select this option and select Use Destination Interface Address. |
- Select other security policy options as required.
- Select OK.
- Select Create New.
- Configure the HTTP security policy:
| Policy Type | Firewall |
| Policy Subtype | Address |
| Incoming Interface | port2 |
| Source Address | all |
| Outgoing Interface | port1 |
| Destination Address | HTTPS_Load_Balance |
| Schedule | always |
| Service | HTTPS |
| Action | ACCEPT |
| Enable NAT | Select this option and select Use Destination Interface Address. |
- Select other security policy options as required.
- Select OK.
CLI configuration: adding persistence for a specific domain
Load balancing is configured from the CLI using the config firewall vip command and by setting type to server-load-balance.
For the CLI configuration, both virtual servers include setting http-cookie-domain to .example.org because HTTP cookie persistence is just required for the example.org domain.
First, the configuration for the HTTP virtual IP:
config firewall vip
edit HTTP_Load_Balance
set type server-load-balance
set server-type http
set extport 8080
set extintf port2
set extip 192.168.20.20
set persistence http-cookie
set http-cookie-domain .example.org
config realservers
edit 1
set ip 10.10.10.1
next
edit 2
set ip 10.10.10.2
next
edit 3
set ip 10.10.10.3
end
end
Second, the configuration for the HTTPS virtual IP. In this configuration you don’t have to set extport to 443 because extport is automatically set to 443 when server-type is set to https.
config firewall vip
edit HTTPS_Load_Balance
set type server-load-balance
set server-type https
set extport 443
set extintf port2
set extip 192.168.20.20
set persistence http-cookie
set http-cookie-domain .example.org
config realservers
edit 1
set ip 10.10.10.1
next
edit 2
set ip 10.10.10.2
next
edit 3
set ip 10.10.10.3
end
end
Copyright © 2020 Fortinet, Inc. All Rights Reserved. | Terms of Service | Privacy Policy
