Standard Installation in NAT/Route Mode
1. Connect the FortiGate’s Internet-facing interface (typically WAN1) to your ISP-supplied equipment.
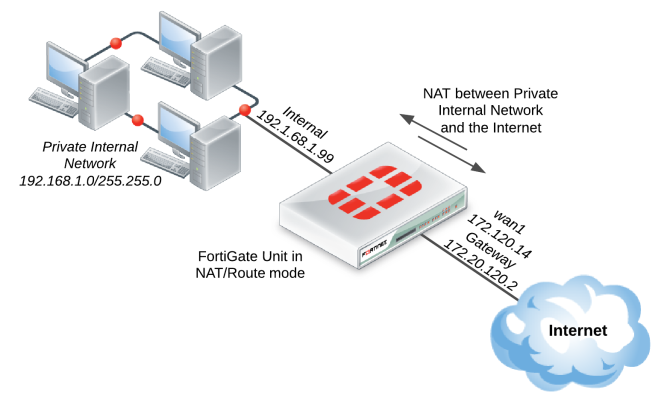
2. Connect a PC to the FortiGate using an internal port (typically port 1).
3. Power on the ISP’s equipment, the FortiGate unit, and the PC on the internal network.
4. From the PC on the internal network, connect to the FortiGate’s web-based manager using either FortiExplorer or an Internet browser (for information about connecting to the web-based manager, please see your models QuickStart Guide). Login using an admin account (the default admin account has the username admin and no password).
5. Go to System > Network > Interfaces and edit the Internet-facing interface. Set Addressing Mode to Manual and the IP/Netmask to your public IP address. Select OK.
6. Edit the internal interface. Set Addressing Mode to Manual and set the IP/Netmask to the private IP address you wish to use for the FortiGate. Select OK.
7. Go to Router > Static > Static Routes (or System > Network > Routing, depending on your FortiGate model) and select Create New to add a default route. Set the Destination IP/Mask to 0.0.0.0/0.0.0.0, the Device to the Internet-facing interface, and the Gateway to the gateway (or default route) provided by your ISP or to the next hop router, depending on your network requirements. Select OK.
| A default route always has a Destination IP/Mask of 0.0.0.0/0.0.0.0. Normally, you would have only one default route. If the static route list already contains a default route, you can either edit it or delete it and add a new one. |
8. (Optional) The FortiGate unit’s DNS Settings are set to use FortiGuard DNS servers by default, which is sufficient for most networks. However, if you need to change the DNS servers, go to System > Network > DNS and add Primary and Secondary DNS servers. Select Apply.
9. If your network uses IPv4 addresses, go to Policy & Objects > Policy > IPv4 and select Create New to add a security policy that allows users on the private network to access the Internet.
| Some FortiGate models include the IPv4 security policy in the default configuration. If you have one of these models, this step has already been done for you and as soon as your FortiGate unit is connected and the computers on your internal network are configured, users should be able to access the Internet. |
If your network uses IPv6 addresses, go to Policy & Objects > Policy > IPv6 and select Create New to add a security policy that allows users on the private network to access the Internet. If the IPv6 menu option is not available, go to System > Config > Features, turn on IPv6, and select Apply. For more information on IPv6 networks, see the IPv6 Handbook.
In the policy, set the Incoming Interface to the internal interface and the Outgoing Interface to the Internet-facing interface. You will also need to set Source Address, Destination Address, Schedule, and Service according to your network requirements. You can set these fields to the default all/ANY settings for now but should create the appropriate objects later after the policies have been verified.
Make sure the Action is set to ACCEPT. Turn on NAT and make sure Use Destination Interface Address is selected. Select OK.
| It is recommended to avoid using any security profiles, such as AntiVirus or web filtering, until after you have successfully installed the FortiGate unit. After the installation is verified, you can apply any required security profiles. For more information about using security profiles, see the Security Profiles handbook. |
Results
Users on the internal network are now able to browse the Internet. They should also be able to connect to the Internet using any other protocol or connection method that you defined in the security policy.
 and a single ISP