Configuring virtual clustering with two VDOMs and VDOM partitioning - web‑based manager
These procedures assume you are starting with two FortiGate-620B units with factory default settings.
To configure the FortiGate-620B units for HA operation
1. Power on the first FortiGate-620B unit and log into the web‑based manager.
2. On the System Information dashboard widget, beside Host Name select Change.
3. Enter a new Host Name for this FortiGate unit.
4. Select OK.
5. Go to System > Config > HA and change the following settings.
Mode | Active-Passive |
Group Name | vexample2.com |
Password | vHA_pass_2 |
6. Select OK.
The FortiGate unit negotiates to establish an HA cluster. When you select OK you may temporarily lose connectivity with the FortiGate unit as the HA cluster negotiates and the FGCP changes the MAC address of the FortiGate unit interfaces (see
“Cluster virtual MAC addresses”). The MAC addresses of the FortiGate‑620B interfaces change to the following virtual MAC addresses:
• port1 interface virtual MAC: 00-09-0f-09-00-00
• port10 interface virtual MAC: 00-09-0f-09-00-01
• port11 interface virtual MAC: 00-09-0f-09-00-02
• port12 interface virtual MAC: 00-09-0f-09-00-03
• port13 interface virtual MAC: 00-09-0f-09-00-04
• port14 interface virtual MAC: 00-09-0f-09-00-05
• port15 interface virtual MAC: 00-09-0f-09-00-06
• port16 interface virtual MAC: 00-09-0f-09-00-07
• port17 interface virtual MAC: 00-09-0f-09-00-08
• port18 interface virtual MAC: 00-09-0f-09-00-09
• port19 interface virtual MAC: 00-09-0f-09-00-0a
• port2 interface virtual MAC: 00-09-0f-09-00-0b
• port20 interface virtual MAC: 00-09-0f-09-00-0c
• port3 interface virtual MAC: 00-09-0f-09-00-0d
• port4 interface virtual MAC: 00-09-0f-09-00-0e
• port5 interface virtual MAC: 00-09-0f-09-00-0f
• port6 interface virtual MAC: 00-09-0f-09-00-10
• port7 interface virtual MAC: 00-09-0f-09-00-11
• port8 interface virtual MAC: 00-09-0f-09-00-12
• port9 interface virtual MAC: 00-09-0f-09-00-13
To be able to reconnect sooner, you can update the ARP table of your management PC by deleting the ARP table entry for the FortiGate unit (or just deleting all arp table entries). You may be able to delete the arp table of your management PC from a command prompt using a command similar to arp -d.
You can use the get hardware nic (or diagnose hardware deviceinfo nic) CLI command to view the virtual MAC address of any FortiGate unit interface. For example, use the following command to view the port1 interface virtual MAC address (Current_HWaddr) and the port1 permanent MAC address (Permanent_HWaddr):
get hardware nic port1
.
.
.
MAC: 00:09:0f:09:00:00
Permanent_HWaddr: 02:09:0f:78:18:c9
.
.
.
7. Power off the first FortiGate unit.
8. Repeat these steps for the second FortiGate unit.
Set the second FortiGate unit host name to:
To connect the cluster to the network
1. Connect the port1 interfaces of 620_ha_1 and 620_ha_2 to a switch connected to the Internet.
2. Connect the port5 interfaces of 620_ha_1 and 620_ha_2 to switch connected to the Internet.
You could use the same switch for the port1 and port5 interfaces.
3. Connect the port2 interfaces of 620_ha_1 and 620_ha_2 to a switch connected to the internal network.
4. Connect the port6 interfaces of 620_ha_1 and 620_ha_2 to a switch connected to the engineering network.
5. Connect the port3 interfaces of the cluster units together. You can use a crossover Ethernet cable or regular Ethernet cables and a switch.
6. Connect the port4 interfaces of the cluster units together. You can use a crossover Ethernet cable or regular Ethernet cables and a switch.
7. Power on the cluster units.
The units start and negotiate to choose the primary unit and the subordinate unit. This negotiation occurs with no user intervention.
When negotiation is complete you can continue.
To configure VDOM settings for the cluster
1. Log into the web‑based manager.
2. On the System Information dashboard widget, beside Virtual Domain select Enable.
3. Select OK and then log back into the web‑based manager.
4. Go to System > VDOM and select Create New to add a new VDOM.
5. Go to System > Network > Interfaces.
6. Edit the port5 interface, add it to the Eng_vdm VDOM and configure other interface settings:
Alias | Engineering_external |
Virtual Domain | Eng_vdm |
IP/Netmask | 172.20.120.143/24 |
7. Select OK.
8. Edit the port6 interface, add it to the Eng_vdm VDOM and configure other interface settings:
Alias | Engineering_internal |
Virtual Domain | Eng_vdm |
IP/Netmask | 10.120.101.100/24 |
Administrative Access | HTTPS, PING, SSH |
9. Select OK.
To add a default route to each VDOM
1. Go to System > VDOM and Enter the root VDOM.
2. Go to Router > Static > Static Routes.
3. Change the default route.
Destination IP/Mask | 0.0.0.0/0.0.0.0 |
Gateway | 172.20.120.2 |
Device | port1 |
Distance | 10 |
4. Select Global.
5. Go to System > VDOM and Enter the Eng_vdm VDOM.
6. Go to Router > Static > Static Routes.
7. Change the default route.
Destination IP/Mask | 0.0.0.0/0.0.0.0 |
Gateway | 172.20.120.2 |
Device | port5 |
Distance | 10 |
To configure VDOM partitioning
1. Go to System > Config > HA.
The cluster members shows two cluster units in Virtual Cluster 1.
2. Edit the cluster unit with the Role of MASTER.
3. Change VDOM partitioning to move the Eng_vdm to the Virtual Cluster 2 list.
4. Select OK.
5. Change the Virtual Cluster 1 and Virtual Cluster 2 device priorities for each cluster unit to the following:
| Device Priority |
Host Name | Virtual Cluster 1 | Virtual Cluster 2 |
620_ha_1 | 200 | 100 |
620_ha_2 | 100 | 200 |
You can do this by editing the HA configurations of each cluster unit in the cluster members list and changing device priorities.
Since the device priority of Virtual Cluster 1 is highest for 620_ha_1 and since the root VDOM is in Virtual Cluster 1, all traffic for the root VDOM is processed by 620_ha_1.
Since the device priority of Virtual Cluster 2 is highest for 620_ha_2 and since the Eng_vdm VDOM is in Virtual Cluster 2, all traffic for the Eng_vdm VDOM is processed by 620_ha_2.
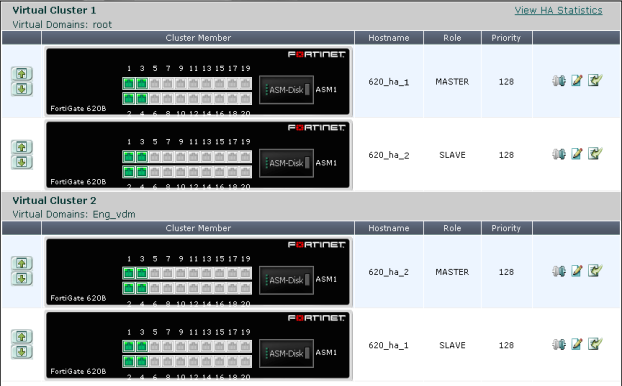
To view cluster status and verify the VDOM partitioning configuration
1. Log into the web‑based manager.
2. Go to System > Config > HA.
The cluster members list should show the following:
• Virtual Cluster 1 contains the root VDOM.
• 620_ha_1 is the primary unit (master) for Virtual Cluster 1.
• Virtual Cluster 2 contains the Eng_vdm VDOM.
• 620_ha_2 is the primary unit (master) for Virtual Cluster 2.
To test the VDOM partitioning configuration
You can do the following to confirm that traffic for the root VDOM is processed by 620_ha_1 and traffic for the Eng_vdm is processed by 620_ha_2.
1. Log into the web‑based manager by connecting to port2 using IP address 10.11.101.100.
You will log into 610_ha_1 because port2 is in the root VDOM and all traffic for this VDOM is processed by 610_ha_1. You can confirm that you have logged into 610_ha_1 by checking the HTML title displayed by your web browser. The title will include the 610_ha_1 host name. Also on the System Information dashboard widget displays the serial number of the 610_ha_1 FortiGate unit.
2. Log into the web‑based manager by connecting to port6 using IP address 10.12.101.100.
You will log into 610_ha_2 because port6 is in the Eng_vdm VDOM and all traffic for this VDOM is processed by 610_ha_2.
3. Add security policies to the root virtual domain that allows communication from the internal network to the Internet and connect to the Internet from the internal network.
4 Log into the web‑based manager and go to Config > System > HA and select View HA Statistics.
The statistics display shows more active sessions, total packets, network utilization, and total bytes for the 620_ha_1 unit.
5. Add security policies to the Eng_vdm virtual domain that allow communication from the engineering network to the Internet and connect to the Internet from the engineering network.
6. Log into the web‑based manager and go to Config > System > HA and select View HA Statistics.
The statistics display shows more active sessions, total packets, network utilization, and total bytes for the 620_ha_2 unit.