Basic example configuration
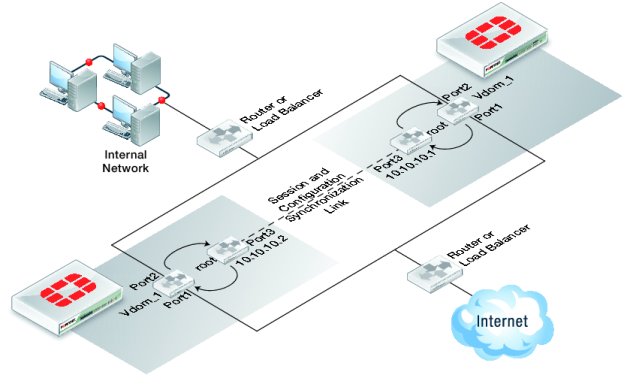
The following configuration example shows how to configure basic FGSP HA for the two peer FortiGate units shown in
Figure 222. The host names of peers are peer_1 and peer_2. Both peers are configured with two virtual domains: root and vdom_1. All sessions processed by vdom_1 are synchronized. The synchronization link interface is port3 which is in the root virtual domain. The IP address of port3 on peer_1 is 10.10.10.1. The IP address of port3 on peer_2 is 10.10.10.2.
Also on both peers, port1 and port2 are added to vdom_1. On peer_1 the IP address of port1 is set to 192.168.20.1 and the IP address of port2 is set to 172.110.20.1. On peer_2 the IP address of port1 is set to 192.168.20.2 and the IP address of port2 is set to 172.110.20.2.
To configure FGSP HA
1. Configure the load balancer or router to send all sessions to peer_1.
2. Configure the load balancer or router to send all traffic to peer_2 if peer_1 fails.
3. Use normal FortiGate configuration steps on peer_1:
• Enable virtual domain configuration.
• Add the vdom_1 virtual domain.
• Add port1 and port2 to the vdom_1 virtual domain and configure these interfaces.
• Set the IP address of port1 to 192.168.20.1.
• Set the IP address of port2 to 172.110.20.1.
• Set the IP address of port3 to 10.10.10.1.
• Add route mode security policies between port1 and port2 to vdom_1.
4. Enter the following commands to configure session synchronization for peer_1
config system session-sync
edit 1
set peerip 10.10.10.2
set peervd root
set syncvd vdom_1
end
5 Use normal FortiGate configuration steps on peer_2:
• Enable virtual domain configuration.
• Add the vdom_1 virtual domain.
• Add port1 and port2 to the vdom_1 virtual domain and configure these interfaces.
• Set the IP address of port1 to 192.168.20.2.
• Set the IP address of port2 to 172.110.20.2.
• Set the IP address of port3 to 10.10.10.1.
• Add route mode security policies between port1 and port2 to vdom_1.
6. Enter the following command to configure session synchronization for peer_1
config system session-sync
edit 1
set peerip 10.10.10.1
set peervd root
set syncvd vdom_1
end
Now that the FortiGate units are connected and configured their configurations are synchronized, so when you make a configuration change on one FortiGate unit it is synchronized to the other one.
To add filters
You can add a filter to this basic configuration if you only want to synchronize some TCP sessions. For example you can enter the following command to add a filter so that only HTTP sessions are synchronized:
config system session-sync
edit 1
config filter
set service HTTP
end
end
You can also add a filter to control the source and destination addresses of the IPv4 packets that are synchronized. For example you can enter the following command to add a filter so that only sessions with source addresses in the range 10.10.10.100 to 10.10.10.200 are synchronized.
config system session-sync
edit 1
config filter
set srcaddr 10.10.10.100 10.10.10.200
end
end
You can also add a filter to control the source and destination addresses of the IPv6 packets that are synchronized. For example you can enter the following command to add a filter so that only sessions with destination addresses in the range 2001:db8:0:2::/64 are synchronized.
config system session-sync
edit 1
config filter
set dstaddr6 2001:db8:0:2::/64
end
end
To synchronize UDP and ICMP sessions
You enter the following command to add synchronization of UDP and ICMP sessions to this configuration:
config system ha
set session-pickup enable
set session-pickup-connectionless enable
end
To synchronize the configuration
Enter the following command to enable configuration synchronization.
config system ha
set standalone-config-sync enable
end