Configuring the reserved management interface and SNMP remote management of individual cluster units
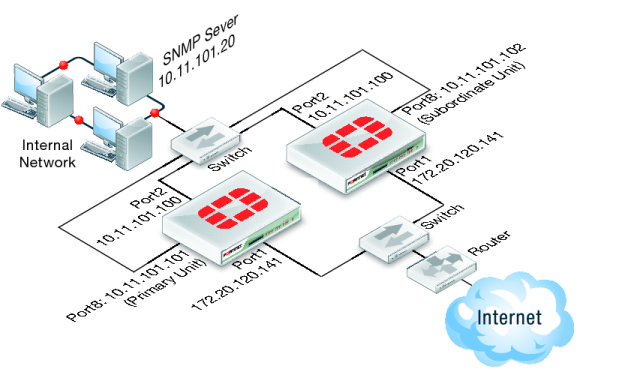
This example describes how to configure SNMP remote management of individual cluster units using the HA reserved management interface. The configuration consists of two FortiGate-620B units already operating as a cluster. In the example, the port8 interface of each cluster unit is connected to the internal network using the switch and configured as the reserved management interface.
To configure the reserved management interface - web‑based manager
1. Go to System > Config > HA.
2. Edit the primary unit.
3. Select Reserve Management Port for Cluster Member and select port8.
4. Select OK.
To configure the reserved management interface - CLI
From the CLI you can also configure a default route that is only used by the reserved management interface.
1. Log into the CLI of any cluster unit.
2. Enter the following command to enable the reserved management interface, set port8 as the reserved interface, and add a default route of 10.11.101.100 for the reserved management interface.
config system ha
set ha-mgmt-status enable
set ha-mgmt-interface port8
set ha-mgmt-interface-gateway 10.11.101.100
end
The reserved management interface default route is not synchronized to other cluster units.
To change the primary unit reserved management interface configuration - web‑based manager
You can change the IP address of the primary unit reserved management interface from the primary unit web‑based manager. Configuration changes to the reserved management interface are not synchronized to other cluster units.
1. From a PC on the internal network, browse to http://10.11.101.100 and log into the cluster web‑based manager.
This logs you into the primary unit web‑based manager.
You can identify the primary unit from its serial number or host name that appears on the System Information dashboard widget.
2. Go to System > Network > Interfaces and edit the port8 interface as follows:
Alias | primary_reserved |
IP/Netmask | 10.11.101.101/24 |
Administrative Access | Ping, SSH, HTTPS, SNMP |
3. Select OK.
You can now log into the primary unit web‑based manager by browsing to https://10.11.101.101. You can also log into this primary unit CLI by using an SSH client to connect to 10.11.101.101.
To change subordinate unit reserved management interface configuration - CLI
At this point you cannot connect to the subordinate unit reserved management interface because it does not have an IP address. Instead, this procedure describes connecting to the primary unit CLI and using the execute ha manage command to connect to subordinate unit CLI to change the port8 interface. You can also use a serial connection to the cluster unit CLI. Configuration changes to the reserved management interface are not synchronized to other cluster units.
1. Connect to the primary unit CLI and use the execute ha manage command to connect to a subordinate unit CLI.
You can identify the subordinate unit from is serial number or host name. The host name appears in the CLI prompt.
2. Enter the following command to change the port8 IP address to 10.11.101.102 and set management access to HTTPS, ping, SSH, and SNMP.
config system interface
edit port8
set ip 10.11.101.102/24
set allowaccess https ping ssh snmp
end
You can now log into the subordinate unit web‑based manager by browsing to https://10.11.101.102. You can also log into this subordinate unit CLI by using an SSH client to connect to 10.11.101.102.
To configure the cluster for SNMP management using the reserved management interfaces - CLI
This procedure describes how to configure the cluster to allow the SNMP server to get status information from the primary unit and the subordinate unit. The SNMP configuration is synchronized to all cluster units. To support using the reserved management interfaces, you must add at least one HA direct management host to an SNMP community. If your SNMP configuration includes SNMP users with user names and passwords you must also enable HA direct management for SNMP users.
1. Enter the following command to add an SNMP community called Community and add a host to the community for the reserved management interface of each cluster unit. The host includes the IP address of the SNMP server (10.11.101.20).
config system snmp community
edit 1
set name Community
config hosts
edit 1
set ha-direct enable
set ip 10.11.101.20
end
end
2. Enter the following command to add an SNMP user for the reserved management interface.
config system snmp user
edit 1
set ha-direct enable
set notify-hosts 10.11.101.20
end
Configure other settings as required.
To get CPU, memory, and network usage of each cluster unit using the reserved management IP addresses
From the command line of an SNMP manager, you can use the following SNMP commands to get CPU, memory and network usage information for each cluster unit. In the examples, the community name is
Community. The commands use the MIB field names and OIDs listed in
Table 57.
Enter the following commands to get CPU, memory and network usage information for the primary unit with reserved management IP address 10.11.101.101 using the MIB fields:
snmpget -v2c -c Community 10.11.101.101 fgHaStatsCpuUsage
snmpget -v2c -c Community 10.11.101.101 fgHaStatsMemUsage
snmpget -v2c -c Community 10.11.101.101 fgHaStatsNetUsage
Enter the following commands to get CPU, memory and network usage information for the primary unit with reserved management IP address 10.11.101.101 using the OIDs:
snmpget -v2c -c Community 10.11.101.101 1.3.6.1.4.1.12356.101.13.2.1.1.3.1
snmpget -v2c -c Community 10.11.101.101 1.3.6.1.4.1.12356.101.13.2.1.1.4.1
snmpget -v2c -c Community 10.11.101.101 1.3.6.1.4.1.12356.101.13.2.1.1.5.1
Enter the following commands to get CPU, memory and network usage information for the subordinate unit with reserved management IP address 10.11.101.102 using the MIB fields:
snmpget -v2c -c Community 10.11.101.102 fgHaStatsCpuUsage
snmpget -v2c -c Community 10.11.101.102 fgHaStatsMemUsage
snmpget -v2c -c Community 10.11.101.102 fgHaStatsNetUsage
Enter the following commands to get CPU, memory and network usage information for the subordinate unit with reserved management IP address 10.11.101.102 using the OIDs:
snmpget -v2c -c Community 10.11.101.102 1.3.6.1.4.1.12356.101.13.2.1.1.3.1
snmpget -v2c -c Community 10.11.101.102 1.3.6.1.4.1.12356.101.13.2.1.1.4.1
snmpget -v2c -c Community 10.11.101.102 1.3.6.1.4.1.12356.101.13.2.1.1.5.1