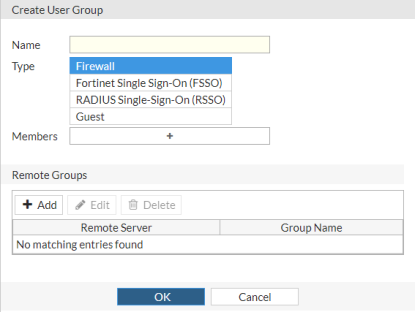
| Firewall |
This type of group can be selected in any security policy that requires firewall authentication. |
| Members |
If you selected a Firewall user group, select users to add to the group from the drop-down list. |
| Remote groups |
If you selected a Firewall user group, add remote authentication servers to the group.
Select Add and then select the server from the drop-down menu. If required, select a group for the server.
|
| Fortinet Single Sign-On (FSSO) |
This type of group can be selected in any security policy that requires FSSO authentication. |
| Members |
If you selected the FSSO user group, select users to add to the group from the drop-down list. |
| RADIUS Single Sign-On (RSSO) |
This type of group can be selected in any security policy that requires RSSO authentication. |
| RADIUS Attribute Value |
If you selected the RSSO user group, enter the RADIUS attribute value. This value matches the value from the RADIUS Accounting-Start attribute. |
| Guest |
This type of group can be selected in any security policy that allows guest authentication. |
| Batch Guest Account Creation |
If you selected the Guest user group, enable the creation of batches of guest accounts.
When enabled, only the Maximum Accounts, Start Countdown, and Time options are available. |
| User ID |
If you selected the Guest user group, select a user identifier option:
- Email: The user identifier is emailed.
- Auto Generated: The user identifier is generated automatically.
- Specify: The user identifier must be specified.
|
| Maximum Accounts |
If you selected the Guest user group, enable Maximum Accounts to limit how many accounts exist and then enter the maximum number in the field. |
| Require Name |
If you selected the Guest user group, enable Require Name to require names for guests. |
| Require Email |
If you selected the Guest user group, enable Require Email to require email addresses for guests. |
| Require SMS |
If you selected the Guest user group, enable Require SMS to require SMS contact information for guests. |
| Password |
If you selected the Guest user group, enable Password to require passwords for guests and then select a password option:
- Auto Generated: The password is generated automatically.
- Specify: The password must be specified.
|
| Sponsor |
If you selected the Guest user group, enable Sponsor and select Required to make a sponsor a requirement for guests. |
| Company |
If you selected the Guest user group, enable Company and select Required to make a company a requirement for guests. |
| Start Countdown |
If you selected the Guest user group, select when the expiration countdown begins for the user group, either On account Creation or After first login. |
| Time |
If you selected the Guest user group, select the expiration time for the user group in Days, Hours, Minutes, and Seconds. |