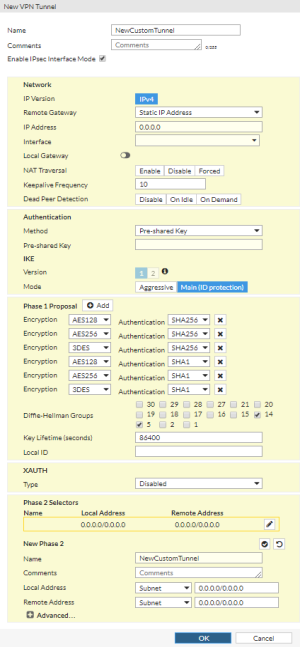
If you select Custom for the template type in the IPsec Wizard and then select Next, the New VPN Tunnel window opens.
Configure the following settings and then select OK:
| Name | Type a name for the Phase 1 definition. |
| Comments | An optional description of the VPN tunnel. |
| Enable IPsec Interface Mode | Select this option if you want to create an IPsec VPN tunnel. |
| IP Version | This option is set to IPv4. |
| Remote Gateway | This option is set to Static IP Address for a remote peer that has a static IP address. |
| IP Address | Enter the IP address of the remote peer. |
| Interface | Select the name of the interface through which remote peers connect to the FortiGate unit that is managed by the FortiProxy unit. |
| Local Gateway | Enable this option to configure a local gateway and then select Primary IP, Secondary IP, or Specify. Enter or select the IP address. |
| NAT Traversal | Select Enable if a NAT device exists between the local FortiGate unit that is managed by a FortiProxy unit. and the VPN peer or client. The local FortiGate unit and the VPN peer or client must have the same NAT traversal setting (both selected or both cleared) to connect reliably.
Additionally, you can force IPsec to use NAT traversal. If this option is set to Forced, the FortiGate uses a port value of zero when constructing the NAT discovery hash for the peer. This causes the peer to think it is behind a NAT device, and it will use UDP encapsulation for IPsec, even if no NAT is present. This approach maintains interoperability with any IPsec implementation that supports the NAT-T RFC. |
| Keepalive Frequency | If you selected Enable or Forced for the NAT traversal, enter a keep-alive frequency. |
| Dead Peer Detection | Select On Idle to reestablish VPN tunnels on idle connections and clean up dead IKE peers if required. You can use this option to receive notification whenever a tunnel goes up or down, or to keep the tunnel connection open when no traffic is being generated inside the tunnel.
With On Idle or On Demand selected, you can use the config vpn ipsec phase1 (tunnel mode) or config vpn ipsec phase1-interface (interface mode) CLI command to optionally specify a retry count and a retry interval. |
| Method | Select Pre-shared Key or Signature:
|
| Pre-shared Key | If you selected Pre-shared Key for the authentication method, enter the pre-shared key that the FortiGate unit managed by a FortiProxy unit will use to authenticate itself to the remote peer or dialup client during Phase 1 negotiations. You must define the same key at the remote peer or client.
The key must contain at least 6 printable characters. For optimum protection against currently known attacks, the key must consist of a minimum of 16 randomly chosen alphanumeric characters. The limit is 128 characters. |
| Certificate Name | If you selected Signature for the authentication method, select + and then select one or more certificates that the FortiGate unit managed by a FortiProxy unit will use to authenticate itself. |
| Version | IKE version 1 is selected by default. |
| Mode | Select Aggressive or Main (ID protection):
|
| Accept Types | If you selected Pre-shared Key for the authentication method and selected aggressive mode, select Any peer ID or Specific peer ID. If you select Specific peer ID, enter the peer ID. If you selected Signature for the authentication method, select Any peer ID, Specific peer ID, or Peer certificate. |
| Peer ID | If you selected Any peer ID, enter the peer ID. |
| Peer certificate | If you selected Peer certificate for the authentication method, select the certificate. |
| Phase 1 Proposal | Select Add to get another row of Encryption and Authentication options. |
| Encryption | Select DES, 3DES, AES128, AES192, and AES256 to use as the encryption algorithm. AES256 is the most secure; DES is the least secure. |
| Authentication | Select MD5, SHA1, SHA256, SHA384, SHA512, or SHA256 to use for authentication. |
| Diffie-Hellman Groups | Select one or more Diffie-Hellman (DH) asymmetric key algorithms for public key cryptography. |
| Key Lifetime (seconds) | Enter the time (in seconds) that must pass before the IKE encryption key expires. When the key expires, a new key is generated without interrupting service. The key lifetime can be from 120 to 172,800 seconds. |
| Local ID | A Local ID is an alphanumeric value. |
| Type | Select Client to require an additional user name and password for authentication. |
| User Name | If you selected Client, enter a user name for authentication. |
| Password | If you selected Client, enter a password for authentication. |
| Name | By default, the Phase-2 name is the same as the Phase-1 name. |
| Comments | An optional description of the VPN tunnel. |
| Local Address | Select Subnet, IP Range, IP Address, Named Address, IPv6 Subnet, IPv6 Range, IPv6 Address, or Named IPv6 Address and then enter the specified information. |
| Remote Address | Select Subnet, IP Range, IP Address, Named Address, IPv6 Subnet, IPv6 Range, IPv6 Address, or Named IPv6 Address and then enter the specified information. |
| Phase 2 Proposal | Select Add to get another row of Encryption and Authentication options. |
| Encryption | Select NULL, DES, 3DES, AES128, AES128GCM, AES192, AES256, or AES256GCM to use as the encryption algorithm. NULL is the least secure; AES256GCM is the most secure. |
| Authentication | Select NULL, MD5, SHA1, SHA256, SHA384, or SHA512 to use for authentication. |
| Enable Replay Detection | Replay attacks occur when an unauthorized party intercepts a series of IPsec packets and replays them back into the tunnel. |
| Enable Perfect Forward Secrecy (PFS) | Perfect forward secrecy (PFS) improves security by forcing a new Diffie-Hellman exchange whenever keylife expires. |
| Local Port | Select All or enter the local port number. |
| Remote Port | Select All or enter the remote port number. |
| Protocol | Select All or enter the protocol number. |
| Auto-negotiate | Enable the option if you want the tunnel to be automatically renegotiated when the tunnel expires. |
| Autokey Keep Alive | Select the check box if you want the tunnel to remain active when no data is being processed. |
| Key Lifetime | Select the method for determining when the Phase 2 key expires: Seconds, Kilobytes, or Both. If you select Both, the key expires when either the time has passed or the number of kilobytes have been processed. |
| Seconds | If you selected Seconds or Both for the key lifetime, enter the number of seconds. |
| Kilobytes | If you selected Kilobytes or Both for the key lifetime, enter the number of kilobytes. |