There are three types of certificates that FortiProxy units use:
The FortiProxy unit generates a certificate request based on the information you entered to identify the FortiProxy unit. After you generate a certificate request, you can download the request to a computer that has management access to the FortiProxy unit and then forward the request to a CA.
The certificate window also enables you to export certificates for authentication, importing, and viewing.
This section describes the following:
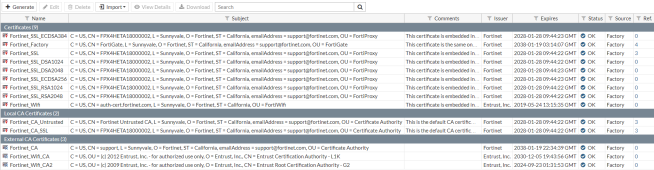
To see a list of certificates that have been imported, go to System > Certificates.
Right-click on any column heading to select which columns are displayed or to reset all the columns to their default settings. You can also drag column headings to change their order.
The following options are available:
| Generate | Generate a CSR. See To generate a CSR:. |
| Edit | Highlight a certificate and select to edit the certificate. |
| Delete | Select a certificate and select Delete to remove the selected certificate or CSR. Select OK in the confirmation dialog box to proceed with the delete action. To remove multiple certificates or CSRs, select multiple rows in the list by holding down the Ctrl or Shift keys and then select Delete. |
| Import |
Import a certificate. Select any of the options in the drop-down list:
|
| View Details | View a certificate. See Viewing certificate details. |
| Download | Select a certificate or CSR and then select Download to download that certificate or CSR to your management computer. |
| Search | Enter a search term to search the certificate list. |
| Name | The name of the certificate. |
| Subject | The subject of the certificate. |
| Comments | Comments. |
| Issuer | The issuer of the certificate. |
| Expires | Displays the certificateʼs expiration date and time. |
| Status |
The status of the certificate or CSR.
|
| Source | The source of a certificate can be Factory, User, or FortiGuard. |
| Ref. | Displays the number of times the certificate or CSR is referenced to other objects. To view the location of the referenced object, select the number in Ref., and the Object Usage window appears displaying the various locations of the referenced object. |
Whether you create certificates locally or obtain them from an external certificate service, you need to generate a Certificate Signing Request (CSR).
When a CSR is generated, a private and public key pair is created for the FortiProxy unit. The generated request includes the public key of the device, and information such as the unit’s public static IP address, domain name, or email address. The device’s private key remains confidential on the unit.
After the request is submitted to a CA, the CA verifies the information and register the contact information on a digital certificate that contains a serial number, an expiration date, and the public key of the CA. The CA then signs the certificate, after which you can install the certificate on the FortiProxy device.
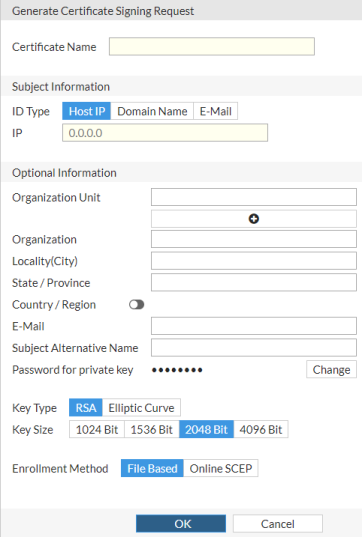
| Certificate Name |
Enter a unique name for the certificate request, such as the host name or the serial number of the device. Do not include spaces in the certificate to ensure compatibility as a PKCS12 file. |
|
| Subject Information |
Select the ID type:
|
|
| Optional Information | Optional information to further identify the device. | |
| Organization Unit | Enter the name of the department. Up to 5 OUs can be added. | |
| Organization | Enter the legal name of the company or organization. | |
| Locality (City) | Enter the name of the city where the unit is located. | |
| State/Province | Enter the name of the state or province where the unit is located. | |
| Country/Region | Enable and then enter the country where the unit is located. Select from the drop-down list. | |
| Enter the contact email address. | ||
| Subject Alternative Name | Enter one or more alternative names, separated by commas, for which the certificate is also valid. An alternative name can be: email address, IP address, URI, DNS name, or a directory name. Each name must be preceded by its type, for example: IP:1/2/3/4, or URL: http://your.url.here/. |
|
| Password for private key | Select Change to choose a new password for the private key. A password is automatically generated for you, but you can change it. |
|
| Key Type | Select RSA or Elliptic Curve. The default is RSA. | |
| Key Size | If you selected RSA for the Key Type, select the key size: 1024 Bit, 1536 Bit, 2048 Bit, or 4096 Bit. The default is 2048 Bit. Larger key sizes are more secure but slower to generate. |
|
| Curve Name | If you selected Elliptic Curve for the Key Type, select the curve name: secp256r1, secp384r1, or secp521r1. | |
| Enrollment Method |
Select the enrollment method. The default is File Based. |
|
You can add certificates and CRLs to your FortiProxy unit:
Local certificates are issued for a specific server, or web site. Generally they are very specific, and often for an internal enterprise network. For example, a personal web site for John Smith at www.example.com (such as http://www.example.com/home/jsmith) would have its own local certificate.
These can optionally be just the certificate file or also include a private key file and PEM passphrase for added security.
Signed local certificates can be imported to the FortiProxy unit.
CA root certificates are similar to local certificates, however they apply to a broader range of addresses or to whole company; they are one step higher up in the organizational chain. Using the local certificate example, a CA root certificate would be issued for all of www.example.com instead of just the smaller single web page.
CA certificates can be imported to the FortiProxy unit.
Remote certificates are public certificates without a private key. Remote certificates can be uploaded to the FortiProxy unit.
Certificate revocation list (CRL) is a list of certificates that have been revoked and are no longer usable. This list includes certificates that have expired, been stolen, or otherwise compromised. If your certificate is on this list, it will not be accepted. CRLs are maintained by the CA that issues the certificates and includes the date and time when the next CRL will be issued as well as a sequence number to help ensure you have the most current version of the CRL.
CRLs can be imported to the FortiProxy unit.
Certificate details can be viewed by selecting a certificate and then selecting View Details from the toolbar.
The following information is displayed:
| Certificate Name | The name of the certificate. |
| Serial Number | The serial number of the certificate. |
| Subject Information |
The subject information of the certificate, including:
|
| Issuer |
The issuer information of the certificate, including most of the information from Subject Information. |
| Validity Period | Displays the Valid From and the expiration Valid To date of the certificate. The certificate should be renewed before this expiration date. |
| Fingerprints | The identifying fingerprint of the certificate. |
| Extension | The certificate extension information. |
Select Close to return to the certificate list.