Figure 105: New endpoint profile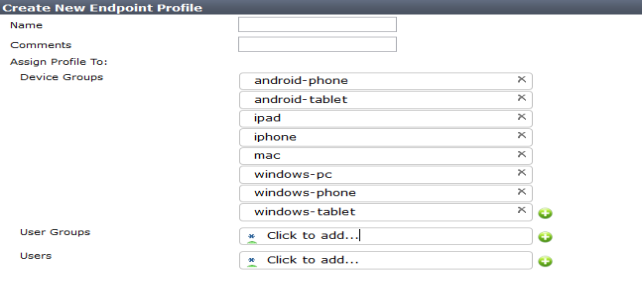
Name | Enter a name for the new endpoint profile. When creating a new endpoint profile, XSS vulnerability characters are not allowed. | |
Comments | Enter a profile description. (optional) | |
Assign to Profile To: | Device Groups: Select device groups in the drop-down menu. Use the plus (+) icon to assign multiple device groups to the endpoint profile, for example Mac and Windows PC. User Groups: Select user groups in the drop-down menu. Select the plus (+) icon to assign multiple user groups to the endpoint profile. Users: Select users in the drop-down menu. Select the plus (+) icon to assign multiple users to the endpoint profile. Note: You can assign the profile to user groups and users when using Active Directory authentication or RADIUS authentication for VPN. | |
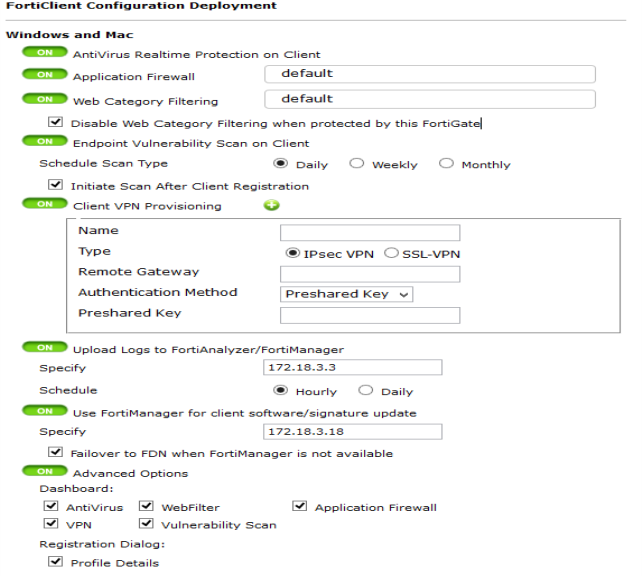
FortiClient Configuration Deployment Windows and Mac | ||
Antivirus Realtime Protection on Client | Toggle the button on or off to enable or disable this feature. | |
Application Firewall | Toggle the button on or off to enable or disable this feature. When enabled, you can select an application control sensor in the drop-down menu. | |
Web Category Filtering | Toggle the button on or off to enable or disable this feature. When enabled, you can select a web filter profile in the drop-down menu. Select the checkbox to disable web category filtering on the client when protected by the FortiGate. | |
Endpoint Vulnerability Scan on Client | Toggle the button on or off to enable or disable this feature. When enabled, you can select the scheduled scan type to daily, weekly, or monthly. Select the checkbox to initiate a scan after client registration with the FortiGate. | |
Client VPN Provisioning | Toggle the button on or off to enable or disable this feature. When enabled, you can configure multiple IPsec VPN and SSL VPN connections. Select the plus (+) icon to add additional VPN connections. Enter the VPN name, type, remote gateway, and authentication method information. | |
Upload Logs to FortiAnalyzer/FortiManager | Toggle the button on or off to enable or disable this feature. When enabled, you can select to use the same FortiAnalyzer/FortiManager used by the FortiGate or select Specify to enter a different device IP. You can set the schedule to hourly or daily. The FortiClient upload logs to the FortiAnalyzer/FortiManager only when it is able to connect to the device on the specified IP address. | |
Use FortiManager for client software/signature update | Toggle the button on or off to enable or disable this feature. When enabled, you can specify the IP address of the FortiManager. Select the checkbox to failover to the FortiGuard Distribution Network when the FortiManager is not available. | |
Advanced Options | Toggle the button on or off to enable or disable these features. When enabled, you can select which FortiClient modules are visible in the FortiClient console window. Select the appropriate checkbox to show the module. You can also select to show profile details for the Registration dialog. | |
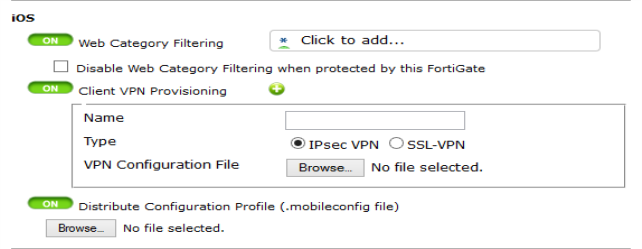
Web Category Filtering | Toggle the button on or off to enable or disable this feature. When enabled, you can select a web filter profile in the drop-down menu. Select the checkbox to disable web category filtering on the client when protected by the FortiGate. | |
Client VPN Provisioning | Enable to configure the FortiClient VPN client. You can enter multiple VPN configurations by selecting the “+” button. Optionally, you can upload the FortiClient iOS VPN configuration file. | |
Name | Enter a name to identify this VPN configuration in the FortiClient application. | |
Type | Select IPsec VPN or SSL-VPN. If you select IPsec VPN, select a VPN Configuration File that contains the required IPsec VPN configuration. The Apple iPhone Configuration Utility/Apple Configurator produces .mobileconfig files which contain configuration information for an iOS device. If you select SSL-VPN, enter the VPN configuration details. | |
Distribute Configuration Profile | Distribute configuration information to iOS devices running FortiClient Endpoint Security. Select Browse and locate the file to be distributed. The Apple iPhone Configuration Utility/Apple Configurator produces .mobileconfig files which contain configuration information for an iOS device. | |
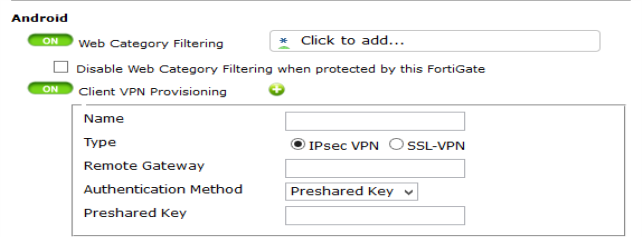
Web Category Filtering | Toggle the button on or off to enable or disable this feature. When enabled, you can select a web filter profile in the drop-down menu. Select the checkbox to disable web category filtering on the client when protected by the FortiGate. Note: FortiClient (Android) only supports FortiGuard Categories settings in the Web Filter Profile. Only Allow and Block actions are supported. All other settings will be ignored by FortiClient (Android). | |
Client VPN Provisioning | Enable to configure the FortiClient VPN client. You can enter multiple VPN configurations by selecting the “+” button. | |
Name | Enter a name to identify this VPN configuration in the FortiClient application. | |
Type | Select IPsec VPN or SSL-VPN. | |
Remote Gateway | Enter the remote gateway. | |
Authentication Method | Select the authentication method to use, either Preshared Key or Certificate. If Preshared Key is selected, enter the your preshared key. This option is only available if the type is IPsec VPN. | |
Require Certificate | Select to require a certificate. This option is only available if the type is SSL-VPN. | |
Access Port | Enter the access port number. This option is only available if the type is SSL-VPN. | |
Import from device | Select a device from which to import the profile or profiles from the drop-down list. This list will include all the devices available in the ADOM. | |
Virtual Domain | Is applicable, select the virtual domain from which the profile will be imported. | |
Available Objects List | The available objects that can be imported. Select an object or objects and then select the down arrow to move the selected object or objects to the Selected Objects List. | |
Selected Objects List | The objects that are to be imported. To remove an object or objects from the list, select the object or objects and then select the up arrow. The selected items will be moved back to the Available Objects List. | |
New Name | Select to create a new name for the item or items that are being imported, and then enter the name in the field. | |