Guest Portals
The following section describes how to configure custom guest portals on a per customer or per AP/Controller basis.
The portals are assigned RADIUS clients and profiles, can permit certain pre-login and post-login services for users (such as password reset and token registration abilities), and rules and replacement messages can be configured.
Portals
Guest portal configuration is available under Authentication > Guest Portals > Portals.
To configure a guest portal:
- Select Create New to configure settings for a new guest portal.
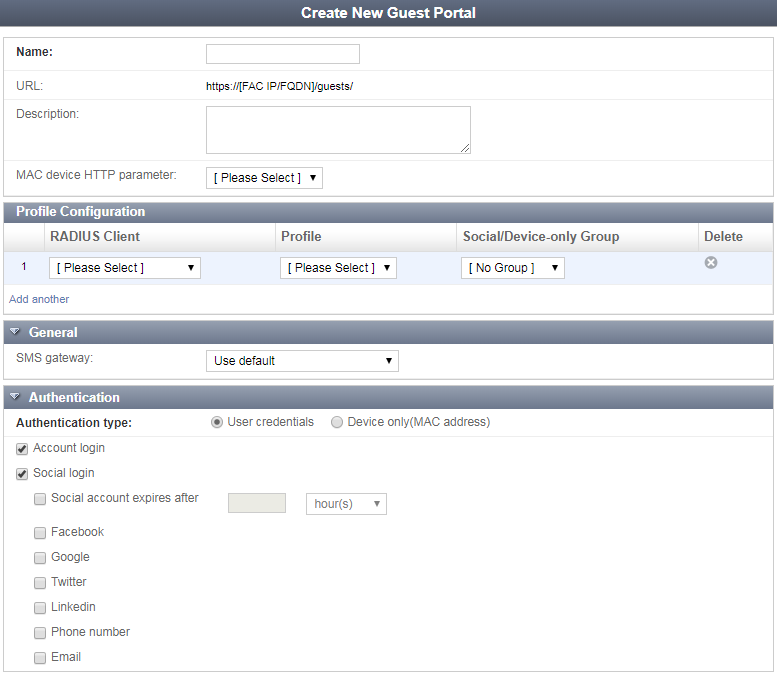
- Enter the following information:
| Name | A name to identify the guest portal. | |
| URL |
The URL of the Guest portal, in the format of:
|
|
| Description | Optionally, enter information about the guest portal. | |
| MAC device HTTP parameter |
Select one of the HTTP parameters available to use for this guest portal:
This field must be configured if this portal's Authentication type is set to Device only (MAC address). |
|
| Profile Configuration | Assign one or more RADIUS clients and profiles to the portal. | |
| General | Assign an SMS gateway for self-registered users. | |
| Authentication |
Select either User credentials or Device only (MAC address) as the authentication type: User credentials: Selected by default, this option requires either local or remote user account credentials, or with social site credentials:
Device only (MAC address): When this option is enabled, the "MAC device HTTP parameter" must also be configured. |
|
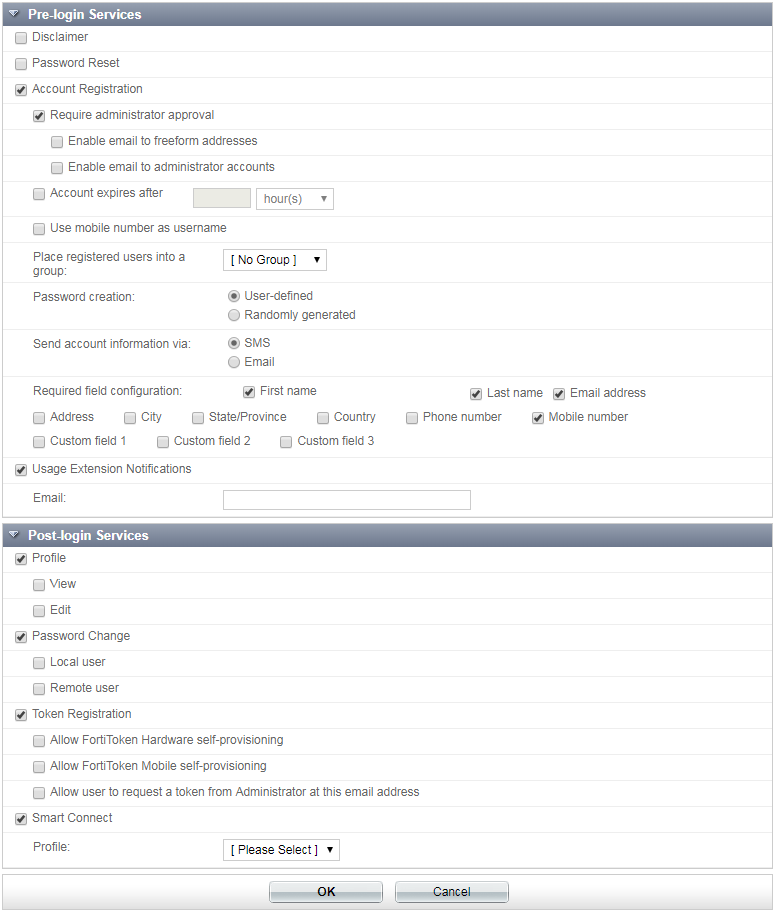
| Pre-login Services | Configure various pre-login services to permit to users. | |
| Disclaimer |
Enable or disable the appearance of a disclaimer to the end-user that must be accepted before proceeding to the login page. To configure the disclaimer, edit the Login Disclaimer Page replacement message under Authentication > Guest Portals > Replacement Messages. |
|
| Password Reset | Enable/disable pre-login password reset link. | |
| Account Registration |
Select to configure various user account registration options:
|
|
| Usage Extension Notifications | Allow users who exceeded their time and/or data usage to request an extension via an email notification. | |
| Post-login Services | Configure various post-login services to permit to users. | |
| Profile | Select to determine whether authenticated users can view/edit their account information. | |
| Password Change | Select to determine whether local and/or remote users have the ability to change their passwords once logged in. | |
| Token Registration | Select to configure FortiToken Mobile self-provisioning privileges. | |
| Smart Connect | Select to assign a Smart Connect profile. See Smart Connect Profiles for more information. | |
- Select OK to add the new guest portal.
Rules
Portal rule configuration is available under Authentication > Guest Portals > Rules.
To configure portal rules:
- Select Create New to configure new portal rules.
- Enter the following information:
|
|
Note that the Conditions section is only available for configuring once the rule has already been created by selecting OK. |
| General | Configure the portal rule's general information, including its name and action. | |
| Name | A name to identify the portal rule. | |
| Description | Optionally, enter information about the portal rule. | |
| Action | Determine the action to take for the rule: assign a guest portal or assign no portal for the rule. | |
| Conditions |
Select Add Condition to configure portal rule attributes. Note that these attributes can be defined to either match the following settings below or to not match the following settings (see the Not checbox). |
|
| Parameter | Select and/or define new Uniform Resource Identifier (URI) parameters. | |
| Operator | Select an operator for the portal rule attribute. | |
| Value | Enter a portal rule attribute value. | |
- Select OK to add the new portal rule.
Replacement Messages
Guest portal replacement message mappings are available under Authentication > Guest Portals > Replacement Messages.
The replacement messages are split into four categories: Authentication, Password Reset, User Registration, and Post-Login.
Selecting a specific message will display the text and HTML or plain text of the message in the lower half of the content pane.
Selecting Toggle Tag List will display a table of the tags used for that message atop the message’s HTML or plain text box.
To edit a replacement message:
- Select a message in the replacement message list.
- Edit the plain text or HTML code in the lower right pane, or select the open in new window icon to edit the message in a new browser window.
- When you are finished editing the message, select Save to save your changes.
- If you have made an error when editing the message, select Restore Default to restore the message to its default value.
Manage Images
Images can be managed by selecting Manage Images in the Replacement Messages window. Images can also be added, deleted, and edited.
To add an image:
- In the manage images screen, select Create New to open the Create New Image window.
- Enter a name for the image in the Name field.
- Select Browse..., find the GIF, JPEG, or PNG image file that you are adding, and then select Open.
- Select OK to add the image.
The maximum image size is 65kB.
To delete an image:
- In the manage images screen, select an image, then select Delete.
- Select Yes, I’m sure in the confirmation window to delete the image.
To edit an image:
In the manage images screen, select an image, then select Edit.
- In the Edit Image window, edit the image name and file as required.
- Select OK to apply your changes.
Smart Connect Profiles
Smart Connect profiles are available under Authentication > Guest Portals > Smart Connect Profiles.
This feature provides the ability to set up network settings (such as WiFi configuration) on an endpoint by downloading a script or an executable (depending on the endpoint's OS) via the FAC's guest portal. In this initial release, iOS and Mac OS are supported.
Once configured, the Smart Connect feature will show up as a new button on the guest portal's post-login main page:

When clicking on the Smart Connect button, the user is given the option to download a self-install file for the OS type of their choice, including iOS, Android, Windows, and Linux. A Device ID can also be entered too, however this is only available if the Smart Connect profile uses EAP-TLS. If entered, the ID will be used to generate the end-user certificate.
To configure a Smart Connect profile:
- Select Create New to start the profile configuration wizard.
- Enter a Name and select Next (you cannot configure a different Connect type other than Wireless).
- Enter an SSID and select the Auth method to use: WPA2 Personal or WPA2 Enterprise.
You can optionally enable or disable Hidden SSID to show or hide the SSID. When finished, select Next.
- Enter a Pre-shared Key, then select Next.
- You will see the Review All Settings page, where you can review and change any of the previously set options, and define more settings, as shown below:
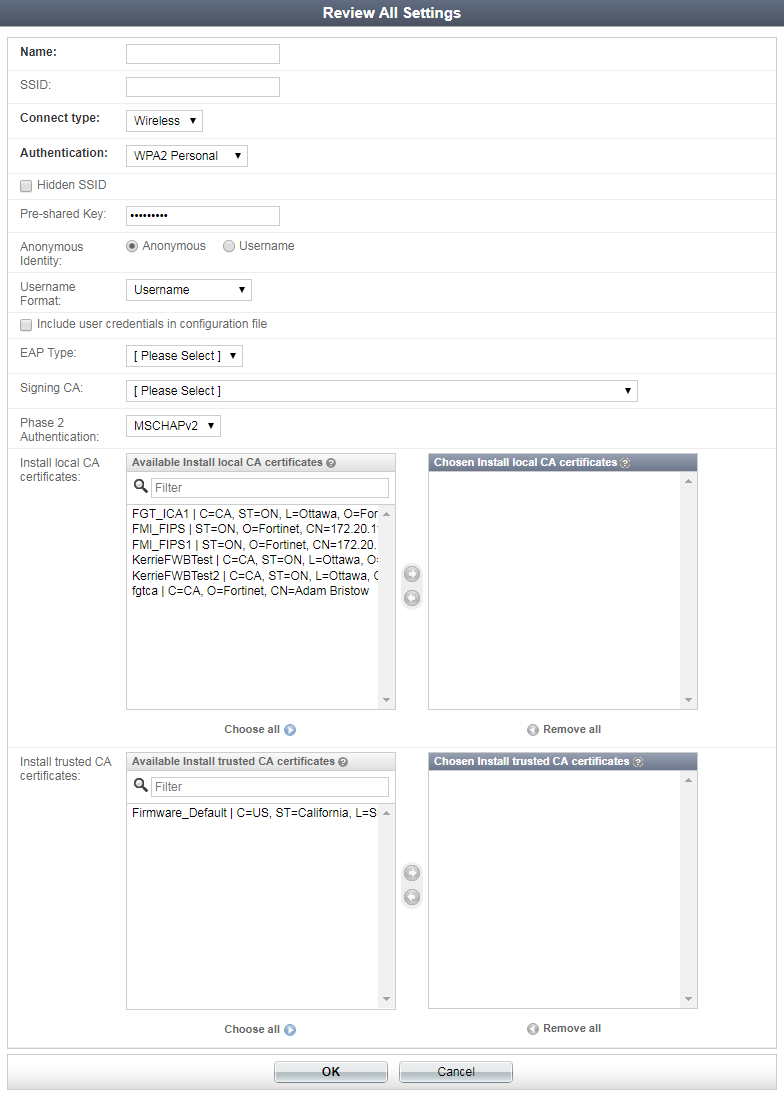
- Select OK to apply your options and finish the configuration.
Once created, a Smart Connect profile can be associated with a guest portal and be available as a post-login service (see Post-login Services under Portals).
Copyright © 2018 Fortinet, Inc. All Rights Reserved. | Terms of Service | Privacy Policy
