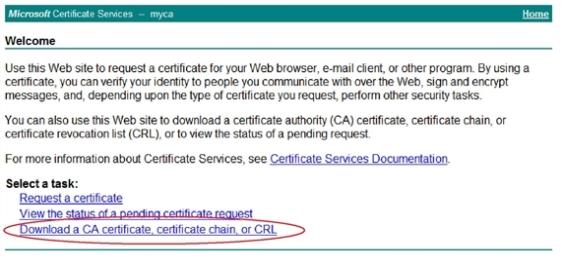
https://<ca-server_ipv4>/certsrv/.where <ca-server_ipv4> is the IP address of your CA server.
The Microsoft Certificate Services home page appears. Figure 53 is an example of this page.
This section includes the following information:
The FortiADC system must be able to process two types of TLS/SSL traffic:
The FortiADC system supports all of the TLS/SSL administration methods commonly used by HTTPS servers, including:
You must download the certificates from your backend servers so that you can import them into the FortiADC system.
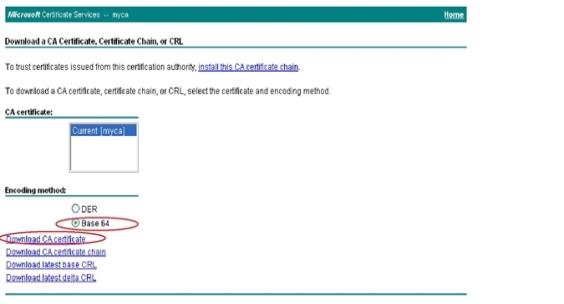
This example shows how to download a CA certificate from Microsoft Windows 2003.
https://<ca-server_ipv4>/certsrv/.where <ca-server_ipv4> is the IP address of your CA server.
The Microsoft Certificate Services home page appears. Figure 53 is an example of this page.
This topic provides the following information on using the System > Certificates > Local page:
You can import (upload) the following types of X.509 server certificates and private keys to the FortiADC system:
Before you begin:
| Settings | Guidelines |
|---|---|
| Type |
Additional fields are displayed depending on your selection. |
| Local Certificate | |
| Certificate File | Browse and locate the certificate file that you want to upload. |
| PKCS12 Certificate | |
| Certificate Name | Name that can be referenced by other parts of the configuration, such as www_example_com. Do not use spaces or special characters. The maximum length is 35 characters. |
| Certificate File | Browse and locate the certificate file that you want to upload. |
| Password | Password to encrypt the file in local storage. |
| Certificate | |
| Certificate Name | Name that can be referenced by other parts of the configuration, such as www_example_com. Do not use spaces or special characters. The maximum length is 35 characters. |
| Certificate File | Browse and locate the certificate file that you want to upload. |
| Key File | Browse and locate the corresponding key file. |
| Password | Password to encrypt the files in local storage. |
Many commercial certificate authorities (CAs) will provide a website where you can generate your own certificate signing request (CSR). A CSR is an unsigned certificate file that the CA will sign. When the CSR is generated, the associated private key that the appliance will use to sign and/or encrypt connections with clients is also generated.
If your CA does not provide this, or if you have your own private CA such as a Linux server with OpenSSL, you can use FortiADC to generate a CSR and private key. This CSR can then be submitted for verification and signing by the CA.
Before you begin:
The system creates a private and public key pair. The generated request includes the public key of the FortiADC appliance and information such as the IP address, domain name, or email address. The FortiADC appliance private key remains confidential on the FortiADC appliance. The Status column of the new CSR entry is Pending.
Standard dialogs appear with buttons to save the file at a location you select. Your web browser downloads the certificate request (.csr) file.
After you submit the request to a CA, the CA will verify the information in the certificate, give it a serial number, an expiration date, and sign it with the public key of the CA.
| Settings | Guidelines |
|---|---|
| Generate Certificate Signing Request | |
| Certification Name |
Configuration name. Valid characters are Note: This is the name of the CSR file, not the host name/IP contained in the certificate’s |
| Subject Information | |
| ID Type |
Select the type of identifier to use in the certificate to identify the virtual server:
Depending on your choice for ID Type, related options appear. |
| IP Address |
Type the static IP address of the FortiADC appliance, such as This option appears only if ID Type is Host IP. |
| Domain Name |
Type the FQDN of the FortiADC appliance, such as This option appears only if ID Type is Domain Name. |
Type the email address of the owner of the FortiADC appliance, such as admin@example.com. This option appears only if ID Type is E-Mail. |
|
| Distinguished Information | |
| Organization Unit | Name of organizational unit (OU), such as the name of your department. This is optional. To enter more than one OU name, click the + icon, and enter each OU separately in each field. |
| Organization | Legal name of your organization. |
| Locality (City) | City or town where the FortiADC appliance is located. |
| State/Province | State or province where the FortiADC appliance is located. |
| Country/Region | Country where the FortiADC appliance is located. |
Email address that may be used for contact purposes, such as admin@example.com. |
|
| Key Information | |
| Key Type |
|
| Key Size |
Select a secure key size. Larger keys use more computing resources, but provide better security. For RSA, select 512 Bit, 1024 Bit, 1536 Bit, 2048 Bit, 4096 Bit. For ECDSA, select 256 Bit, 384 Bit, or 512 Bit. |
| Enrollment Information | |
| Enrollment Method |
|
Create local groups to facilitate the configuration of profiles that are associated with a virtual server.
Include in the local certificate group all of the server certificates and intermediate CAs for the pool of backend servers to be associated with a single virtual server.
Before you begin:
The configuration page displays the Local Certificate Group tab.
| Settings | Guidelines |
|---|---|
| Group Name | Configuration name. Valid characters are A-Z, a-z, 0-9, _, and -. No spaces. The maximum length is 35 characters. After you initially save the configuration, you cannot edit the name. |
| Group Member | |
| Local Certificate | Select the certificate to add to the group, |
| Intermediate CA group | Select the Intermediate CA group to add to the local group, |
| Default | Select one certificate to be the default for the group. |
The certificate authority (CA) store is used to authenticate the certificates of other devices. When the FortiADC system is presented a certificate, it examines the CA’s signature, comparing it with the copy of the CA’s certificate that you have imported into the CA store. If the public keys match key, the client or other device’s certificate is considered legitimate.
In web browsers, the CA store includes trusted root CAs that can be used to establish trust with servers that have certificates signed by the issuing CAs. In an SSL forward proxy deployment, FortiADC acts as a proxy for the client, so you might want to import client browser CAs, create a CA group, and create a certficate verification policy to verify server certificates against this group. You can examine the CA store in common web browsers to come up with a good list of CAs to download and then import. The following list has links for some common web browsers:
You must do one of the following:
Before you begin:
| Settings | Guidelines |
|---|---|
| Certificate Name | Configuration name. Valid characters are A-Z, a-z, 0-9, _, and -. No spaces.The maximum length is 35 characters. After you initially save the configuration, you cannot edit the name. |
| Import Method |
|
| SCEP | |
| SCEP URL | Server URL. |
| CA Identifier | Identifier for a specific CA on the SCEP server. |
| File | |
| Local PC | Browse and locate the certificate file that you want to upload. |
Create CA groups to facilitate the configuration of the certificate validator that is associated with a virtual server.
Include in the CA group all of the CAs for the pool of backend servers to be associated with a single virtual server.
Before you begin:
| Settings | Guidelines |
|---|---|
| Group Name | Configuration name. Valid characters are A-Z, a-z, 0-9, _, and -. No spaces. The maximum length is 35 characters. After you initially save the configuration, you cannot edit the name. |
| Group Member | |
| CA | Select the CA to add to the group. |
The Intermediate CA store is for the Intermediate CA certificates that the backend servers would ordinarily use to complete the chain between the client certificate and the server certificate. HTTPS transactions use intermediate CAs when the server certificate is signed by an intermediate certificate authority (CA) rather than a root CA.
Before you begin:
| Settings | Guidelines |
|---|---|
| CA Name | Configuration name. Valid characters are A-Z, a-z, 0-9, _, and -. No spaces.The maximum length is 35 characters. After you initially save the configuration, you cannot edit the name. |
| Import Method |
|
| SCEP | |
| SCEP URL | Server URL. |
| CA Identifier | Identifier for a specific CA on the SCEP server. |
| File | |
| Certificate File | Browse and locate the certificate file that you want to upload. |
| Key File |
Browse and locate the corresponding PEM key file that you want to upload. Note: Both a certificate file and key file are required for the special Intermediate CA used in SSL decryption by forward proxy. |
| Password | Password to encrypt the files in local storage. |
You select an Intermediate CA group configuration object in the profile configuration for a virtual server, so you should configure in the group all the Intermediate CAs that would be needed by the backend servers that belong to a single virtual server.
Before you begin:
| Settings | Guidelines |
|---|---|
| Group Name | Configuration name. Valid characters are A-Z, a-z, 0-9, _, and -. No spaces. The maximum length is 35 characters. After you initially save the configuration, you cannot edit the name. |
| Group Member | |
| Intermediate CA | Select the Intermediate CA to add to the group, |
| Default | Select one certificate to be the default for the group. |
You can import a certificate that is maintained in a remote location using Online Certificate Status Protocol (OCSP). OCSP enables you to validate or revoke certificates by query, rather than by importing certificate revocation list (CRL) files. Since distributing and installing CRL files can be a considerable burden in large organizations, and because delay between the release and install of the CRL represents a vulnerability window, this can often be preferable.
To use OCSP queries, you must first install the certificates of trusted OCSP servers.
Before you begin:
| Settings | Guidelines |
|---|---|
| Certificate Name | Configuration name. Valid characters are A-Z, a-z, 0-9, _, and -. No spaces.The maximum length is 35 characters. After you initially save the configuration, you cannot edit the name. |
| Local PC | Browse and locate the certificate file that you want to upload. |
| OCSP URL | Specify the OCSP URL. |
A certificate revocation lists (CRL) is a file that contains a list of revoked certificates, their serial numbers, and their revocation dates. The file also contains the name of the issuer of the CRL, the effective date, and the next update date. By default, the shortest validity period of a CRL is one hour.
Some potential reasons for certificates to be revoked include:
You can upload a CRL file or specify a URL for the CRL file.
|
|
Online certificate status protocol (OCSP) is an alternative to CRL. OCSP is useful when you do not want to deploy CRL files, for example, or want to avoid the public exposure of your PKI structure even if it is only invalid certificates. |
Before you begin:
| Settings | Guidelines |
|---|---|
| Name | Configuration name. Valid characters are A-Z, a-z, 0-9, _, and -. No spaces. The maximum length is 35 characters. After you initially save the configuration, you cannot edit the name. |
| Import Method | |
| HTTP | Select to use HTTP; specify the URL. |
| SCEP | Select to use SCEP; specify the SCEP URL. |
| File | Browse and locate the certificate file that you want to upload. |
To be valid, a client certificate must meet the following criteria:
Certificate verification rules specify the CA certificates to use when validating client certificates, and they specify a CRL and/or OCSP server, if any, to use for certificate revocation checking.
You select a certificate verification configuration object in the profile configuration for a virtual server. If the client presents an invalid certificate during the authentication phase of a SSL/TLS session initiation, the FortiADC system will not allow the connection.
Before you begin:
Ater you have configured a certificate verification object, you can include it in a virtual server profile or a real server SSL profile, and it will be used to validate certificates presented to FortiADC.
The configuration page displays the Verify tab.
| Settings | Guidelines |
|---|---|
| Name | Configuration name. Valid characters are A-Z, a-z, 0-9, _, and -. No spaces.The maximum length is 35 characters. After you initially save the configuration, you cannot edit the name. |
| CA Group | Select the CA group to be used to validate certificates. |
| Remote | Select an OCSP configuration if you want to use OCSP to validate certificates. |
| CRL | Select a CRL configuration if you want to use CRL to validate certificates. |