1. Go to System > Network > Interface.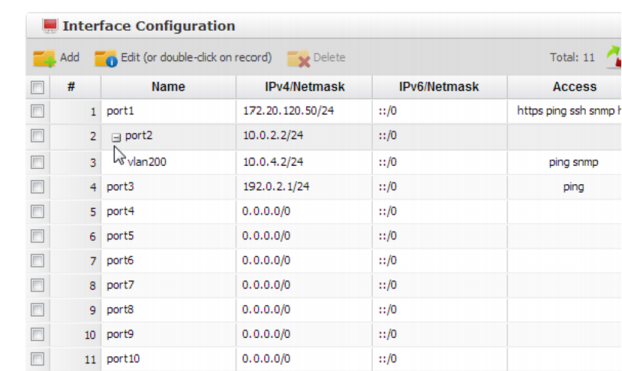
If this FortiADC will belong to a FortiADC HA cluster, do not configure any network interface that will be used as an HA heartbeat and synchronization link. If you are re-cabling your network and must configure it, connect and switch to the new HA link first. Failure to do so could cause unintentional downtime, failover, and ignored IP address configuration. To switch the HA link, see “Configuring a high availability (HA) FortiADC cluster”. |
If the network interface’s Status column contains a red dot, its administrative status is currently “down” and it will not receive or emit packets, even if you otherwise configure it. This Status column is not the detected physical link status; it is the administrative status that indicates whether you permit network interface to receive and/or transmit packets. For example, if the cable is physically unplugged, diagnose netlink interface list port1 will indicate that the link is down, even though you have administratively enabled it. By definition, HA heartbeat and synchronization links should always be “up.” Therefore, if you have configured FortiADC to use a network interface for HA, its Status column will always display HA Member. |
Setting name | Description | |
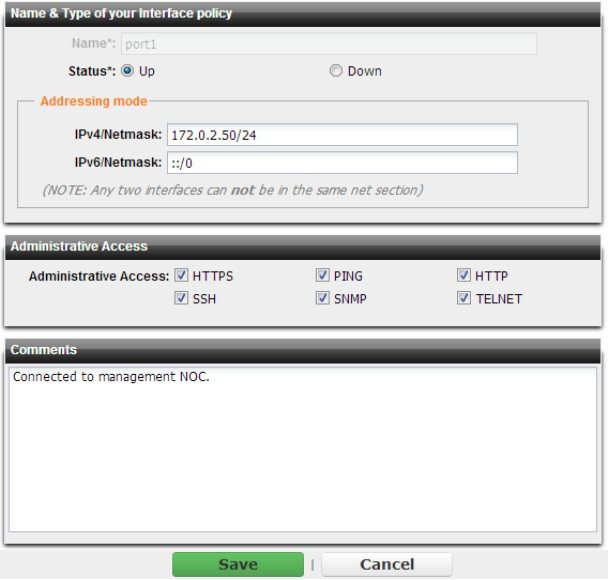
IPv4/Netmask or IPv6/Netmask | Type the IP address and CIDR-formatted subnet mask, separated by a forward slash ( / ), such as 192.0.2.5/24 for an IPv4 address or 2001:0db8:85a3:::8a2e:0370:7334/64 for an IPv6 address. Dotted quad formatted subnet masks are not accepted. The IP address must be on the same subnet as the network to which the interface connects. Two network interfaces cannot have IP addresses on the same subnet (i.e. overlapping subnets). | |
Administrative Access | Enable the types of administrative access that you want to permit to this interface. These options do not disable outgoing administrative connections, such as outgoing ICMP resulting from a CLI command such as execute ping. Neither do they govern traffic destined for a virtual server, which are governed by load balancing policies. These options only govern incoming connections destined for the appliance itself. Caution: Enable only on network interfaces connected to trusted private networks (defined in Trusted Host) or directly to your management computer. If possible, enable only secure administrative access protocols such as HTTPS or SSH. Failure to restrict administrative access could compromise the security of your FortiADC appliance. Note: Administrative access cannot be configured for VLAN subinterfaces, except for PING. | |
HTTPS | Enable to allow secure HTTPS connections to the web UI through this network interface. To configure the listening port number, see “Global web UI & CLI settings”. | |
PING | Enable to allow: • ICMP type 8 (ECHO_REQUEST) • UDP ports 33434 - 33534 for ping and traceroute to be received on this network interface. When it receives an ECHO_REQUEST (“ping”), FortiADC will reply with ICMP type 0 (ECHO_RESPONSE or “pong”). Note: Disabling PING only prevents FortiADC from receiving ICMP type 8 (ECHO_REQUEST) and traceroute-related UDP. It does not disable FortiADC CLI commands such as execute ping or execute traceroute that send such traffic. | |
HTTP | Enable to allow HTTP connections to the web UI through this network interface. To configure the listening port number, see “Global web UI & CLI settings”. Caution: HTTP connections are not secure, and can be intercepted by a third party. If possible, enable this option only for network interfaces connected to a trusted private network, or directly to your management computer. Failure to restrict administrative access through this protocol could compromise the security of your FortiADC appliance. | |
SSH | Enable to allow SSH connections to the CLI through this network interface. | |
SNMP | Enable to allow SNMP queries to this network interface, if queries have been configured and the sender is a configured SNMP manager. To configure the listening port number and configure queries and traps, see “SNMP traps & queries”. | |
TELNET | Enable to allow Telnet connections to the CLI through this network interface. Caution: Telnet connections are not secure, and can be intercepted by a third party. If possible, enable this option only for network interfaces connected to a trusted private network, or directly to your management computer. Failure to restrict administrative access through this protocol could compromise the security of your FortiADC appliance. | |
Comments | Type a comment. The maximum length is 63 characters. Optional. | |
HTTP and Telnet connections are not secure, and can be intercepted by a third party. If possible, enable this option only for network interfaces connected to a trusted private network, or directly to your management computer. Failure to restrict administrative access through this protocol could compromise the security of your FortiADC appliance. |