Adding VLAN subinterfaces
You can add a virtual local area network (VLAN) subinterface to a network interface on the FortiADC appliance.
Similar to a local area network (LAN), use a
IEEE 802.1q VLAN to reduce the size of a broadcast domain and thereby reduce the amount of broadcast traffic received by network hosts, improving network performance.
| VLANs are not designed to be a security measure, and should not be used where untrusted devices and/or individuals outside of your organization have access to the equipment. VLAN tags are not authenticated, and can be ignored or modified by attackers. VLAN tags rely on the voluntary compliance of the receiving host or switch. |
Unlike physical LANs, VLANs do not require you to install separate hardware switches and routers to achieve this effect. Instead, VLAN-compliant switches, such as FortiADC appliances, restrict broadcast traffic based upon whether its VLAN ID matches that of the destination network. As such, VLAN trunks can be used to join physically distant broadcast domains as if they were close.
The VLAN ID is part of the tag that is inserted into each Ethernet frame in order to identify traffic for a specific VLAN. VLAN header addition is handled automatically by FortiADC appliances, and does not require that you adjust the maximum transmission unit (MTU). Depending on whether the device receiving a packet operates at Layer 2 or Layer 3 of the network, this tag may be added, removed, or rewritten before forwarding to other nodes on the network.
For example, a Layer 2 switch would typically add or remove a tag when forwarding traffic among members of the VLAN, but would not route tagged traffic to a different VLAN ID. In contrast, a FortiADC appliance, inspecting the traffic to make routing decisions based upon higher-level layers/protocols, might route traffic between different VLAN IDs (also known as inter-VLAN routing) if indicated by its policy, such as if it has been configured to do content-based routing.
Cisco Discovery Protocol (CDP) is supported for VLANs.
To configure a VLAN subinterface
1. Go to System > Network > Interface.
To access this part of the web UI, your administrator's account access profile must have
Read-Write permission to items in the
System category. For details, see
“Permissions”.
2. Click Add.
3. Configure these settings:
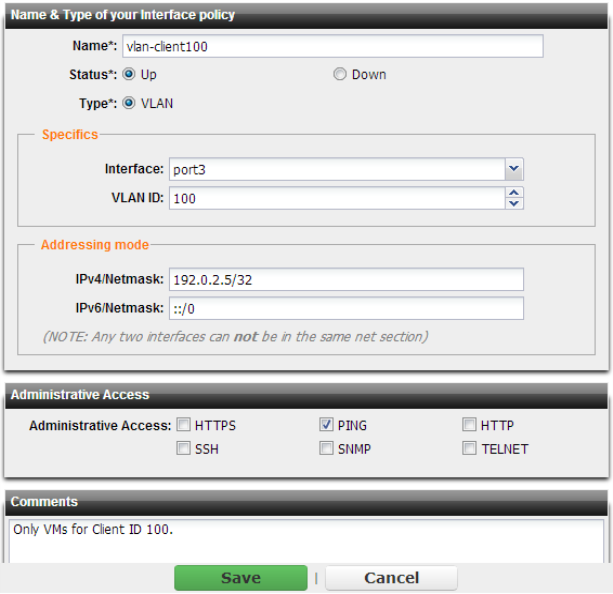
Setting name | Description |
Name | Type the name (such as vlan_101) of this VLAN subinterface that can be referenced by other parts of the configuration. Do not use spaces or special characters. The maximum length is 35 characters. Tip: The name cannot be changed once you save the entry. For a workaround, see “Renaming entries”. |
Type | Select VLAN. |
Interface | Select the physical network interface associated with the physical network port where you want to create the VLAN subinterface. |
VLAN ID | Type the VLAN ID of packets that belong to this VLAN subinterface. • If one physical network port (that is, a VLAN trunk) will handle multiple VLANs, create multiple VLAN subinterfaces on that port, one for each VLAN ID that will be received. • If multiple different physical network ports will handle the same VLANs, on each of the ports, create VLAN subinterfaces that have the same VLAN IDs. The valid range is between 1 and 4094 and must match the VLAN ID added by the IEEE 802.1q-compliant router or switch connected to the VLAN subinterface. For the maximum number of interfaces for your FortiADC model, including VLAN subinterfaces, see “Appendix B: Maximum configuration values”. |
IPv4/Netmask or IPv6/Netmask | Type the IP address and subnet mask associated with the VLAN, if any. The IP address must be on the same subnet as the network to which the interface connects. Two network interfaces cannot have IP addresses on the same subnet. Separate the subnet with a slash, such as 192.0.2.5/24. |
4. Click Save.
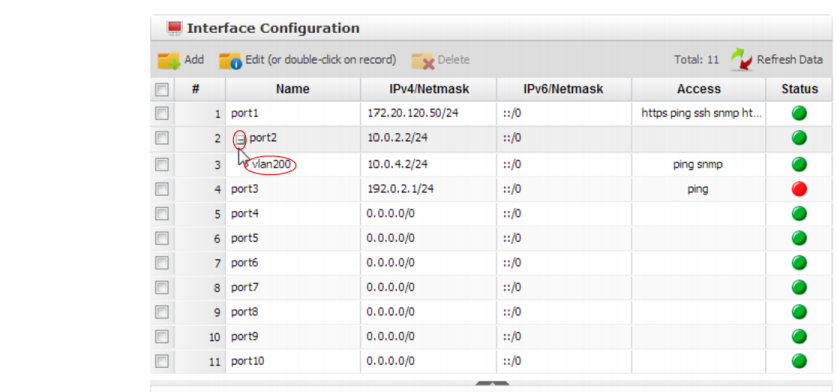
Your new VLAN is initially hidden in the list of network interfaces.
To expand the network interface listing in order to view all of a port’s associated VLANs, click the “-” next to the name of the port.
See also