General firmware upgrade steps
The following table lists the general firmware upgrade steps.
Table 8: Upgrade steps
Step 1 | Prepare your FortiAnalyzer for upgrade. |
Step 2 | Backup your FortiAnalyzer system configuration. For FortiAnalyzer VM, take a Snapshot of the VM instance. |
Step 3 | Transfer the firmware image to your FortiAnalyzer device. |
Step 4 | Log into your FortiAnalyzer Web-based Manager to verify the upgrade was successful. |
Step 1: Prepare your FortiAnalyzer for upgrade
1. Make sure all log devices are running the supported firmware version as stated in the release notes.
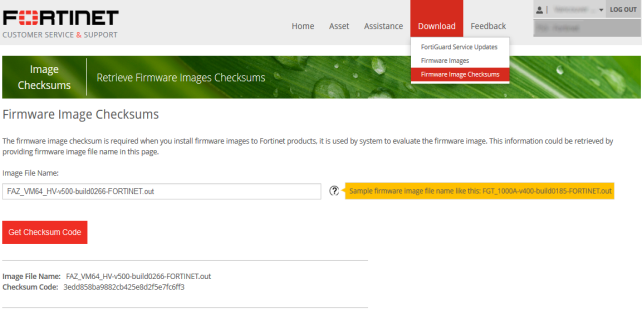
2. To verify the integrity of the download, go back to the
Download section of the
Customer Service & Support portal, then select the
Firmware Image Checksums link. Optionally, you can select
Download from the toolbar and select
Firmware Image Checksums from the drop-down list.
3. Enter the file name and select Get Checksum Code to get the firmware image checksum code. Compare this checksum with the checksum of the firmware image.
Step 2: Back up your FortiAnalyzer configuration
1. Go to System Settings > Dashboard.
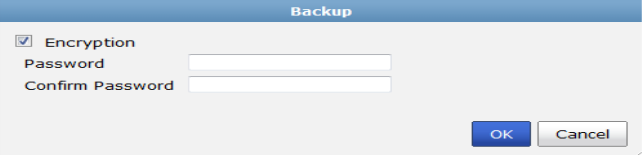
2. In the System Information widget, under System Configuration, select Backup.
The Backup dialog box opens.
3. Select the checkbox to encrypt the backup file and enter a password.
| When selecting to encrypt the backup configuration file, the same password used to encrypt the file will be required to restore this backup file to the FortiAnalyzer device. |
4. Select OK and save the backup file on your local computer.
| The system configuration file from a FortiAnalyzer v4.0 MR3 device cannot be directly imported into a FortiAnalyzer v5.0 Patch Release 6 device. |
| Optionally, you can backup the configuration file to a FTP, SFTP, or SCP server using the following CLI command: execute backup all-settings {ftp | sftp} <server IP address> <path/filename to the server> <user name on server> <password> [cryptpasswd] execute backup all-settings scp <server IP address> <path/filename to the server> <user name on server> <SSH certificate> <crptpassrd> |
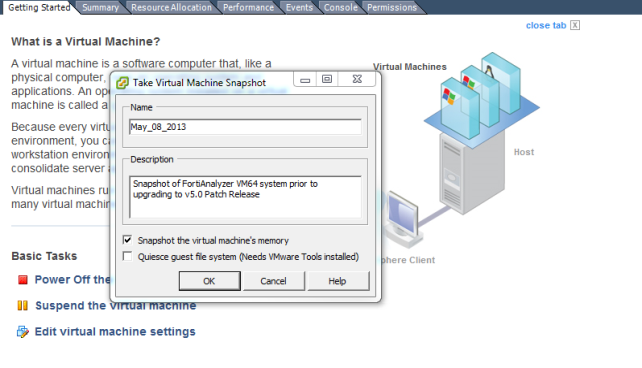
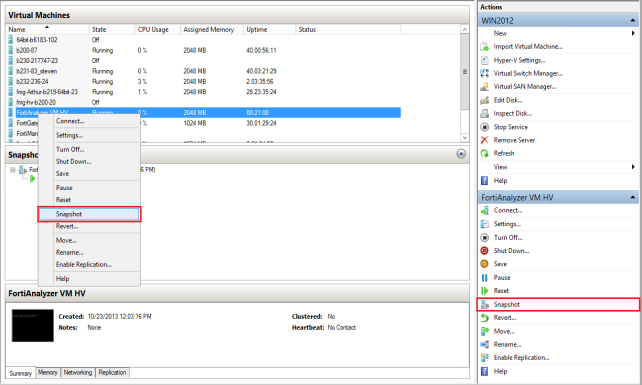
5. In VM environments, it is recommended that you take a Snapshot of the VM instance. In the event of an issue with the firmware upgrade, use the Snapshot Manager to revert to the Snapshot. To create a Snapshot, right-click the VM instance and select Snapshot > Take Snapshot.
| For information on snapshots in Microsoft Hyper-V Server environments, refer to the Microsoft Windows Server online help. |
Step 3: Transfer the firmware image to your FortiAnalyzer device
1. Go to System Settings > Dashboard.
2. In the System Information widget, in the Firmware Version field, select Update.
The Firmware Upgrade dialog box opens.
3. Select
Browse to locate the firmware image (
.out file) that you downloaded from the
Customer Service & Support portal and select
Open.
4. Select OK.
Your FortiAnalyzer will upload the firmware image and you will receive the following message: The firmware upload is complete. The upgrade process has begun. Please refresh your browser in a few minutes.
| Optionally, you can upgrade firmware stored on a FTP or TFTP server using the following CLI command: exexute restore image {ftp | tftp} <file path on the FTP server> <server IP address <user name on server> <password> |
Step 4: Verify the upgrade
1. Refresh the browser page and log back in to the device.
2. In the Device Manager tab, ensure that all formerly added log devices are still listed.
3. Launch other functional modules to ensure that they work properly.